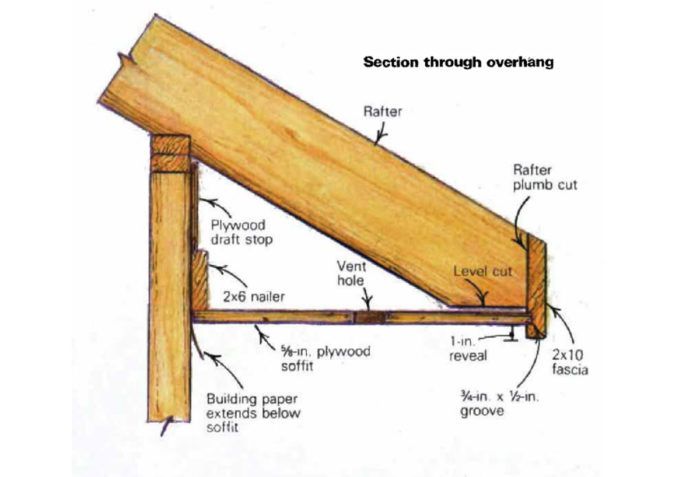
Synopsis: This one-page article discusses a method of eave construction in which a groove milled in the edge of the fascia is used to support the soffit, eliminating the time-consuming chore of installing 2×4 outriggers.
Until a few years ago, the typical eave detail on the West Coast was the exposed overhang. When we built ranch-style houses, you could see the rafters and the underside of the roof sheathing (usually ship-lapped boards exposed to view). But the current trend where I build in California’s Central Valley is toward the Mediterranean look; more and more of the houses we frame have soffit-covered eaves.
In the past, the crew used to grumble and moan when they got to the soffit-framing part of a job. The framework for our first few attempts consisted of sun-baked 2x4s salvaged from the scrap pile. We scabbed them to the rafter tails and toenailed them to a horizontal nailer affixed to the wall studs. Cobbling together row upon row of outriggers around the eave line took a lot of time, and leveling each one was equally frustrating.
About a year ago, however, I learned of a slick method for installing soffits that uses the fascia to support the outboard edge of the soffit. Our crew quickly put the idea to the test, and the job went so smoothly that we now use the method as standard procedure.
In the groove
For soffit material, we typically use 5/8-in. thick plywood with a resawn face, and slip it into a groove cut in the backside of the fascia. Plywood this thick is stiff enough to span up to about 30 in. without additional support.
Before cutting any rafters, I calculate the position of the level cut and the plumb cut on the rafter tails. First I step off 1 in. on the fascia (usuallya 2×10) to allow for a reveal below the soffit. Next I mark off 3/4 in. to allow for the soffit groove. I make the groove 1/8 in. wider than the thickness of the soffit material to give me some wiggle room for inserting the edge of the plywood. The remaining width of the fascia represents the maximum depth of the rafter plumb cut. I always lay out the level cut on the rafter to end up a little bit above the groove in the fascia — 1/2 in. to 3/4 in. will do. This makes up for the inevitable variations in framing lumber that can bring the bottom of the level cut into the plane of the soffit. I make all the level cuts on the rafters before stacking the roof.
The top edge of the fascia should be beveled to match the pitch of the roof. Most of the lumberyards that I deal with can provide this service. If yours doesn’t, take the time to bevel the fascia yourself. It will give you a consistent line at the roof edge and solid bearing for the roof sheathing.
For more drawings and details, click the View PDF button below:
Fine Homebuilding Recommended Products
Fine Homebuilding receives a commission for items purchased through links on this site, including Amazon Associates and other affiliate advertising programs.

Original Speed Square

Smart String Line

100-ft. Tape Measure


