
Installing a Split-Jamb Door
These precased doors are quick to install and allow variations in wall thicknesses.
Synopsis: A concise guide to taking your doorway from rough opening to finished casing in less than an hour. Learn the advantages of purchasing a prehung door with the trim already installed, as well as the tricks the pros use to make installations a cinch. The article includes step-by-step pictorials which cover every aspect of installation from precutting shims to tweaking hinges for a sturdier hold.
Door manufacturers keep making it easy on us. As an improvement to building door jambs on site, they gave us prehung doors: doors that are hinged and installed in the jamb at a factory. No more building jambs or mortising hinges. All that’s left to do is set the door in an opening and install trim pieces. How could they make it any easier? By installing the trim at the factory, too.
Split-jamb doors, featuring tongue-and-groove jambs with casing already applied, answered the prayers of overextended trim carpenters and do-it-yourself homeowners somewhat daunted by tight miter joints.
The jamb with the groove, called the split jamb, contains the door and door stops and is installed first. The tongued half, called the main jamb, is installed second. The tongue-and-groove design ensures a tight fit, even when wall thickness changes due to bulges in plaster or drywall.
My method for installation involves preplumbing the rough opening with custom shims. I can go from rough opening to finished casing in less than a half-hour.
Shims And Spacers Remove The Guesswork
Because precased doors leave no room for shims to extend beyond the wall, standard shims don’t work easily for split-jamb doors. Instead, I cut 4-in. by 4-in. square shims from 1⁄8-in., 1⁄4-in., and 1⁄2-in. stock; and plumb the rough opening on the hinge side before setting the jamb in place
If I’m installing a door before the finished floor is in place, I use a variety of spacers to raise the jamb off the floor. For carpet, I use a 3⁄8-in. spacer; for tile, I use a 1⁄2-in. spacer; and for hardwood or an engineered floor, I ask the floor installer for samples of flooring, and I use the samples as spacers.
Doorways often define transitions between floorings of different thickness. Split-jamb doors make this transition easy.
A Story Pole Makes It Quicker
I verify the rough-opening size and determine the direction of door swing. This step establishes which side the hinge jamb is on.
The rough opening should be 2 in. taller and 2 in. wider than the door size: 82 in. for a 6-ft. 8-in. door and 98 in. for an 8-ft. door. This extra space allows room for the jamb, the shims, and the clearance for the floor covering.
I cut a straight 2×4 to create a simple story pole for marking the door’s hinge positions.(If you’ve got only one or two doors to hang, you can just measure.) The 2×4 should be shorter than the rough opening and taller than the top hinge. Number and location of hinges vary by manufacturer, so I make a new story pole for each job. I attach a 4-ft. level to the story pole with shrink wrap. I like shrink wrap because it’s fast and leaves no sticky residue as tape does.
Setting a spacer on the floor on the hinge side of the rough opening, I stand the story pole against the trimmer stud and plumb it by fastening premade shims at the hinge locations. I’m usually installing an entire houseful of doors, so I plumb all the rough openings before installing any doors.
Install The Split Jamb First
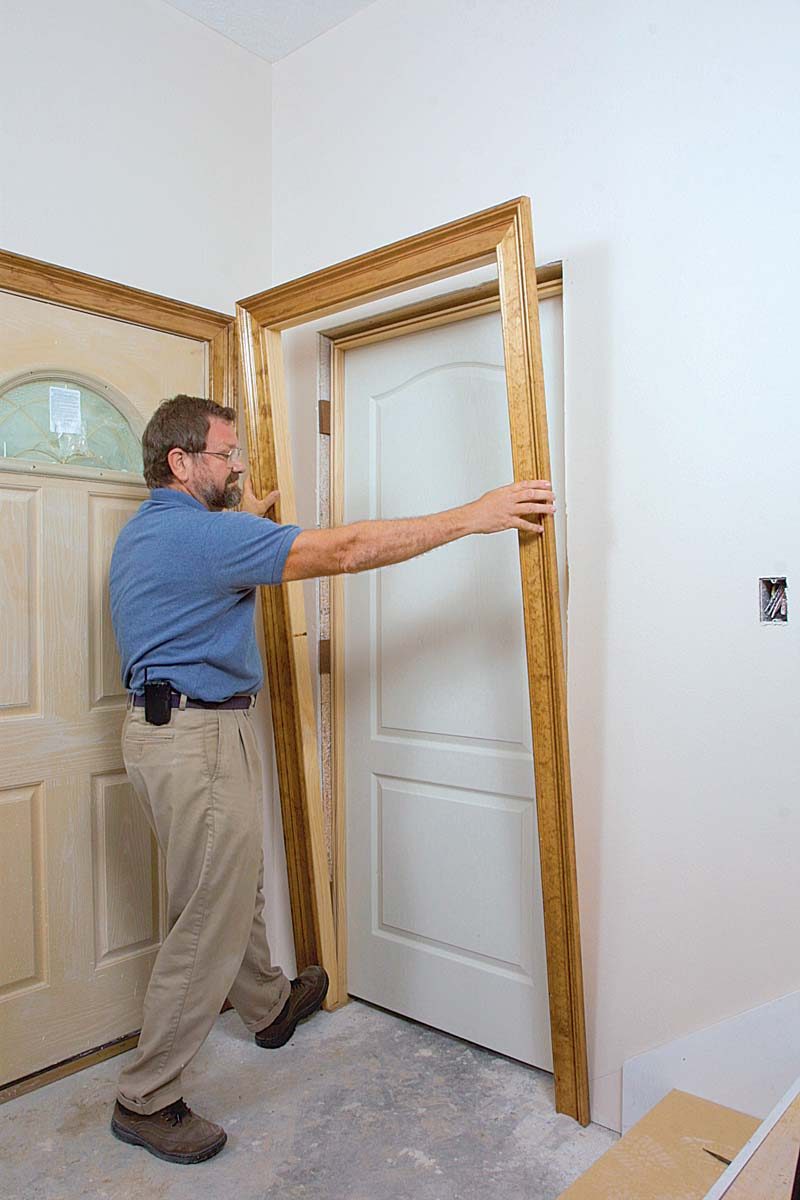
I separate the jambs and place each jamb on its proper side of the rough opening. For shipping, the door usually is secured to the jamb with one or more nails. Because the door is easier to handle with a nail in place, I remove all the nails but one, which I loosen.
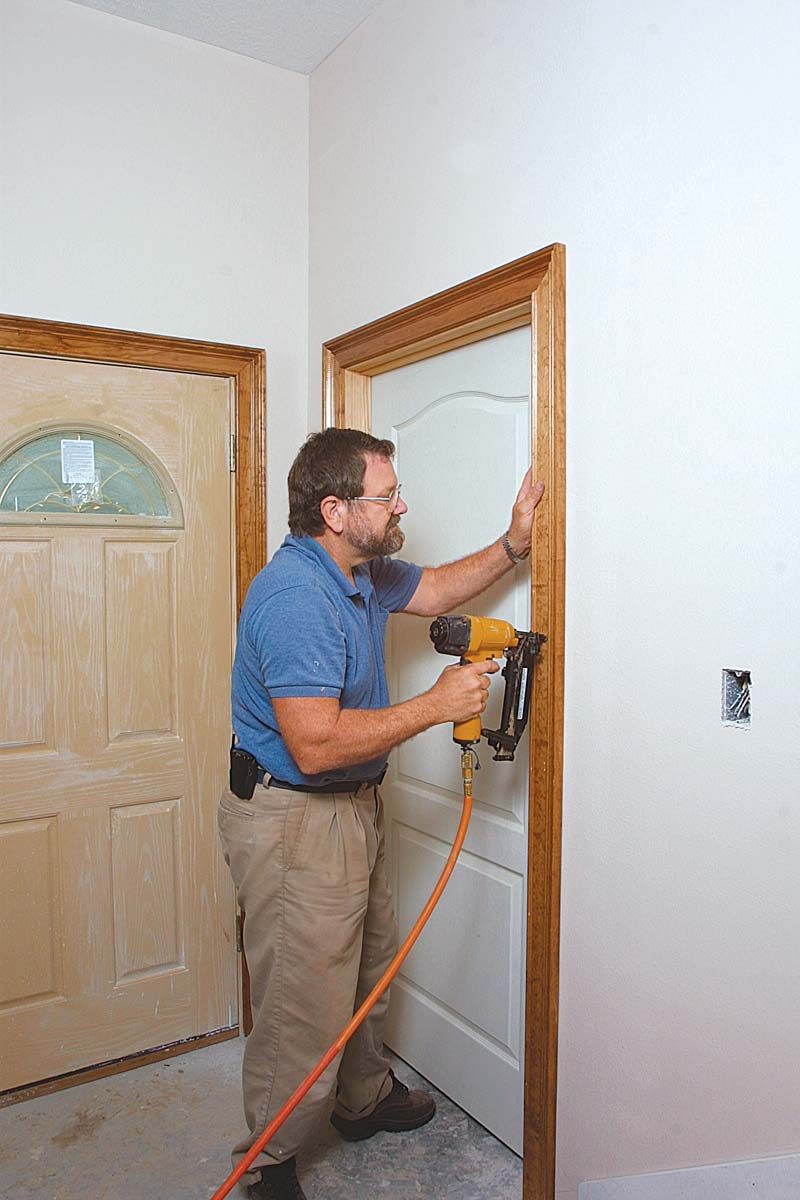
Setting the hinge side on the aforementioned floor spacer, I test-fit the split jamb in the rough opening. If it fits, I slip the latch side out, pull the last nail, slip the latch side back into the rough opening, and tack the casing at the hinges. I prop open the door at about 90° to expose the hinges. With the casing snugly against the wall and the jamb pushed tight against the shims, I drive a #9 by 21⁄2-in. screw through the top hinge to lock the jamb to the framing. I do the same to the bottom hinge and middle hinge, if present. The relatively more common #8 screws are too small and #10 screws are too big, so I search out #9 screws.
With the door secured to the wall on the hinge side, the head and latch jambs are hanging loose. Remaining on the door side, I close the door and slip 1⁄8-in. spacers between the jamb and door to produce a uniform gap across the top of the door and along the latch side. After that, I nail the casing tight to the wall (photo 2).
It’s important not to use a floor spacer under the latch jamb for three reasons: The latch holes are measured from the top of the door; the jamb legs may not be the same length; and the floor may not be level.
Slip The Tongue Into The Groove
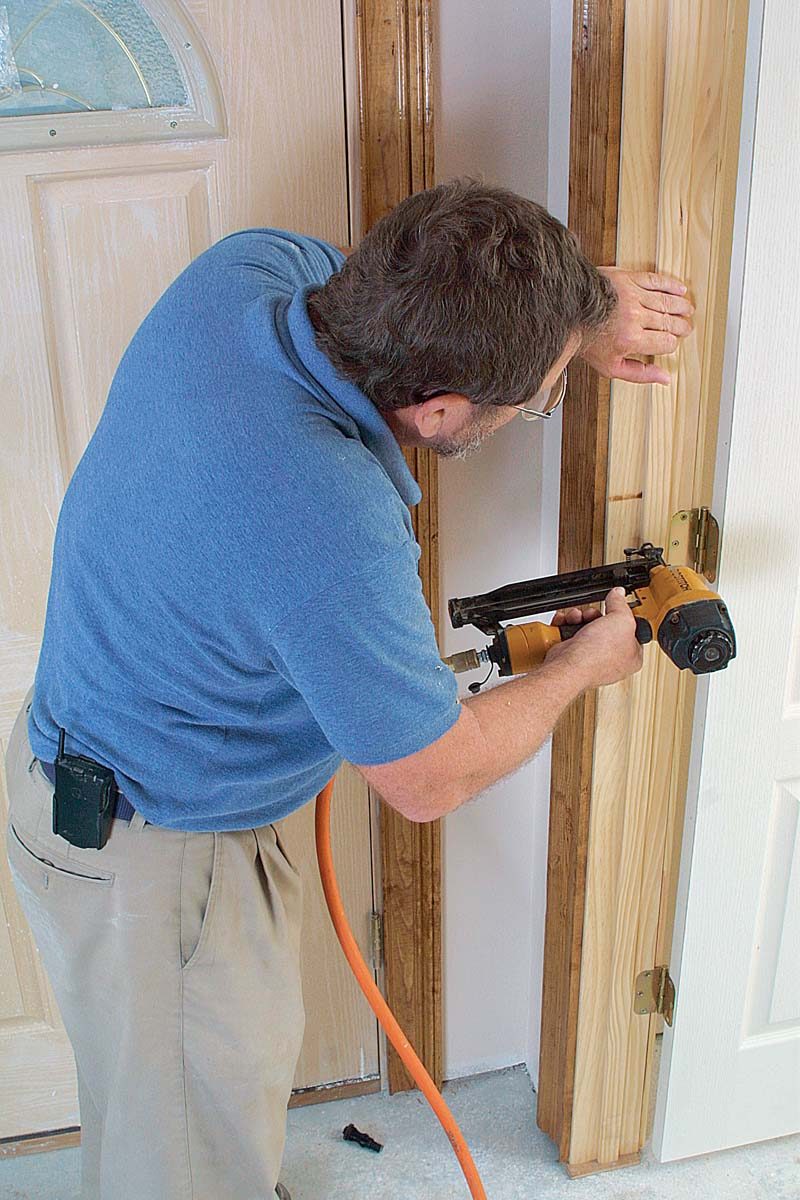
Now that the door and split jamb are installed, close the door, and from the latch side, I fill the gap between the jamb and the trimmer stud. Using precut shims, I gently fill this space at the top, bottom, and latch plate. Because the jamb is exactly where it is supposed to be, the shims should snug the jamb to the trimmer stud, but not move the jamb. It is better to err on the loose side than to pack the gap too tight.
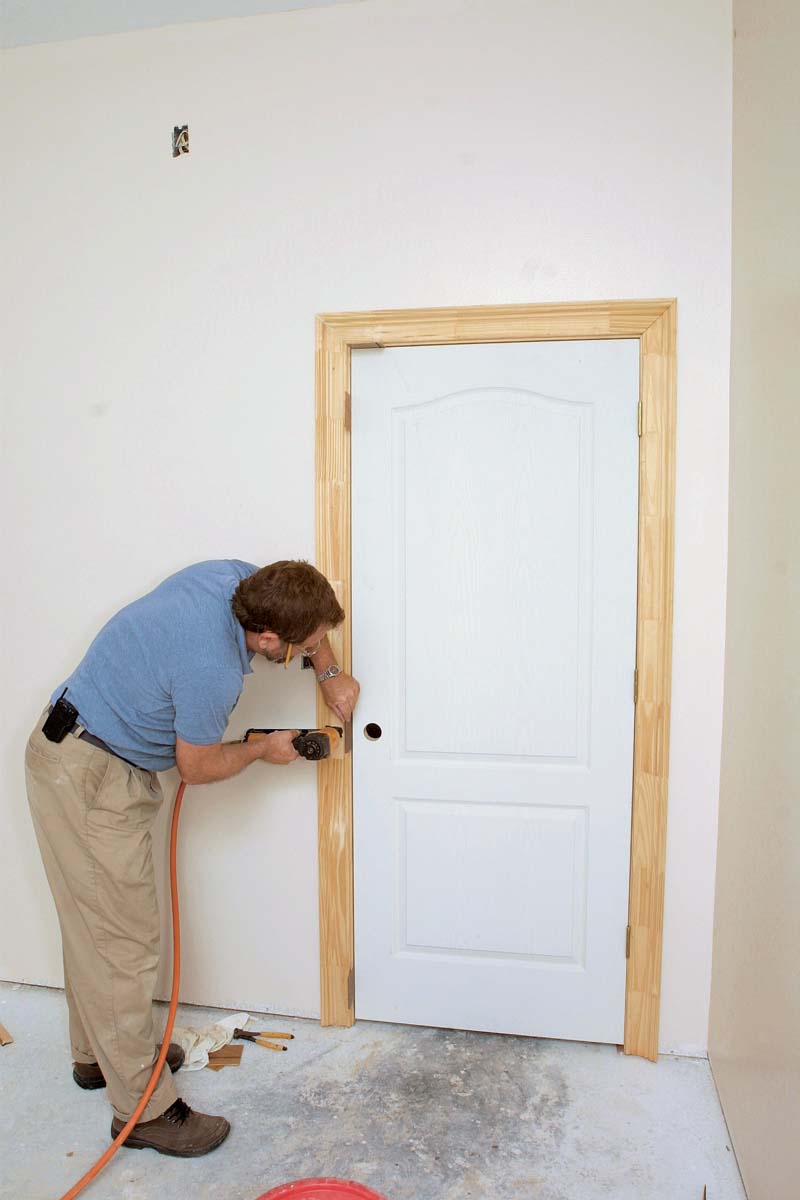
With the shims properly placed at the top, bottom, and latch, I slip the main jamb into the split jamb (photo 4). I hold the casing of the main jamb firmly against the drywall and nail it off.
Once this step is done, I nail through the jamb where the tongue and groove mate (photo 6). It’s important not to overcompress the door jamb at this point; an air-powered finish nailer does the trick nicely. I nail through the shims on the latch side and at each hinge. If there are only two hinges on the door, I add a nail where the middle hinge would be.
Two Types Of Prehung Doors
The Split-Jamb Prehung Foor
Advantages
1. Installs quickly.
2. The jamb can conform to changes in wall thickness.
3. Comes with casing (or trim) already installed.
4. The split jamb can be adjusted to remove slight gaps between the door and the stop due to uneven rough openings.
5. This style is easily adaptable to floor-thickness transitions.
Disadvantages
1. Home centers have a limited selection of molding styles. Local door makers and lumberyards will install any casing style you want.
2. Not as strong as solid jambs.
Standard Prehung Door
Advantages
1. Far quicker to install and more accurate than a blank door and jamb, which must be assembled, hinged, and fitted on site.
2. Usually, wide walls can be accommodated with extension jambs to the nonhinged side.
3. One-piece jambs are strong.
Disadvantages
1. If the wall is not of uniform thick- ness, a gap will appear between the casing and the jamb.
Split Jamb (Groove Side)
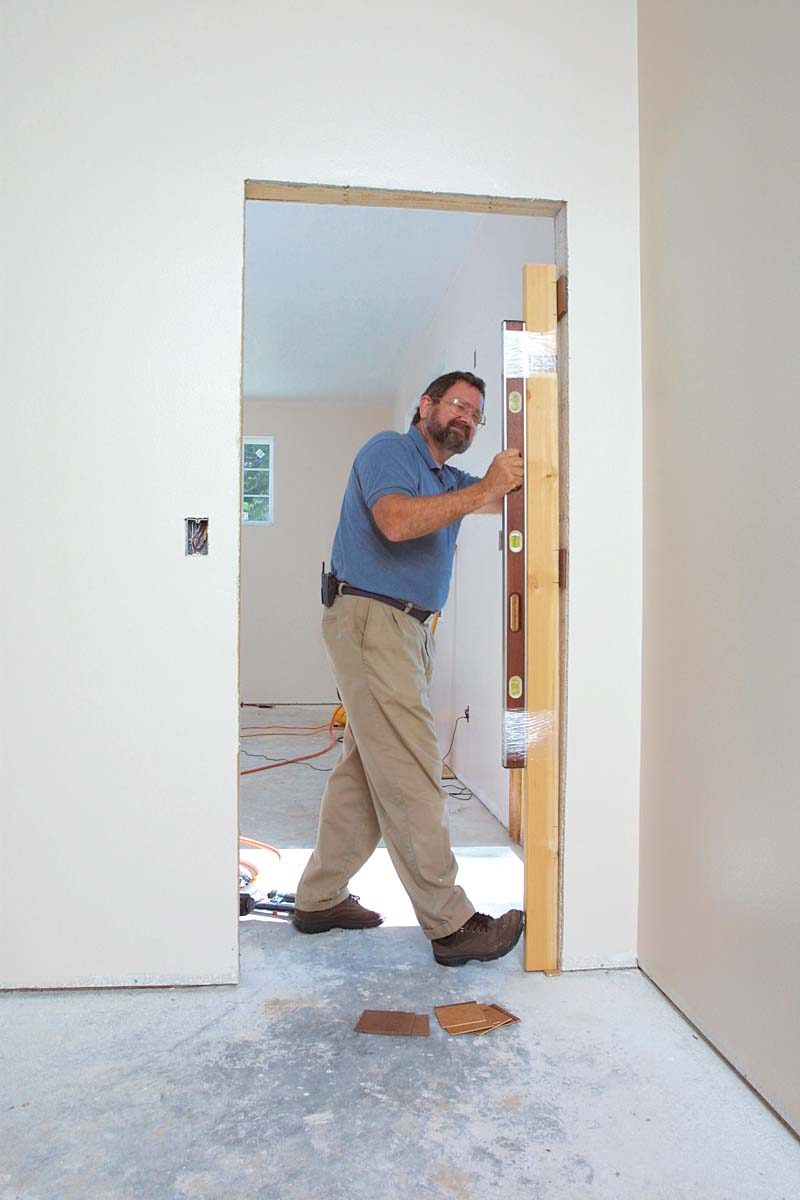 |
1. Prepare the rough opening. With precut shims, plumb the hinge side of the rough opening. If the jack stud is plumb already, use three shims at the hinge locations to center the door in the opening. To make sure the shims line up properly with the hinges, set the level/story pole on a spacer of the same thickness as the flooring. |
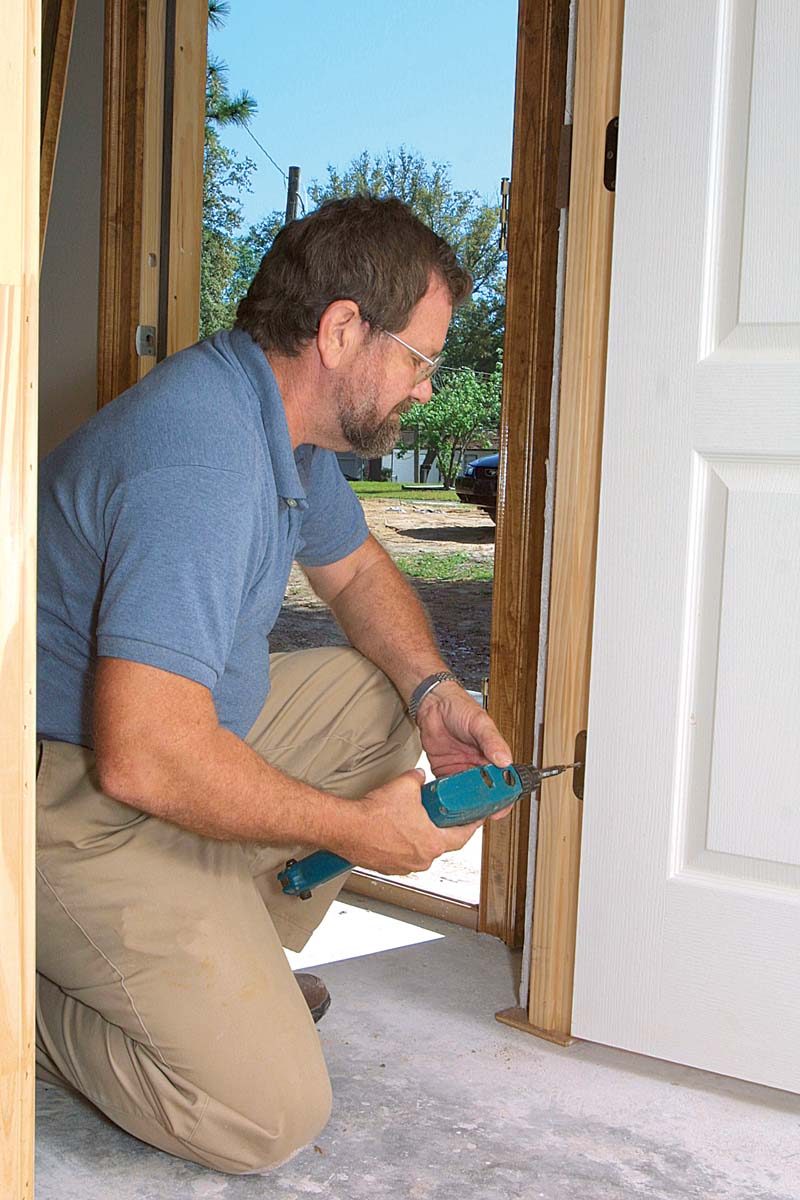 |
2. Screw hinges into the framing. After inserting the split jamb into the now-plumb opening and tacking the casing to the wall, remove the center screw from each hinge and replace it with a longer one to penetrate the framing. Although not common, #9 screws (bottom right photo, facing page) fit better than #8 or #10. |
 |
3. Tight-fitting spacers make a uniform gap. Placed at the top, latch, and bottom of the split jamb, 1⁄8-in. spacers maintain a uniform gap between door and jamb while the casing is nailed. |
Main Jamb (Tongue Side)
|
4. Slip tongue into groove. Gently fill the gap on the latch side with spacers before slipping tongue into groove. Set the hinge-side tongue on the floor spacer, and slide the rest into place. Omit a flooring spacer on the latch side; the reveal around the door has been set. |
 |
|
5. Nail the casing. Hold the casing tight against the wall and nail it with a 21⁄2-in. finish nail into the jack stud every 2 ft. or so. |
 |
|
6. Nail the split jambs. A final nailing sequence through the door stops and into the jack studs joins the tongue and groove together. Nail through the jambs at the top, bottom, and center hinge locations. If the door has only two hinges, add a third nail in the center. |
 |
Different Shims For Split Jambs

Because split-jamb doors have preapplied molding, long, wedge-shaped shims won’t work; instead, the author cuts 4-in. squares of different thicknesses to plumb the opening, to raise the jamb for flooring, and to make a consistent gap around the door.
Screw The Hinges To The Framing
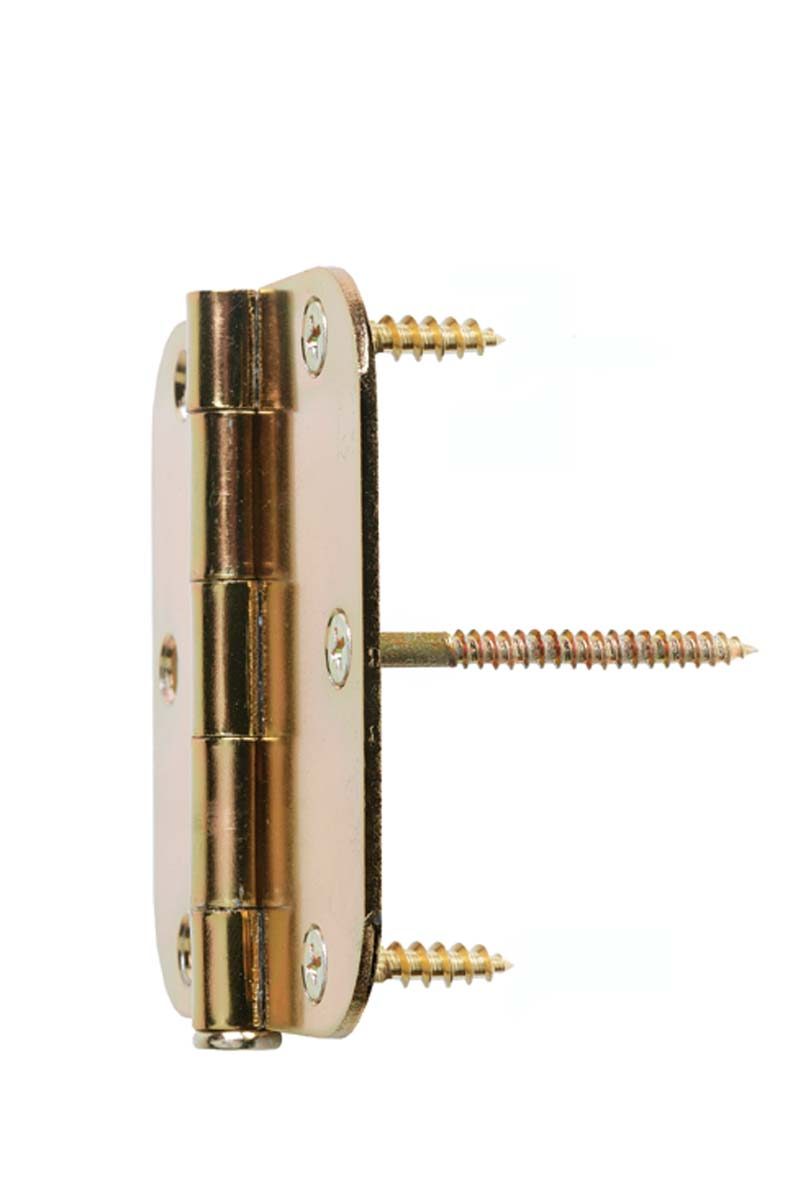
For a sturdy installation, remove the middle screw from each hinge and replace it with one long enough to penetrate the framing. The hard-to-find #9 screws fit the countersink perfectly.
For more photos and details, click the View PDF button below:
Fine Homebuilding Recommended Products
Fine Homebuilding receives a commission for items purchased through links on this site, including Amazon Associates and other affiliate advertising programs.

Pretty Good House

Homebody: A Guide to Creating Spaces You Never Want to Leave
Code Check 10th Edition: An Illustrated Guide to Building a Safe House
