FHB Logo Facebook LinkedIn Email Pinterest Twitter X Instagram Tiktok YouTube Plus Icon Close Icon Navigation Search Icon Navigation Search Icon Arrow Down Icon Video Guide Icon Article Guide Icon Modal Close Icon Guide Search Icon Skip to content
Subscribe
Log In
  • How-To
  • Design
  • Tools & Materials
  • Restoration
  • Videos
  • Blogs
  • Forum
  • Magazine
  • Members
  • FHB House
  • Podcast
Log In

Fine Homebuilding Project Guides

Framing

Guide Home
  • Introduction to Framing
  • Framing Tools, Techniques, and Materials
  • Framing Floors
  • Framing Walls
  • Framing Stairs
  • Framing Roofs
  • Efficient Framing Methods
  • Timber Framing
How-To

Framing an Octagonal Turret Roof

This roof shape may look complicated, but it's basically the same process as framing a common 45-degree bay-window roof.

By Rick Arnold Issue 224
  • X
  • facebook
  • linkedin
  • pinterest
  • email
  • add to favorites Log in or Sign up to save your favorite articles

The first time I saw an octagonal turret on a set of plans, I cringed. I knew that if I tried to fake my way through framing it with strings and T-bevels, I would lose money in both labor and material, so I decided to do some research first. After looking through a couple of old timber-framing books at the library (this was before the internet), I discovered that it wasn’t that difficult to understand. In fact, the octagonal turret is simply a continuation of a 45° bay-window roof, which I had successfully built many times.

Since then, I haven’t really changed my basic approach to framing an octagonal turret, but I have streamlined a few procedures that eliminate the cringe factor. First, I figure out the framing dimensions with a calculator. Then I cut all the parts and assemble the roof on the deck, next to its intended location.

An octagonal plan

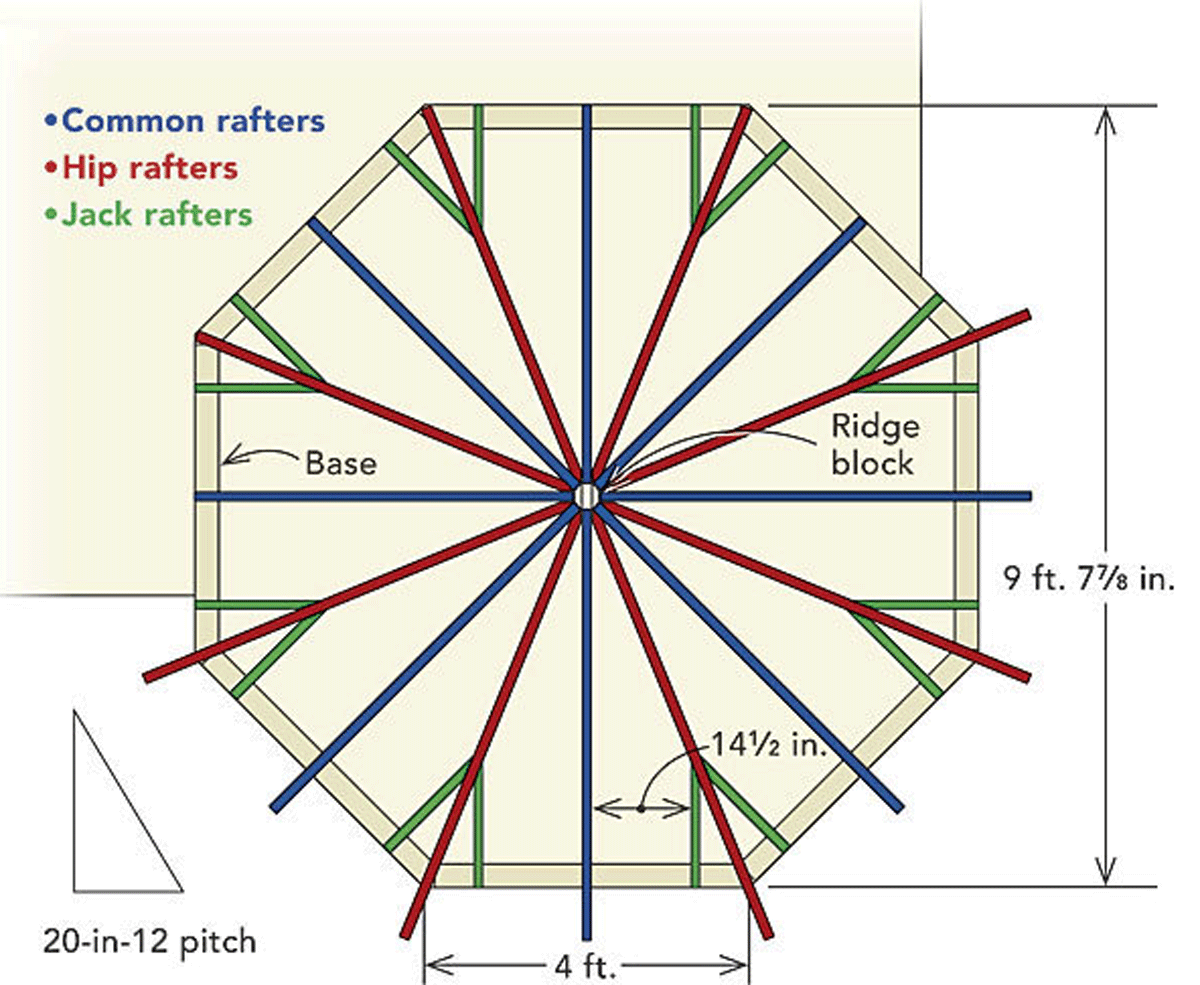
In this example, the octagon segments are 4 ft. long and combine to create a base width of 9 ft. 7-7⁄8-in. A total of eight common and eight hip rafters make a roof with a 20-in-12 pitch. Due to the turret’s location, only half of the rafters are extended into tails that form the soffit. The rafters on the roof side of the turret are cut flush with the plate.

Octagon plan


Plan first, cut rafters, then assemble the base

octagon

After drawing the plan and figuring out the various framing lengths and angles, I pick the best stock for one common rafter to use as a pattern for the rest. Then I start building the base. I like to build the entire turret on the deck near where it will be located, but away from the edge so that my crew can frame, sheathe, and roof the entire structure without staging or extension ladders.

The first step is to snap the turret-wall outline on the third-floor deck. I plan for double top plates so that I can overlap them at the corners, which helps to stabilize the structure as I build on it.

Once the walls are built, I block them up off the floor to make room for the rafter tails that, when in place, will extend past the floor deck to meet the fascia of the regular roof. Then I recheck and adjust the octagon until its measurements are exact.

Build the base, and raise the eight common rafters

Find the common-rafter length as you would for a conventional roof. First, determine the adjusted run by dividing the footprint of the roof in half; then subtract half the thickness of the ridge.

man working on an octagon roof

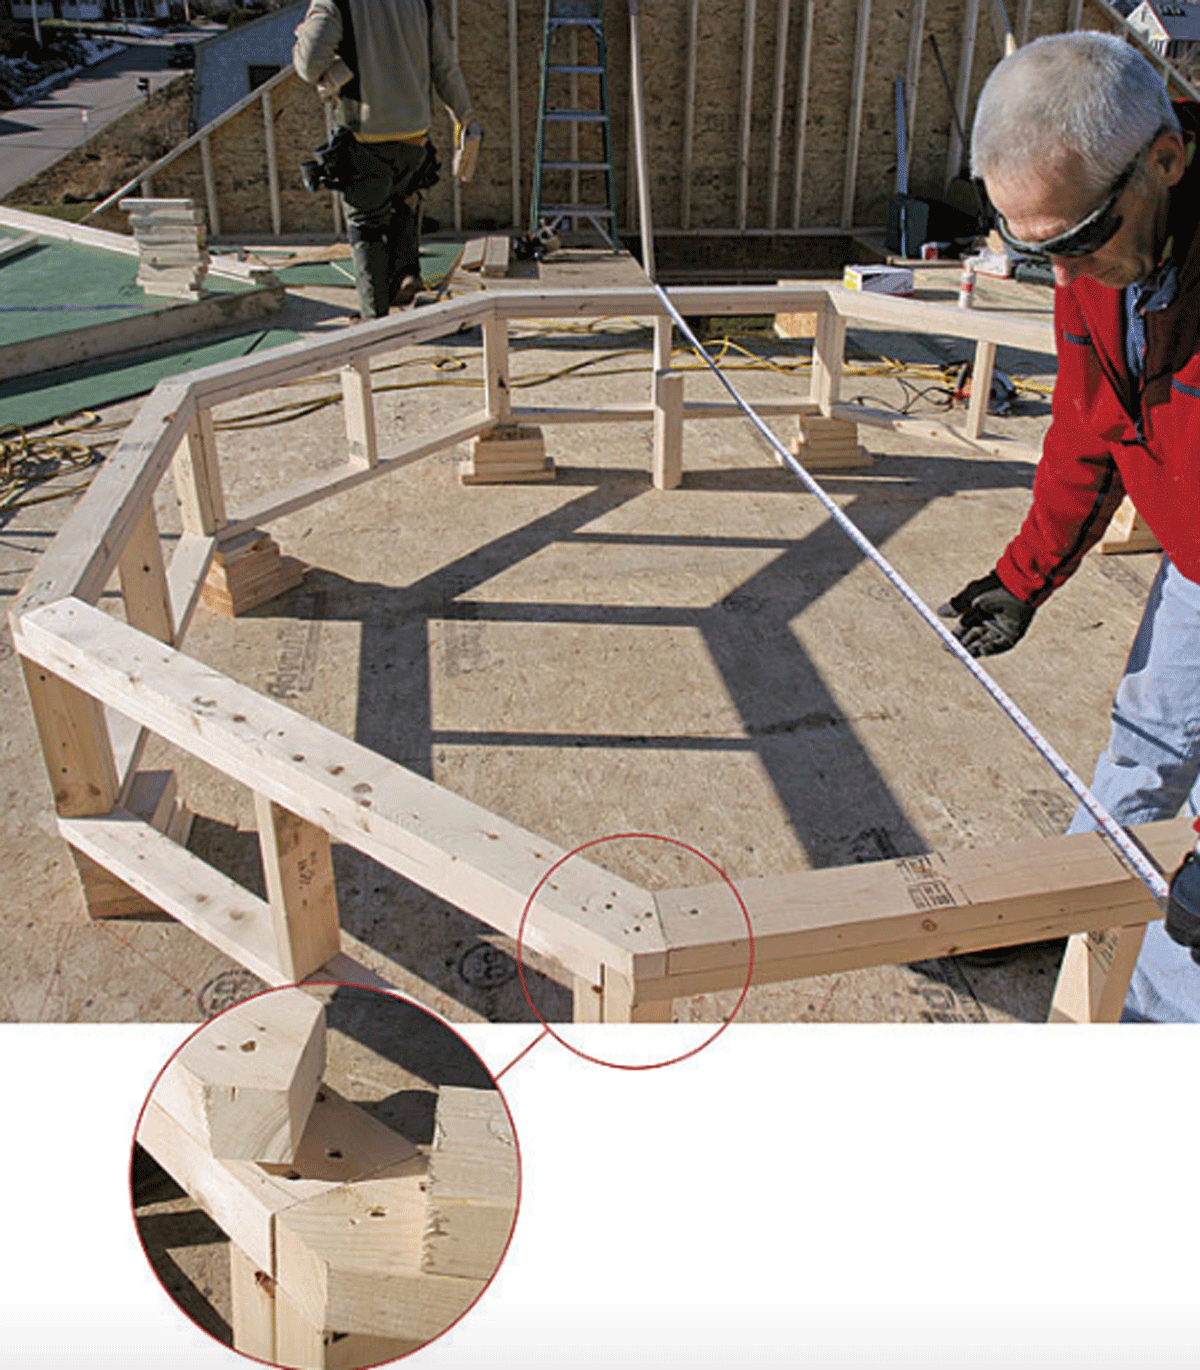
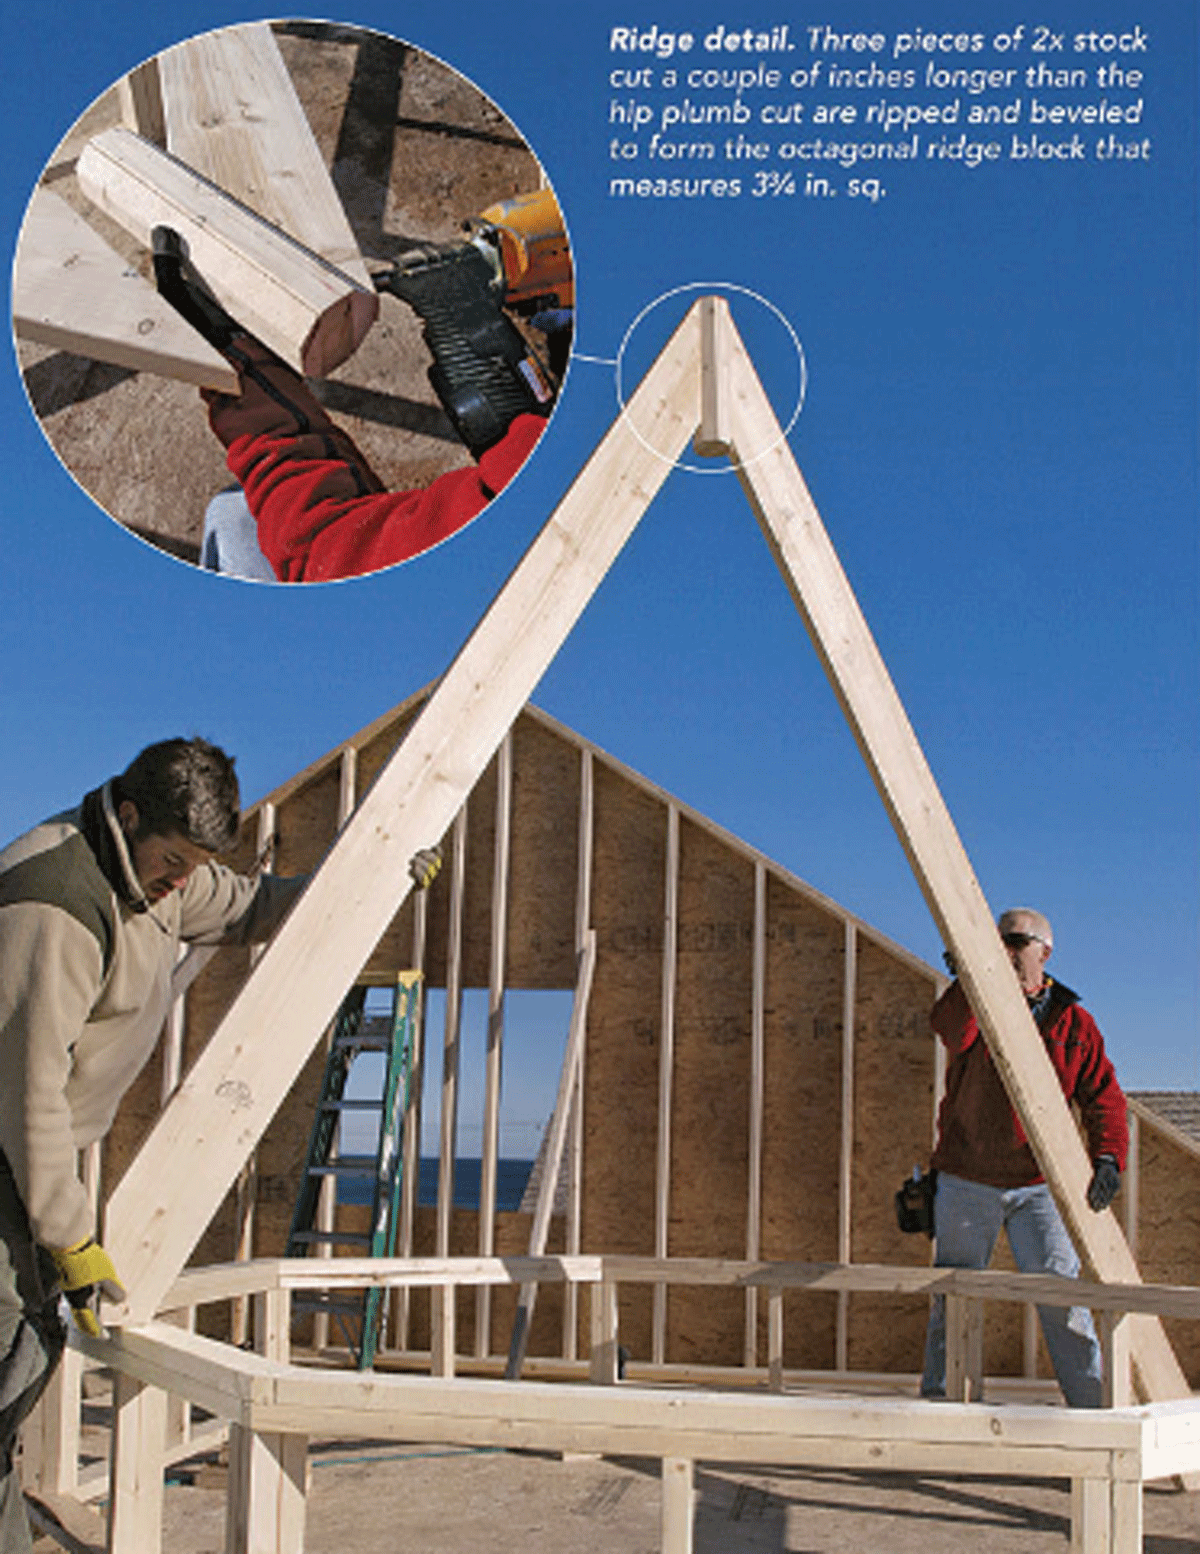
Overlapping double plates give the base greater strength. When complete, the base is blocked up so that the rafters with tails can be installed. Ridge detail. Three pieces of 2x stock cut a couple of inches longer than the hip plumb cut are ripped and beveled to form the octagonal ridge block that measures 3-3⁄4-in. sq.

making an octagon roof

Calculate the common-rafter length

Turret-base width: 9 ft. 7-7⁄8-in. ÷ 2 = 4 ft. 9-15⁄16-in.

Adjusted run: half the turret base (4 ft. 9-15⁄16-in.) minus half the ridge (1-7⁄8-in.) = 4 ft. 8-1⁄16-in.

Using a construction calculator:

  • Enter 4 ft. 8-1/16-in., then PRESS Run.
  • Enter 20-in., then PRESS Pitch.
  • PRESS Diag. The common after length = 9 ft. 15/16-in.
  • PRESS Rise = 7 ft. 9-7/16-in. (record the rise for calculating the hip rafter).

octagon roof
Assemble the rafters

I make the ridge from three pieces of 2×6 stock cut a bit longer than the length of the hip plumb cut. The center piece is ripped at 3-3⁄4-in. The sides are ripped at 3-3⁄4-in. by 1-1⁄8-in., then beveled at a 45° angle.

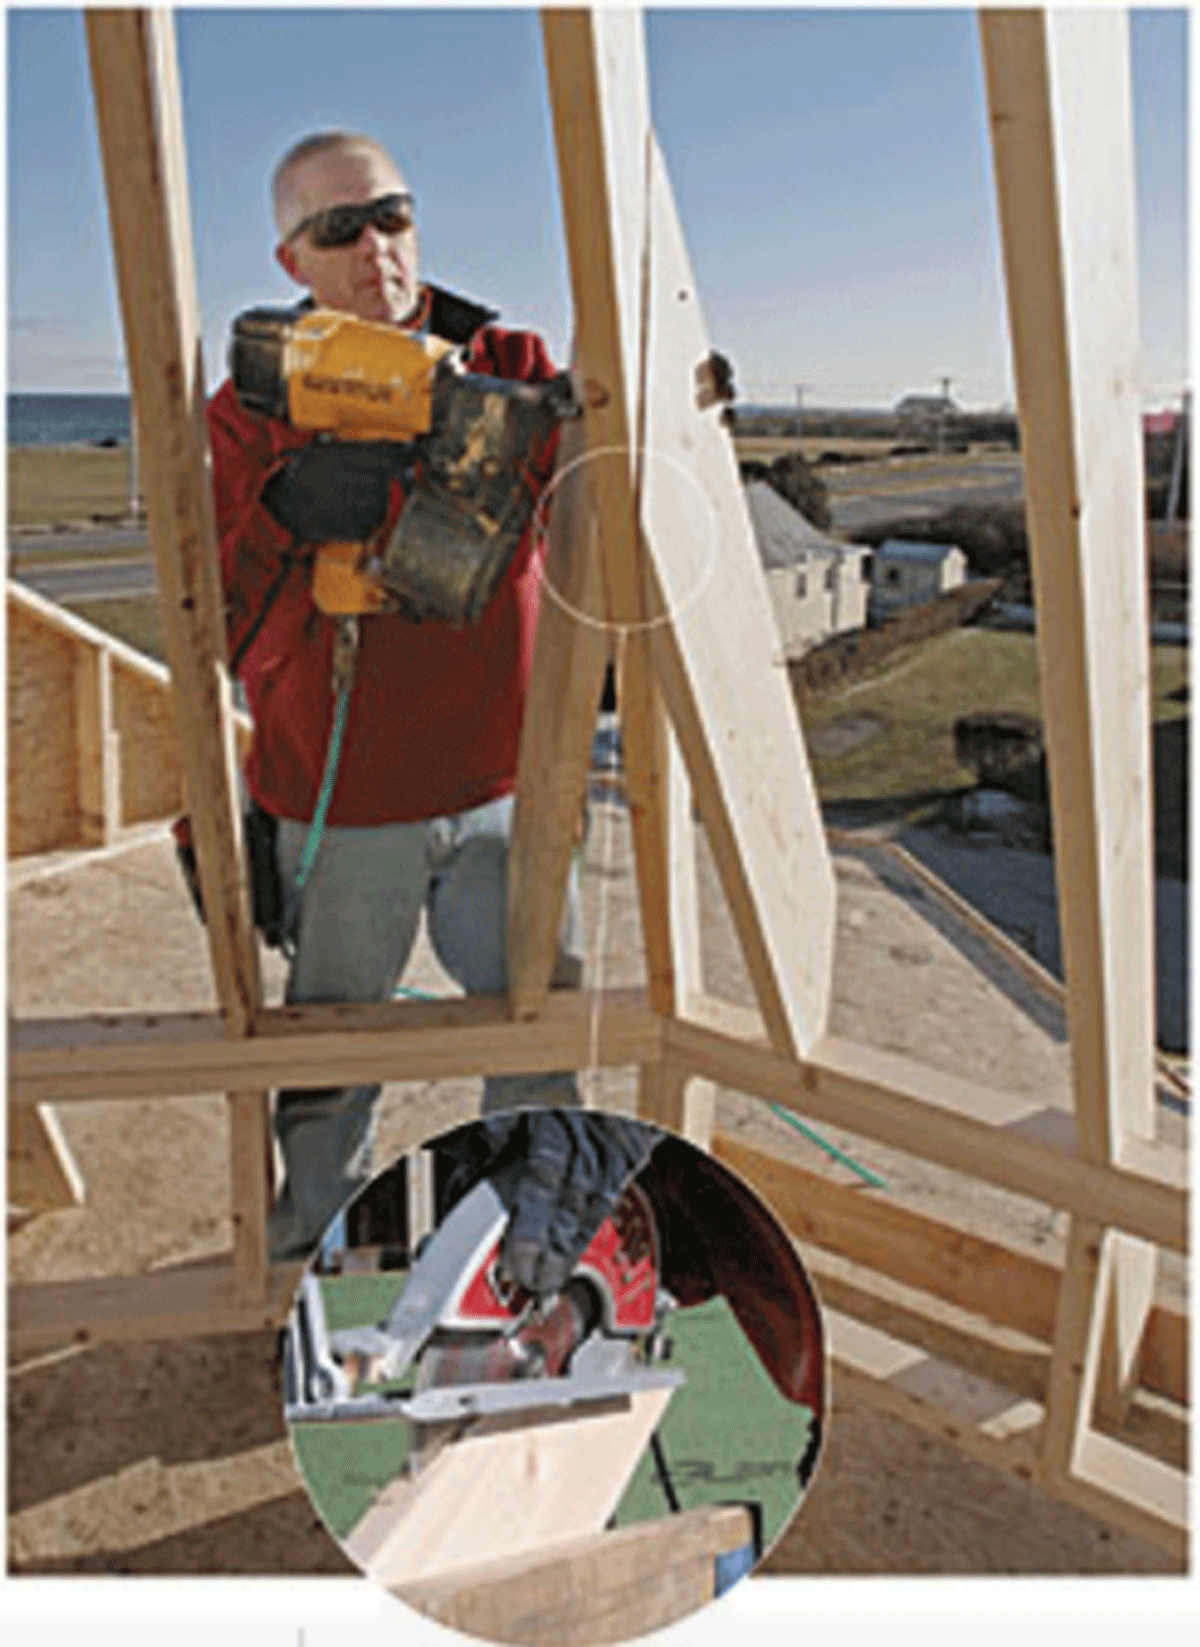
I nail a pair of opposing common rafters to the ridge, then swing the ridge up and fasten it into position. Then I add the remaining six commons, followed by the hip rafters and jacks.

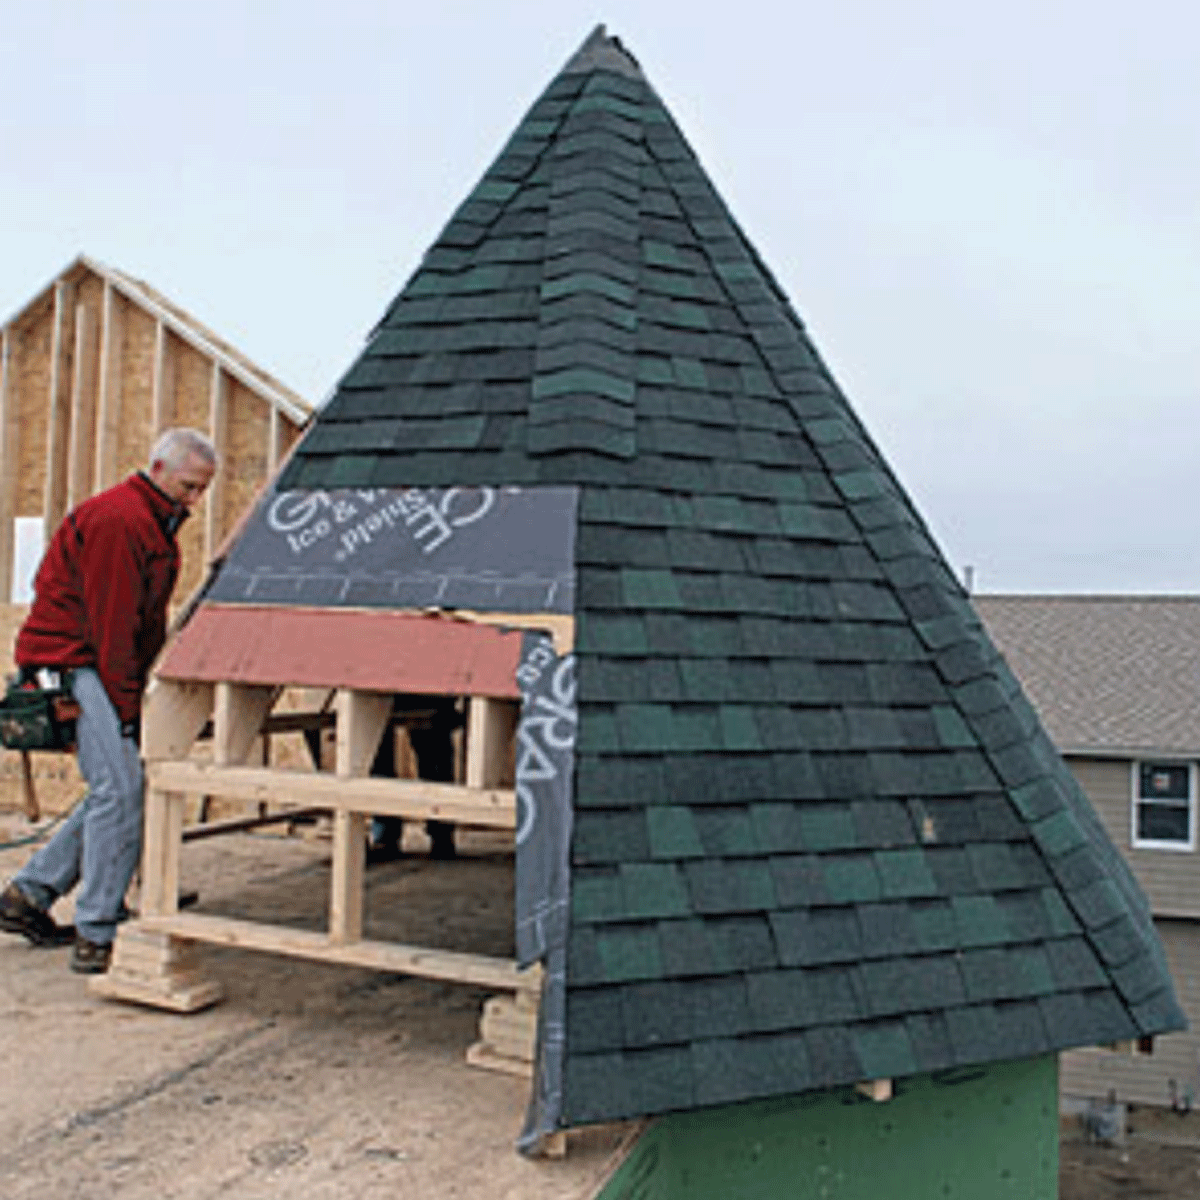
Because the roof sections are so small, there is little tolerance for out-of-plane members, so I check with a straightedge. If there’s a significant problem, I even it out with a cordless planer. When all the rafters and the fascia are in place, my crew and I nail on most of the sheathing, leaving a place for access from inside the third floor. We shingle as much as possible while the structure is still on the deck, which saves a considerable amount of labor and is much safer than doing it from staging. After completing as much work as possible, the whole crew gets underneath the turret and walks it into place. After removing the blocking, we nail the turret base to the deck and start to fill in the rest of the roof.

Hip rafters: Bevel the plumb cuts, and adjust the bird’s mouths

To calculate the hip rafter, use the triangle formed by the adjusted common-rafter run, the adjusted hip-rafter run, and the connecting exterior-wall segment (all in plan view, as if you were calculating floor joists) to determine the length of the adjusted hip-rafter run. Use the known angle formed by the common and hip runs in the center of an octagon, which is always 22.5°.

Calculate the hip-rafter length

  • Enter adjusted common run (4 ft. 8-1⁄16-in.), then PRESS Run.
  • Enter 22.5, then PRESS Pitch.
  • PRESS Diag to get the adjusted hip run, 5 ft. 11/16-in.
  • Enter adjusted hip run (5 ft. 11/16-in.), then PRESS Run.
  • Enter common-rafter rise (7 ft. 9-7/16-in.), then PRESS Rise.
  • PRESS Diag to get the hip-rafter length (9 ft. 3-7/16-in.).

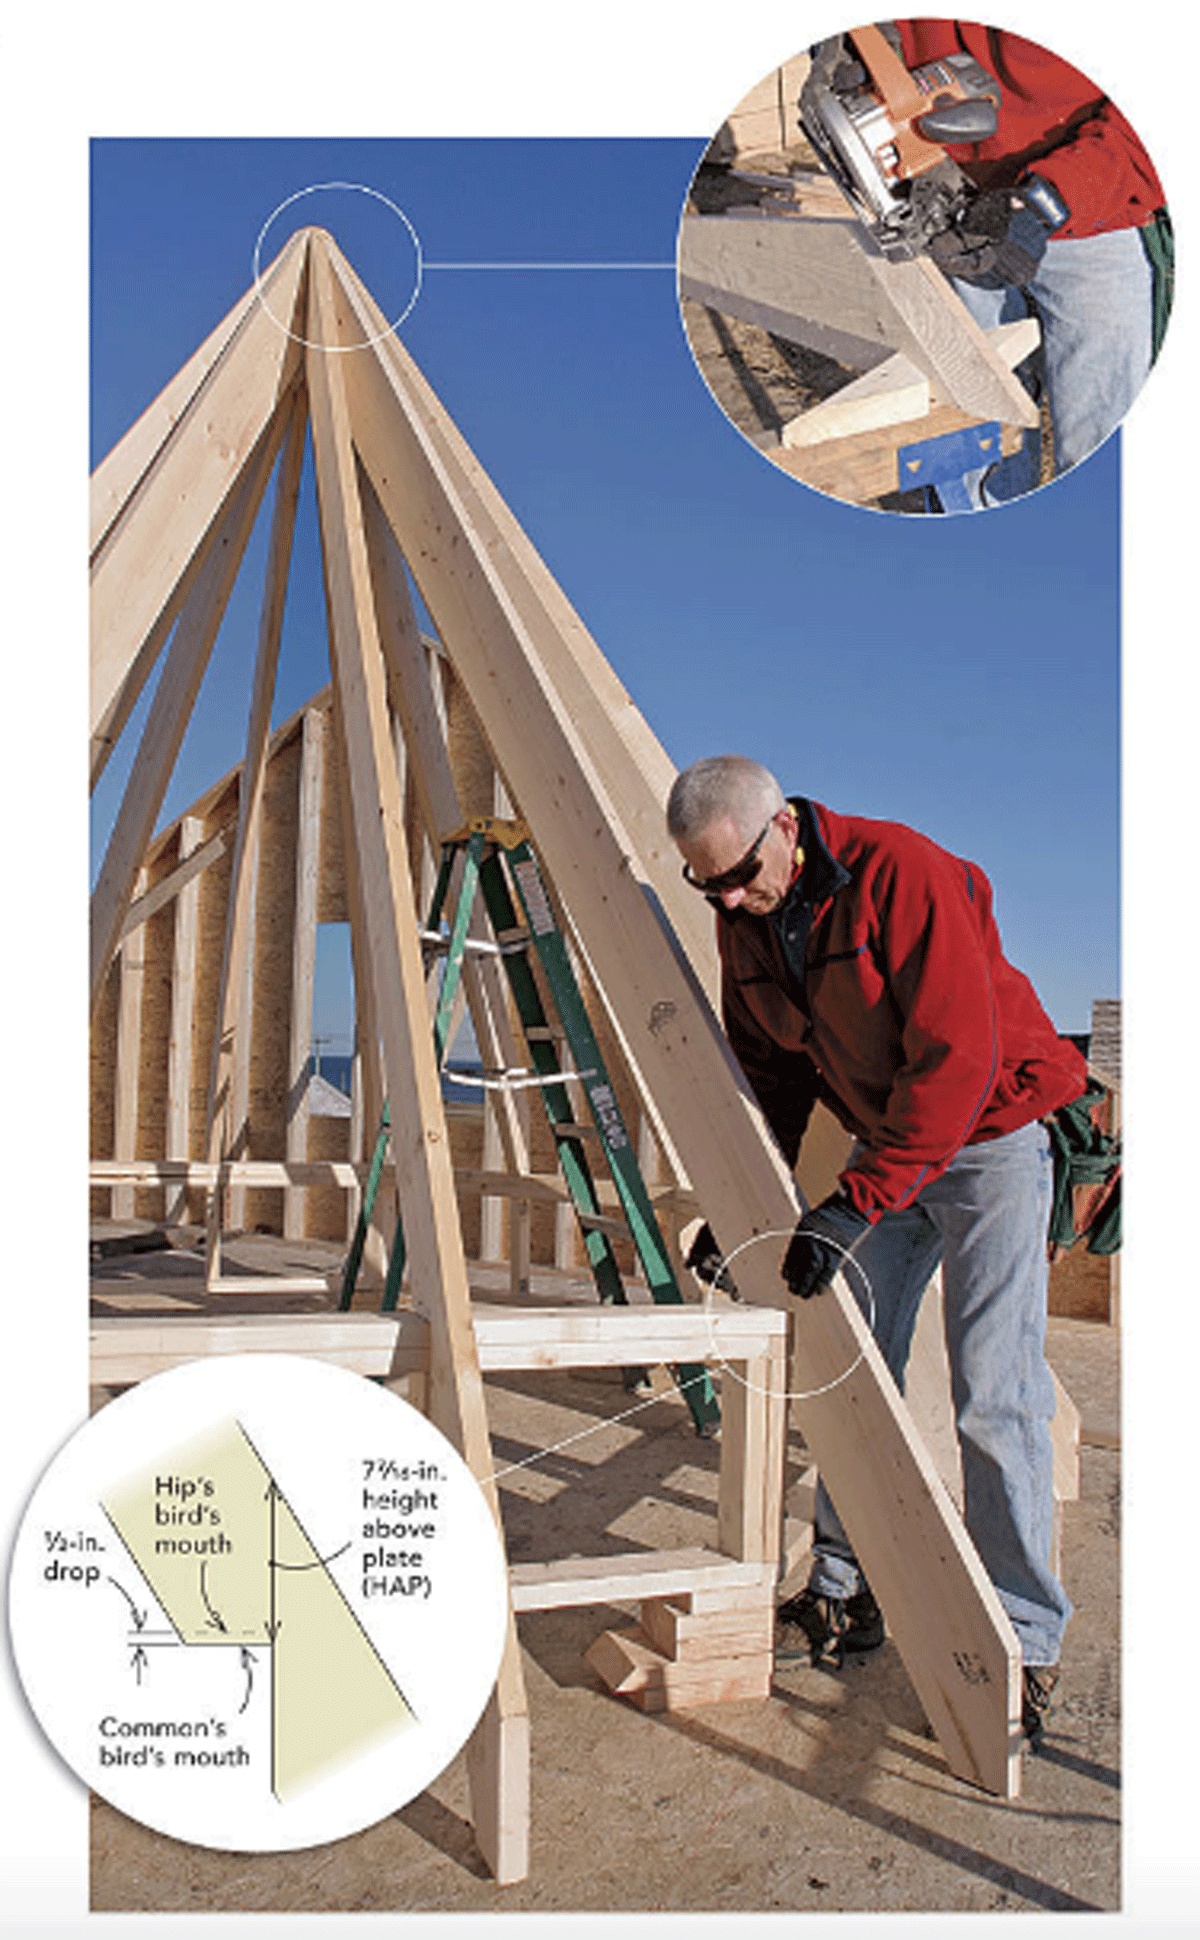
Calculate the hip drop

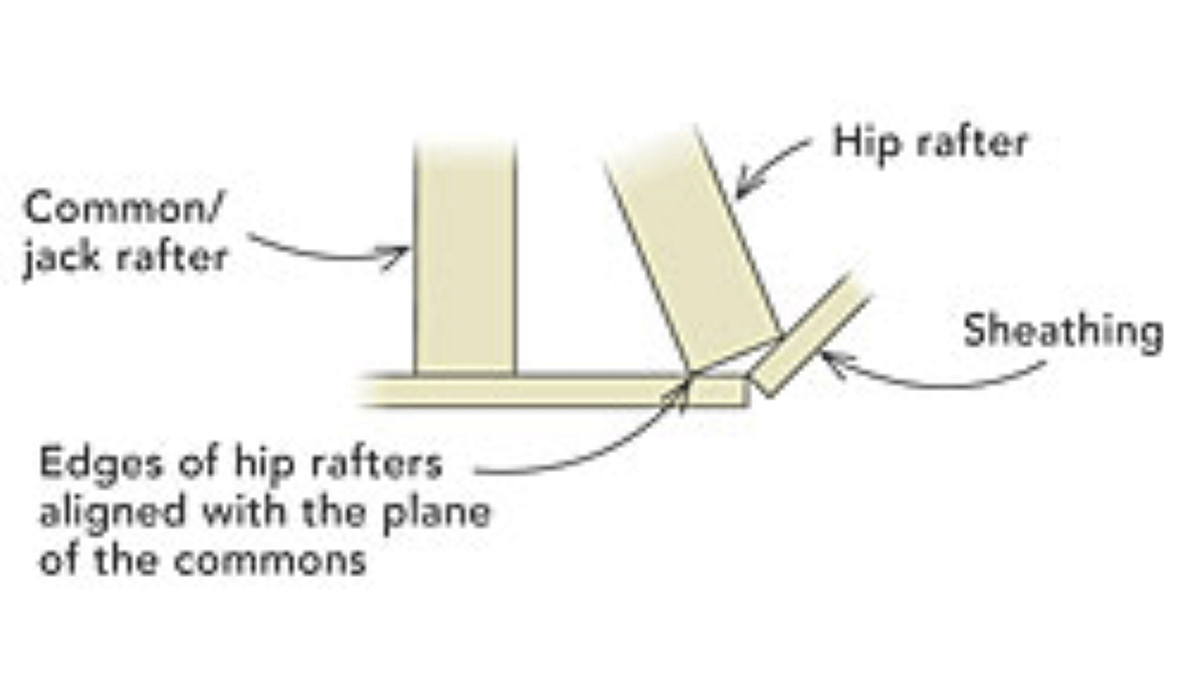
To mark the hips’ bird’s mouths, slide the framing square along the plumb line until the HAP (height above plate) reads the same as the common rafter. The hip rafter must be lowered or its edges will be above the plane of the sheathing. The determining factor in dropping the hip is the thickness of that rafter. Instead of cutting a double bevel (also called backing) along the hip’s top edge, it’s easier to calculate the drop and subtract that amount from the HAP.

  • Enter 67.5, then PRESS Pitch.
  • Enter half the thickness of the rafter (3⁄4-in.). PRESS Rise.
  • PRESS RUN = 5⁄16-in.
  • Pitch (20) x run (5⁄16-in.) = 6-3⁄16-in.
  • Divide by unit run of an octagon hip: 6-3⁄16-in. ÷ 12.9887 = 1⁄2-in. drop.

octagon
Add a pair of jacks to each hip

Because the octagon walls are only 4 ft. long, there will be only two jack rafters per wall. With the jacks laid out from each side of the common rafter, both (and therefore all) jack rafters will be the same length, but with opposite cheek cuts. By adjusting the same plan-view triangle used to calculate the run of the hip, you can determine the run of the jack.

  • Enter 14-1⁄2-in., then PRESS Rise.
  • Enter 22.5, then PRESS Pitch.
  • PRESS Run to get 35 in.

To calculate the jack run, subtract run (35 in.) from adjusted run (4 ft. 8-1⁄16-in). to equal 1 ft. 9-1⁄16-in. However, you still need to account for the thickness of the hip rafter so that the jack layout remains true.

Account for the thickness of the hip rafter

  • Enter one-half the thickness of the rafter (3⁄4-in.), then PRESS Run.
  • Enter pitch (67.5), then PRESS Pitch.
  • PRESS Diag = 1-15⁄16-in.
  • Jack run (1 ft. 9-1⁄16-in.) minus 11-5⁄16-in. = 1 ft. 7-1⁄8-in.
  • Enter 1 ft. 7-1⁄8-in., then PRESS Run.
  • Enter 20 in., then PRESS Pitch.
  • PRESS Diag = 3 ft. 1-3⁄16-in. for the jack-rafter length.

Get it nearly finished, then slide it in place. Except for the portion that will be enclosed by the roof, the turret is sheathed and shingled on the deck. With most of the crew lifting from inside, the turret roof is moved to its location on the exterior wall. Once in place, the blocks are removed, and the plates can be nailed down.

octagon
octagon

Fine Homebuilding Recommended Products

Fine Homebuilding receives a commission for items purchased through links on this site, including Amazon Associates and other affiliate advertising programs.

Guardian Fall Protection Pee Vee

This tool is a gem! You can use it to align plates with your snapped lines, and it’s especially helpful when working alone.
Buy at Amazon

Stabila Extendable Plate to Plate Level

This level raises the bar for accuracy and quality. The extensions are designed to contact and plumb from bottom to top plates, avoiding studs that may be bowed.
Buy at Amazon

Leather Tool Rig

This is tool rig is heavy duty, professional, and well-thought-out for tool storage — plus it can help reduce fatigue throughout the day.
Buy at Amazon
Previous: Conquering Complicated Roofs Next: Framing the Bell Curve

Guide

Framing

Chapter

Framing Roofs

Sign up for eletters today and get the latest how-to from Fine Homebuilding, plus special offers.

Signing you up...

This site is protected by reCAPTCHA and the Google Privacy Policy and Terms of Service apply.
See all newsletters
See all newsletters

Log in or create an account to post a comment.

Sign up Log in

Become a member and get full access to FineHomebuilding.com

Framing

Framing

Trusted, in-depth guidance from the pros for framing a durable, code-compliant house

View Project Guide

View All Project Guides »

Become a member and get unlimited site access, including the Framing Project Guide.

Start Free Trial

Introduction to Framing
  • House Framing Concepts, Tips, and More
Framing Tools, Techniques, and Materials
  • Tools
  • Techniques
  • Framing Lumber
  • Steel
Framing Floors
  • Floor Framing
  • Engineered Floors
  • Floor Sheathing
Framing Walls
  • Wall Framing Basics
  • Layout
  • Wall Assembly
  • Raising and Straightening Walls
  • Framing Rough Openings
  • Blocking
Framing Stairs
  • Stair Layout
  • Building Stairs
Framing Roofs
  • Roof-Framing Basics
  • Roof Design
  • Laying Out and Cutting Rafters
  • Framing Valleys
  • Working with Trusses
  • Dormers
  • Special Situations
Efficient Framing Methods
  • Advanced Framing
  • Double-Stud Walls
Timber Framing
  • Timber-Frame Construction
  • Timber-Frame Design

Fine Home Building

Newsletter Sign-up

  • Fine Homebuilding

    Home building tips, offers, and expert advice in your inbox.

  • Green Building Advisor

    Building science and energy efficiency advice, plus special offers, in your inbox.

  • Old House Journal

    Repair, renovation, and restoration tips, plus special offers, in your inbox.

Signing you up...

This site is protected by reCAPTCHA and the Google Privacy Policy and Terms of Service apply.
See all newsletters

Follow

  • Fine Homebuilding

    Dig into cutting-edge approaches and decades of proven solutions with total access to our experts and tradespeople.

    Start Free Trial Now
    • Facebook
    • Instagram
    • X
    • LinkedIn
  • GBA Prime

    Get instant access to the latest developments in green building, research, and reports from the field.

    Start Free Trial Now
    • Facebook
    • YouTube
  • Old House Journal

    Learn how to restore, repair, update, and decorate your home.

    Subscribe Now
    • Facebook
    • Instagram
    • X

Membership & Magazine

  • Online Archive
  • Start Free Trial
  • Magazine Subscription
  • Magazine Renewal
  • Gift a Subscription
  • Customer Support
  • Privacy Preferences
  • About
  • Contact
  • Advertise
  • Careers
  • Terms of Use
  • Site Map
  • Do not sell or share my information
  • Privacy Policy
  • Accessibility
  • California Privacy Rights

© 2025 Active Interest Media. All rights reserved.

Fine Homebuilding receives a commission for items purchased through links on this site, including Amazon Associates and other affiliate advertising programs.

  • Home Group
  • Antique Trader
  • Arts & Crafts Homes
  • Bank Note Reporter
  • Cabin Life
  • Cuisine at Home
  • Fine Gardening
  • Fine Woodworking
  • Green Building Advisor
  • Garden Gate
  • Horticulture
  • Keep Craft Alive
  • Log Home Living
  • Military Trader/Vehicles
  • Numismatic News
  • Numismaster
  • Old Cars Weekly
  • Old House Journal
  • Period Homes
  • Popular Woodworking
  • Script
  • ShopNotes
  • Sports Collectors Digest
  • Threads
  • Timber Home Living
  • Traditional Building
  • Woodsmith
  • World Coin News
  • Writer's Digest
Active Interest Media logo
X
X
This is a dialog window which overlays the main content of the page. The modal window is a 'site map' of the most critical areas of the site. Pressing the Escape (ESC) button will close the modal and bring you back to where you were on the page.

Main Menu

  • How-To
  • Design
  • Tools & Materials
  • Video
  • Blogs
  • Forum
  • Project Guides
  • Reader Projects
  • Magazine
  • Members
  • FHB House

Podcasts

  • FHB Podcast
  • ProTalk

Webinars

  • Upcoming and On-Demand

Podcasts

  • FHB Podcast
  • ProTalk

Webinars

  • Upcoming and On-Demand

Popular Topics

  • Kitchens
  • Business
  • Bedrooms
  • Roofs
  • Architecture and Design
  • Green Building
  • Decks
  • Framing
  • Safety
  • Remodeling
  • Bathrooms
  • Windows
  • Tilework
  • Ceilings
  • HVAC

Magazine

  • Current Issue
  • Past Issues
  • Magazine Index
  • Subscribe
  • Online Archive
  • Author Guidelines

All Access

  • Member Home
  • Start Free Trial
  • Gift Membership

Online Learning

  • Courses
  • Project Guides
  • Reader Projects
  • Podcast

More

  • FHB Ambassadors
  • FHB House
  • Customer Support

Account

  • Log In
  • Join

Newsletter

Get home building tips, offers, and expert advice in your inbox

Signing you up...

This site is protected by reCAPTCHA and the Google Privacy Policy and Terms of Service apply.
See all newsletters
See all newsletters

Follow

  • X
  • YouTube
  • instagram
  • facebook
  • pinterest
  • Tiktok

Join All Access

Become a member and get instant access to thousands of videos, how-tos, tool reviews, and design features.

Start Your Free Trial

Subscribe

FHB Magazine

Start your subscription today and save up to 70%

Subscribe

We hope you’ve enjoyed your free articles. To keep reading, become a member today.

Get complete site access to expert advice, how-to videos, Code Check, and more, plus the print magazine.

Start your FREE trial

Already a member? Log in

Privacy Policy Update

We use cookies, pixels, script and other tracking technologies to analyze and improve our service, to improve and personalize content, and for advertising to you. We also share information about your use of our site with third-party social media, advertising and analytics partners. You can view our Privacy Policy here and our Terms of Use here.

Cookies

Analytics

These cookies help us track site metrics to improve our sites and provide a better user experience.

Advertising/Social Media

These cookies are used to serve advertisements aligned with your interests.

Essential

These cookies are required to provide basic functions like page navigation and access to secure areas of the website.

Delete My Data

Delete all cookies and associated data