Radiant Barriers
When it comes to saving money on utility bills, the jury is still out on whether radiant barriers are worth it.
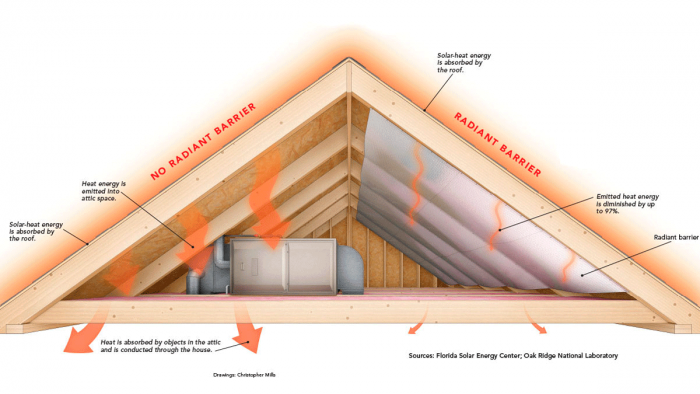
Want to get builders into a heated discussion? Bring up radiant barriers.
Promoted as a method for reducing cooling costs by mitigating solar heat gain through walls and attics, these shiny (typically aluminum) surfaces have as many detractors as proponents. The dispute is not about the science of radiant-heat transmission; it’s whether applying that science to your roof will make a difference on your utility bill.
First, the science
Heat energy moves through houses (and everything else) in three ways: conduction (when objects touch), convection (through air movement), and radiation (through an airspace or vacuum via electromagnetic waves). Insulation, thermal breaks, and air-sealing prevent conduction and convection; radiant barriers prevent heat transfer through radiation only.
Emissivity (or emittance) measures how much radiant energy a material emits. It’s rated on a scale from 0 to 1; the lower the value, the less energy emitted. Radiant barriers by definition have an emissivity of 0.1 or less, emitting 10% or less of the radiant energy striking them.
Are they radiating or reflecting?
Both, actually. Surfaces that are highly reflective to long-wave (heat) energy are also low-emitting. Aluminum, for example, reflects 97% of the long-wave radiation that hits it, emitting 3% into the airspace on the other side. Remember, though, we’re talking about invisible, long-wave radiation—not visible light. White paint, for example, does a great job of reflecting light but a poor job of blocking long-wave heat transfer. The key point is this: A material can look reflective and not be a good radiant barrier, and a good radiant barrier will work whether or not the shiny side is facing the heat source—as long as it is facing an airspace.
Fine. But do they work?
Current research supports radiant barriers in attics as a viable strategy for reducing cooling loads in hot climates. This reduction, however, is limited to solar gain from the attic—about 22% of a home’s cooling load. So even though research has found that radiant barriers can deflect 40% of incoming attic heat, the net savings represents only 8% to 10% of a home’s total cooling costs.
The benefit is even sketchier in northern homes, where summer heat gain is less of a concern and the barriers may limit beneficial winter solar gain. Although radiant barriers may help to retain winter heat, most winter heat loss through attics is due to convection (rising air), not radiation—making proper insulation and air-sealing far more effective.
Here’s how radiant barriers work.
Where radiant barriers work—and where they don’t
Because radiation occurs in an airspace, radiant barriers won’t work unless they face an airspace. Pressed between two surfaces, a radiant barrier becomes a heat conductor. In addition, because heat moves toward cold, there also must be a difference in temperature between materials. Radiant barriers, then, are of negligible benefit in well-insulated homes.
Vented attics can be good places for radiant barriers because they contain large airspaces and take the brunt of solar-heat gain. Because walls are subject to less solar gain and because heat transfer through them relies more on conduction and convection than radiation, radiant barriers in walls provide less benefit. Although barriers placed on attic floors can work, surface dust will eventually hinder performance.
New construction
In a new vented attic, radiant-barrier sheathing can be used (below left), or a foil barrier can be draped over the rafters or trusses before sheathing is installed (below right). In the second example, the airspace created in the rafter bays enhances the foil’s effect by increasing ventilation.


Retrofits
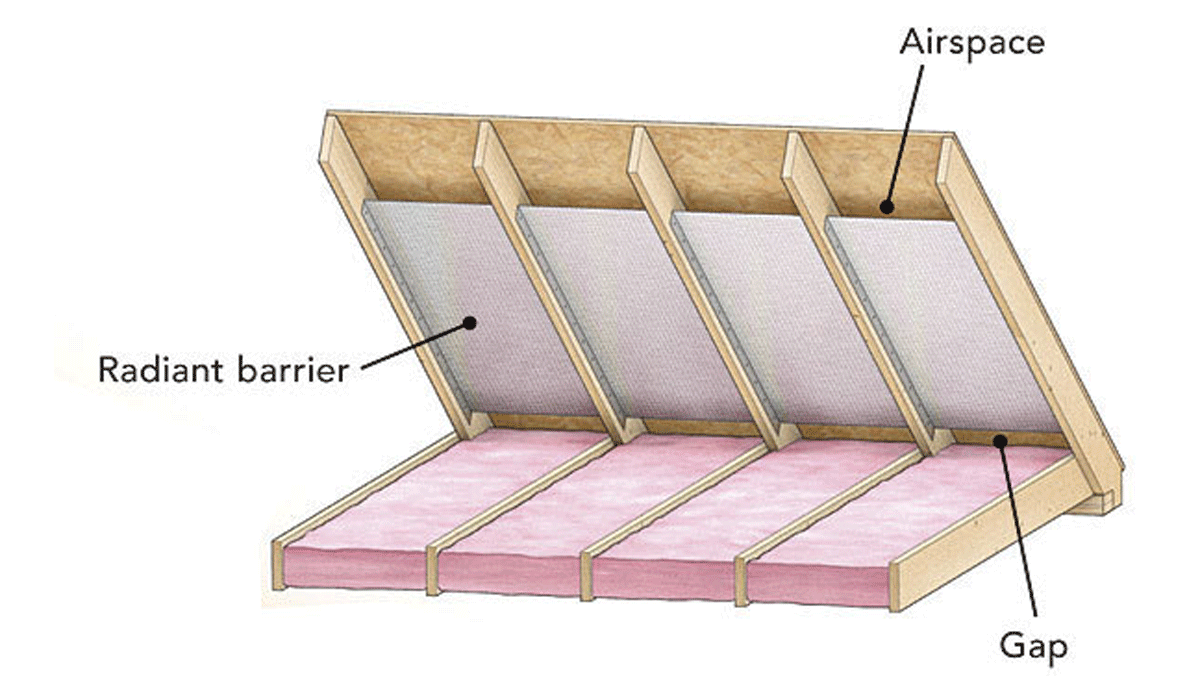
Radiant-barrier foil can be attached to the rafter sides (below) or to the faces (top). The latter method curtails heat transfer through the rafters and is preferred. In both cases, gaps at the top and bottom promote ventilation. Double-sided foil provides a small increase in effectiveness.
Sources: Florida Solar Energy Center; Oak Ridge National Laboratory
Drawings: Christopher Mills
From Fine Homebuilding #236
Fine Homebuilding Recommended Products
Fine Homebuilding receives a commission for items purchased through links on this site, including Amazon Associates and other affiliate advertising programs.
Roofing Gun
Flashing Boot Repair
Flashing Boot


View Comments
This article on reflective / radiant barriers should include more specific details. For example: (1) All radiant barriers require a sealed air gap. This air pocket provides almost all of the R value claimed by the manufacturer; the shiny plastic or bubble wrap has almost no R value. The radiant barrier is not effective if it is simply applied to the sheathing, as shown in the first example. (2) This air gap MUST be sealed to prevent heated air from escaping into the attic. This can be part of a standard soffit-to-ridge vent roof ventilation system, for example. (3) Radiant barriers become less effective as dust accumulates on the shiny surface, a major factor as shown in a Canadian study (4) Radiant barriers are not effective in winter because cold cannot be 'reflected' and the warmer air inside the house is not radiant. Reflectix, a major manufacturer, claims R7 in a cathedral ceiling in summer, for example, but only R1 in winter, in a northern location. So if you live in a region with cold winters, it would be much smarter to install foil-faced polyiso foam board on the bottom of the rafters. With standard 1.875" polyiso board, this would provide R12 winter and summer, plus the benefit of a radiant barrier to reflect infrared energy from the hot roof in summer. Plus the foam board would break the thermal bridge created by all of the hot rafters, which shiny bubble wrap will not solve. Finally, it would be smart to add a link to the excellent articles on radiant barriers on GreenBuildingAdvisor.com, e.g. "Oooh, Shiny Stuff! — Radiant Barrier Fundamentals", "Stay Away from Foil-Faced Bubble Wrap" and "Radiant Barriers: A Solution in Search of a Problem". See: http://www.greenbuildingadvisor.com/blogs/dept/building-science/oooh-shiny-stuff-radiant-barrier-fundamentals and http://www.greenbuildingadvisor.com/blogs/dept/musings/stay-away-foil-faced-bubble-wrap and http://www.greenbuildingadvisor.com/blogs/dept/musings/radiant-barriers-solution-search-problem
I have no connection to any insulation product vendor, by the way, except as a retail customer.
I hope this is helpful,
Mark
In hot climates, with up to 97% of the radiant energy emitted by the roof into the attic space now reflected back to the roof, does this cause significant acceleration of the breakdown of asphalt shingles due to poor heat dissipation? Can this void roofing warranties?
I've been doing radiant systems for the past 12 yrs or so. I use the material that Green Building Advisor says to stay away from - and it works quite well here in southern NC. I came across the product while building an upper end horse barn 12 or 13 yrs ago. That was a version of the product that was intended for agricultural building and had foil on one side, white poly on the other and a bubble wrap-type membrane in between. It was meant to be installed by draping across the rafters before installing the roof sheathing (a process that makes the framer REAL happy, btw), and when installed with an average air gap of 1 1/2", the mfg was claiming an R value of 14. While it took that with a grain of salt, it made me think of an envelope solar home that I saw back in the '70's. I was an engineer back then and was firmly enthralled by passive solar design. It looked to me like a product similar to that installed on the lower faces of the rafters or rafter components of trusses, could create an isolated air cavity that would keep the attic air separated from the outside world, and with the right product, provide a "radiant barrier" to the inside spaces. Just for the record, I hadn't seen anything mentioned about this type of installation prior to that.
So, I decided to give it a shot. I had a couple of building clients at that time who were interested in energy efficiency so I pitched them the idea and they went for it. I found a product that had foil on both faces and an open cell foam center that seemed perfect for the plan. The first house was indeed a learning experience, as industry tolerances on both the width of the foil and rafter spacing made it clear that running it parallel to the rafter pitch wasn't going to work. That pushed me to develop an install method to run it perpendicular to the rafters and that worked much better. The energy usage results were indeed quite impressive on both of those homes, but I did several other things above and beyond the "code" as a standard part of my construction practices, so it was hard to tell just how much of the low energy numbers to attribute to the barrier. So, I decided to install the system in my own home for an "acid test. I had built that house in the mid-80's so I had a good baseline for energy costs to compare it to.
My home had a partially finished attic that prevented a full system installation, but I had access to 60-70% of the roughly 3200 sf attic space. I hung a thermometer in the affected area after completion so I could monitor the results.
In my area, attic temps can easily reach 130-140 degrees on the hot days of July and August (and sometimes May thru October). I tried to check it on the hottest days, and never saw the temperature needle above 96 (on a day it was 99 outside). We typically kept the upper floor temp set around 76.
As my upper level HVAC system was in this non-acclimated space, this made a HUGE difference in the efficiency of the system (it still had the 1987 version of insulated flex and duct board) and on average dropped my electric bills $40-$60 per month in the summer. It surprised me even more that it took the winter month bills down $30 or so during heating season. Even more pleasing than the lower bills was the increase in comfort level in the second floor spaces.
And though I was still spending more each month to acclimate my 1987, 3600 sf 2.5 story home with 2 - 10 seer Heat Pumps (top of the line in '87) than my 2nd custom home client that tried the system (8900 sf with 4 - Hi Eff gas furnaces with HP backups) by about 20%, I was still pretty happy with the results. I've done a few other upfits since then with similar results. And yes, you do need to seal the seams and lap them properly to deal with condensation in the now-isolated air chamber, seal them to the soffit and attic vent areas, and provide adequate roof ventilation for the air to flow in thru the soffit vents and out thru the roof vents. Ridge vents work the best, but I've done homes with gable vents. It's just a bit more work.
I'm trying the "radiant barrier" OSB on a couple of new construction projects right now. The thermodynamics aren't there to allow this system to be anywhere near as efficient as the isolated air chamber method, but there's no additional labor cost in the OSB approach whereas the isolation system is quite labor intensive. I expect results consistent with the additional cost of the installation. In other words, not great, but every little bit helps.
My results are real world experiences of an engineer turned Builder 30+ yrs ago. When I see information parroted by internet "experts" that runs contradictory to my own observations, I just shake my head. I occasionally read the source cited in Mark's comment and have found them contradictory to my personal experiences in several areas. I've offered them construction comments, but they don't seem interested....
But....it's the internet...so it must be real, right?
David