FHB Logo Facebook LinkedIn Email Pinterest Twitter X Instagram Tiktok YouTube Plus Icon Close Icon Navigation Search Icon Navigation Search Icon Arrow Down Icon Video Guide Icon Article Guide Icon Modal Close Icon Guide Search Icon Skip to content
Subscribe
Log In
  • How-To
  • Design
  • Tools & Materials
  • Restoration
  • Videos
  • Blogs
  • Forum
  • Magazine
  • Members
  • FHB House
  • Podcast
Log In

Fine Homebuilding Project Guides

Insulation

Guide Home
  • Energy Efficiency
  • Air-Sealing
  • Choosing Insulation
  • Installing Insulation
  • Water Management
Energy-Smart Details

A Practical Air-Sealing Sequence

If you aim to build a superinsulated airtight home and want to keep it affordable, your best bet is to use common materials and methods that don’t disrupt traditional work sequences very much.

By Andrew Webster Issue 242 - April/May 2014
  • X
  • facebook
  • linkedin
  • pinterest
  • email
  • add to favorites Log in or Sign up to save your favorite articles

Last year, my architecture firm’s founding partner, Bruce Coldham, developed a set of details to create an affordable, durable, and continuous air barrier for a house with a conventionally framed 2×6 wall and a truss roof.

Airtight wall sheathing

We opt to use the exterior face of the wall sheathing as the air barrier, using either Huber Zip sheathing and Zip tape or a handmade version: OSB with Grace’s WB Primer and Vycor tape at all joints, burnished or rolled to get the best adhesion.

This strategy keeps the air barrier out of the way of the electricians and plumbers who are called on to punch many holes in our walls. It also provides a durable, inspectable, and affordable solution to reducing air leaks. With a continuous layer (or two) of rigid polyiso over the OSB, we get warm sheathing and good overall wall R-values as well.

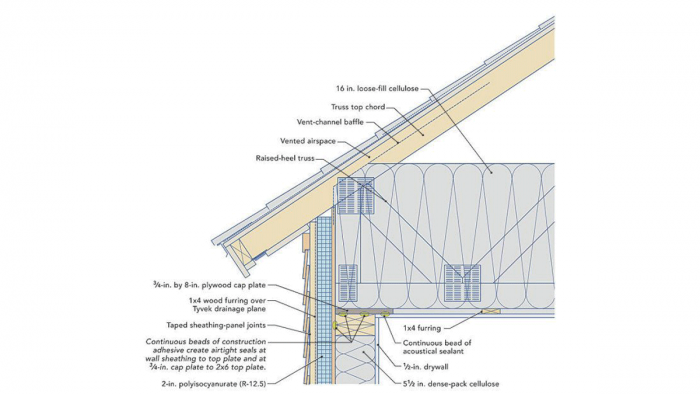
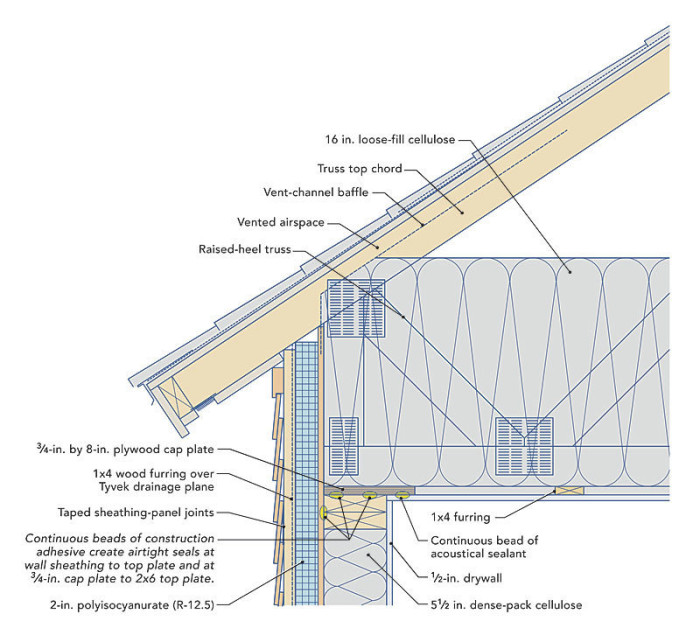
The wall-roof intersection

For reasons of construction economy, many clients want trussed roofs with traditional eaves and a ventilation channel. The immediate challenge in this design is figuring out how to connect the exterior sheathing air barrier on the walls to the interior drywall air barrier at the ceiling.

The solution is found in a simple plywood cap plate (3/4 in. by 8 in.) that is attached to the exterior walls. To achieve airtightness at this transition requires the use of construction adhesive in two locations: The wall sheathing has to be sealed with adhesive along the 2×6 top plate, and the plywood cap plate has to be sealed to the 2×6 top plate that it’s nailed to.

A diagram demonstrating the wall-to-roof transition
Wall-to-roof transition

Doing it this way doesn’t interrupt the construction sequencing, and the materials needed to accomplish it are typically on site already.

Wall-to-roof transition

The exterior walls are capped with a plywood plate that is 3/4 in. thick and 8 in. wide. The plywood cap is the same thickness as the 1x4s used to strap the ceiling.


Detailing partitions

With an airtight drywall ceiling, the tops of partition walls threaten to interrupt the air barrier. We could handle this in two ways: either by having a continuous plane of drywall installed before the partitions are erected, or by adding another plywood cap plate atop each partition wall.

Adding a continuous layer of drywall demands mobilizing the drywall contractor twice. Adding cap plates helps to keep the normal construction sequence intact.

A bead or two of construction adhesive is used to seal the top plate of the partition wall to the wide plywood cap plate. A similar bead seals the cap plate to the drywall ceiling. The drywall is fastened to the plywood cap plate and to 1×4 furring strips in the same plane.

Finally, any ceiling penetrations, especially recessed can lights, need to be carefully sealed, which can be accomplished with an air-sealed “hat” made of rigid foam and canned spray foam and tape (see drawing and “Recessed Can Lights” in FHB #237).

To create an affordable superinsulated airtight home, it helps if the details are simple rather than disruptive. A little creative forethought and a clear plan will help builders get it done.

Airtight partitions

air-sealing diagram

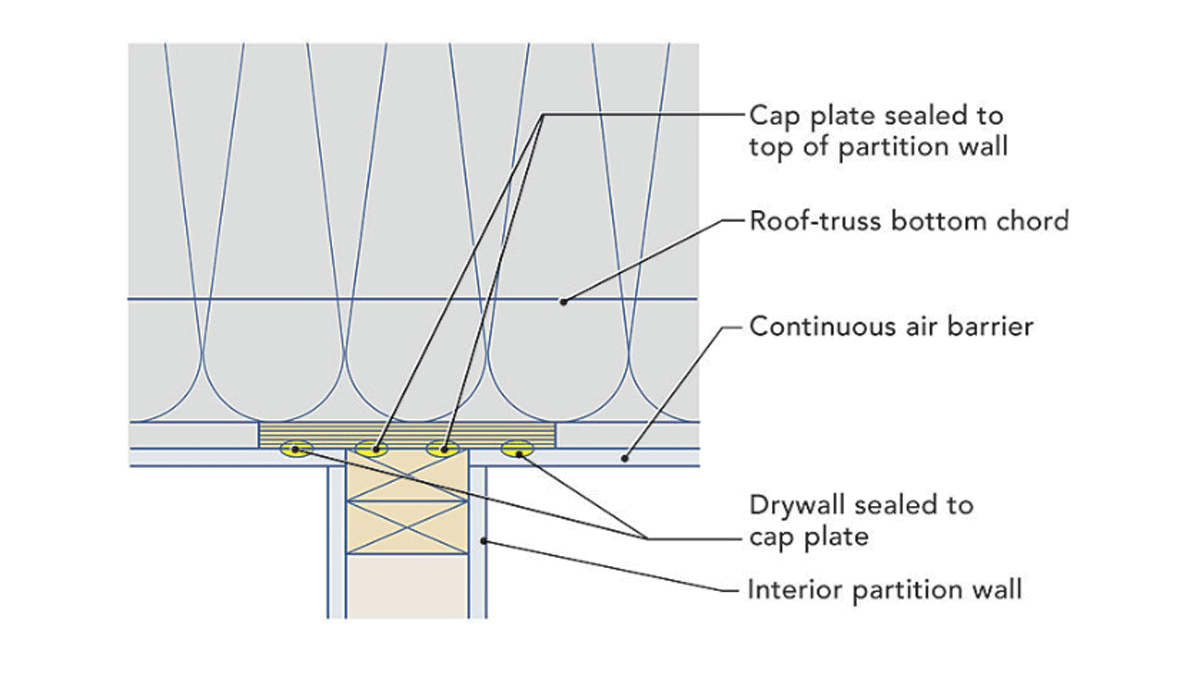
You can install continuous drywall on the ceiling before partition walls are framed, or use this detail to stick to a more traditional building sequence. The plywood caps installed above the partition top plates are wide enough to provide an overhanging lip on both sides of the partition to receive beads of sealant.

Don’t forget the can lights

air-sealing can lights diagram

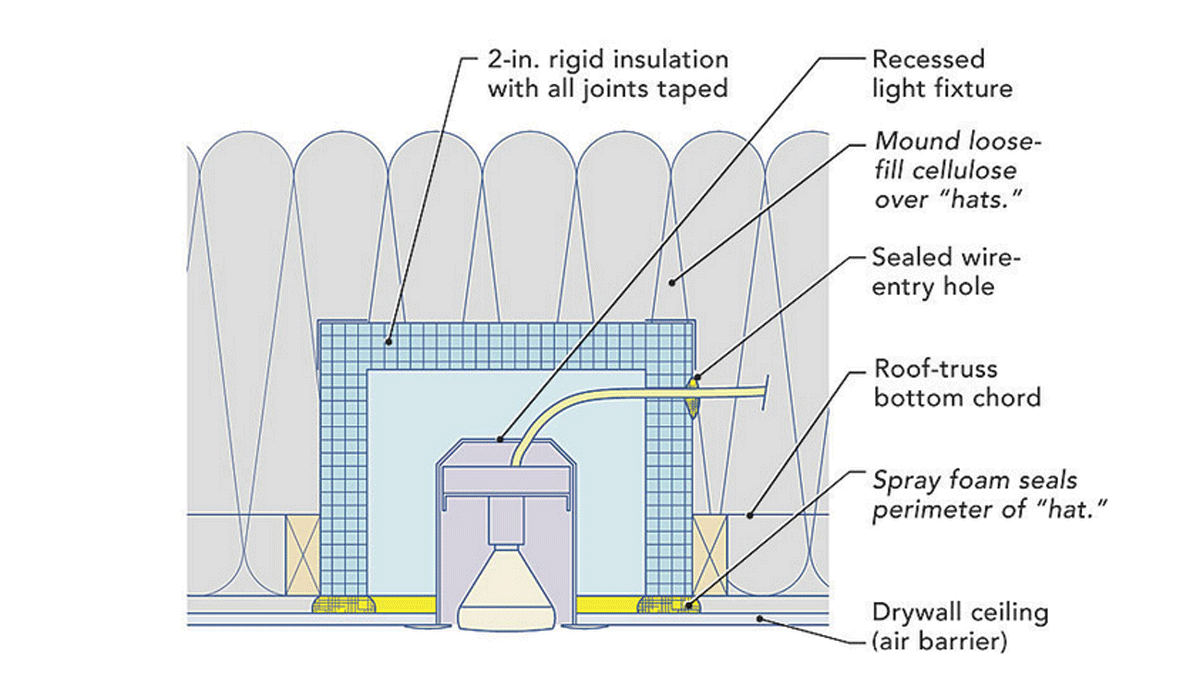
Air leaks at recessed can lights often lead to winter ice dams. Even recessed cans that are rated IC and “airtight” are known to leak. To create a more airtight ceiling, construct rigid-foam boxes that are air-sealed with tape and canned spray foam. The boxes should be sealed to the drywall before loose-fill insulation is installed.

Applied eaves make an airtight hot roof work

air sealing roof

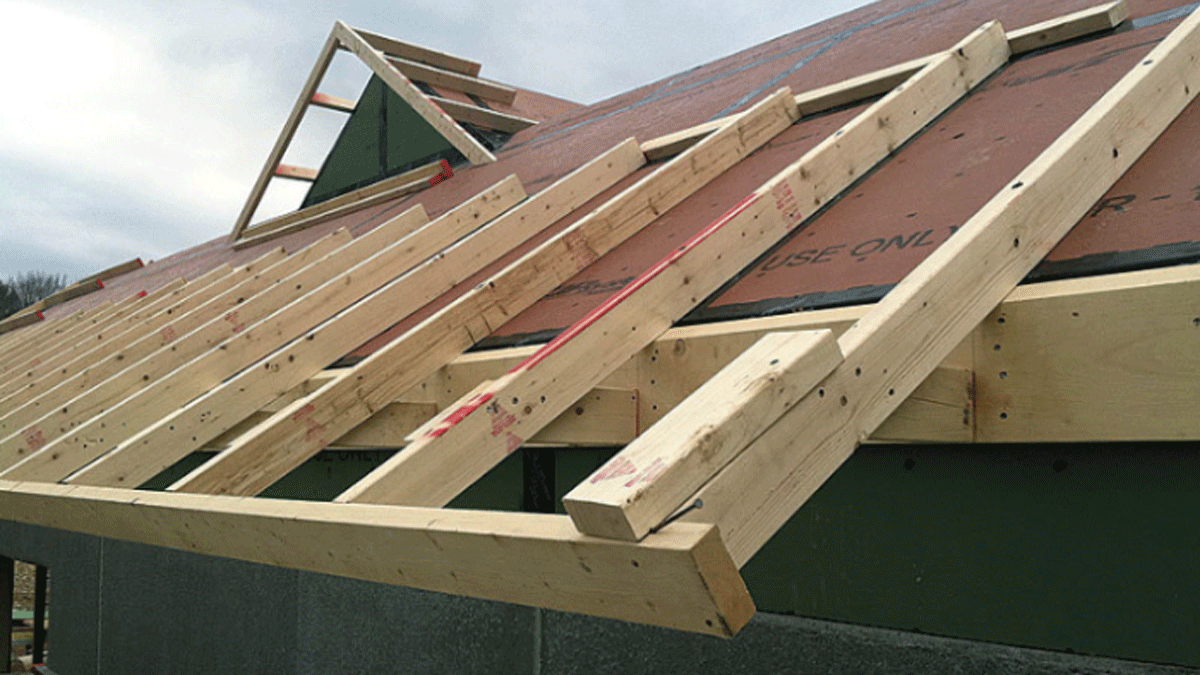
2×4 eave rafter = 3-1⁄2 in. of rigid foam. If a house is framed without any roof overhangs, it’s easy to tape the seam between the wall sheathing and the roof sheathing. Once the sheathing is airtight, “applied eaves” are framed with 2x4s, which will be on the same plane as the 31⁄2 in. of rigid foam that is installed next.

We’ve employed the sheathing-based air-barrier solution regularly since testing it out with energy consultant Marc Rosenbaum at the College of the Atlantic’s Davis Student Village. There we achieved near Passive House airtightness with OSB, primer, and Vycor for our wall and roof assemblies.

We have long believed that aligning the weather, air, and thermal barriers is the most bulletproof way of making wood-framed structures in our climate. But this is more expensive to do on a roof than on a wall, because it either complicates the venting requirement or requires an unvented “hot” roof. The current code requirements for hot roofs—designed to avoid condensation on the inside of the sheathing—are more elaborate than earlier methods used in our area.

For a high-performance house with a hot roof, we often use 12-in. I-joist rafters filled with dense-pack cellulose. To comply with the code, this type of roof needs 3-1/2 in. of continuous rigid insulation above the primary roof sheathing in our climate zone.

If the roofs are framed without any overhangs, the wall sheathing can extend all the way up to the roof sheathing. Once the sheathing seams are taped, including the seam where the wall meets the roof, we sometimes install 2×4 outriggers to create an “applied eave” (see photo). The height of the 2×4 outriggers matches the thickness of the foam insulation.

Photo: courtesy of Coldham & Hartman Architects. Drawings: Steve Baczek, Architect.

Previous: Air Barriers Are Essential for a Modern, High-Performance Home Next: Are There Any Reasons to Make Homes ‘A Little Bit Leaky’?

Guide

Insulation

Chapter

Air-Sealing

Sign up for eletters today and get the latest how-to from Fine Homebuilding, plus special offers.

Signing you up...

This site is protected by reCAPTCHA and the Google Privacy Policy and Terms of Service apply.
See all newsletters
See all newsletters

Log in or create an account to post a comment.

Sign up Log in

Become a member and get full access to FineHomebuilding.com

Insulation

Insulation

Trusted, comprehensive guidance from the pros for a home that is healthy, comfortable, and energy efficient

View Project Guide

View All Project Guides »

Become a member and get unlimited site access, including the Insulation Project Guide.

Start Free Trial

Energy Efficiency
  • Understanding Energy and Houses
  • Building Energy-Efficient Homes
Air-Sealing
  • Air-Sealing Basics
  • Air-Sealing Tools and Materials
  • Foundations and Floors
  • Walls, Windows, and Doors
  • Attics and Roofs
Choosing Insulation
  • Insulation Basics
  • Material Choices
Installing Insulation
  • Insulating Attics and Roofs
  • Insulating Walls
  • Insulating Floors, Footings, and Slabs
  • Insulating Foundation Walls
Water Management
  • Water-Management Principles
  • Materials
  • Installation Methods

Fine Home Building

Newsletter Sign-up

  • Fine Homebuilding

    Home building tips, offers, and expert advice in your inbox.

  • Green Building Advisor

    Building science and energy efficiency advice, plus special offers, in your inbox.

  • Old House Journal

    Repair, renovation, and restoration tips, plus special offers, in your inbox.

Signing you up...

This site is protected by reCAPTCHA and the Google Privacy Policy and Terms of Service apply.
See all newsletters

Follow

  • Fine Homebuilding

    Dig into cutting-edge approaches and decades of proven solutions with total access to our experts and tradespeople.

    Start Free Trial Now
    • Facebook
    • Instagram
    • X
    • LinkedIn
  • GBA Prime

    Get instant access to the latest developments in green building, research, and reports from the field.

    Start Free Trial Now
    • Facebook
    • YouTube
  • Old House Journal

    Learn how to restore, repair, update, and decorate your home.

    Subscribe Now
    • Facebook
    • Instagram
    • X

Membership & Magazine

  • Online Archive
  • Start Free Trial
  • Magazine Subscription
  • Magazine Renewal
  • Gift a Subscription
  • Customer Support
  • Privacy Preferences
  • About
  • Contact
  • Advertise
  • Careers
  • Terms of Use
  • Site Map
  • Do not sell or share my information
  • Privacy Policy
  • Accessibility
  • California Privacy Rights

© 2025 Active Interest Media. All rights reserved.

Fine Homebuilding receives a commission for items purchased through links on this site, including Amazon Associates and other affiliate advertising programs.

  • Home Group
  • Antique Trader
  • Arts & Crafts Homes
  • Bank Note Reporter
  • Cabin Life
  • Cuisine at Home
  • Fine Gardening
  • Fine Woodworking
  • Green Building Advisor
  • Garden Gate
  • Horticulture
  • Keep Craft Alive
  • Log Home Living
  • Military Trader/Vehicles
  • Numismatic News
  • Numismaster
  • Old Cars Weekly
  • Old House Journal
  • Period Homes
  • Popular Woodworking
  • Script
  • ShopNotes
  • Sports Collectors Digest
  • Threads
  • Timber Home Living
  • Traditional Building
  • Woodsmith
  • World Coin News
  • Writer's Digest
Active Interest Media logo
X
X
This is a dialog window which overlays the main content of the page. The modal window is a 'site map' of the most critical areas of the site. Pressing the Escape (ESC) button will close the modal and bring you back to where you were on the page.

Main Menu

  • How-To
  • Design
  • Tools & Materials
  • Video
  • Blogs
  • Forum
  • Project Guides
  • Reader Projects
  • Magazine
  • Members
  • FHB House

Podcasts

  • FHB Podcast
  • ProTalk

Webinars

  • Upcoming and On-Demand

Podcasts

  • FHB Podcast
  • ProTalk

Webinars

  • Upcoming and On-Demand

Popular Topics

  • Kitchens
  • Business
  • Bedrooms
  • Roofs
  • Architecture and Design
  • Green Building
  • Decks
  • Framing
  • Safety
  • Remodeling
  • Bathrooms
  • Windows
  • Tilework
  • Ceilings
  • HVAC

Magazine

  • Current Issue
  • Past Issues
  • Magazine Index
  • Subscribe
  • Online Archive
  • Author Guidelines

All Access

  • Member Home
  • Start Free Trial
  • Gift Membership

Online Learning

  • Courses
  • Project Guides
  • Reader Projects
  • Podcast

More

  • FHB Ambassadors
  • FHB House
  • Customer Support

Account

  • Log In
  • Join

Newsletter

Get home building tips, offers, and expert advice in your inbox

Signing you up...

This site is protected by reCAPTCHA and the Google Privacy Policy and Terms of Service apply.
See all newsletters
See all newsletters

Follow

  • X
  • YouTube
  • instagram
  • facebook
  • pinterest
  • Tiktok

Join All Access

Become a member and get instant access to thousands of videos, how-tos, tool reviews, and design features.

Start Your Free Trial

Subscribe

FHB Magazine

Start your subscription today and save up to 70%

Subscribe

We hope you’ve enjoyed your free articles. To keep reading, become a member today.

Get complete site access to expert advice, how-to videos, Code Check, and more, plus the print magazine.

Start your FREE trial

Already a member? Log in

Privacy Policy Update

We use cookies, pixels, script and other tracking technologies to analyze and improve our service, to improve and personalize content, and for advertising to you. We also share information about your use of our site with third-party social media, advertising and analytics partners. You can view our Privacy Policy here and our Terms of Use here.

Cookies

Analytics

These cookies help us track site metrics to improve our sites and provide a better user experience.

Advertising/Social Media

These cookies are used to serve advertisements aligned with your interests.

Essential

These cookies are required to provide basic functions like page navigation and access to secure areas of the website.

Delete My Data

Delete all cookies and associated data