FHB Logo Facebook LinkedIn Email Pinterest Twitter X Instagram Tiktok YouTube Plus Icon Close Icon Navigation Search Icon Navigation Search Icon Arrow Down Icon Video Guide Icon Article Guide Icon Modal Close Icon Guide Search Icon Skip to content
Subscribe
Log In
  • How-To
  • Design
  • Tools & Materials
  • Restoration
  • Videos
  • Blogs
  • Forum
  • Magazine
  • Members
  • FHB House
  • Podcast
Log In
Energy-Smart Details

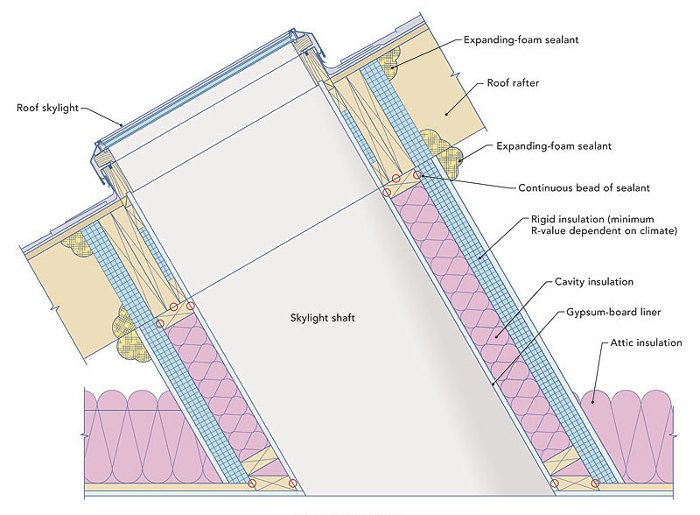
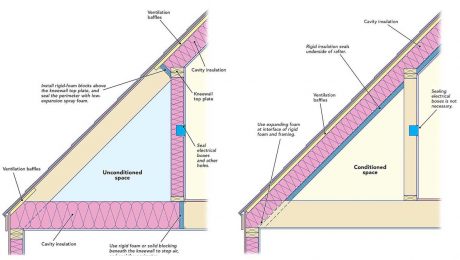
Insulated Skylight Shaft

If you have or plan to install a skylight in your home, get the insulation details right to avoid problems with comfort and condensation.

By Martin Holladay Issue 240 - Dec 2013/Jan 2014
  • X
  • facebook
  • linkedin
  • pinterest
  • email
  • add to favorites Log in or Sign up to save your favorite articles
Seal it Tight and Insulate Right
If the skylight shaft is insulated with an air-permeable insulation such as fiberglass or cellulose, the insulation must be enclosed on the attic side with a durable layer that acts as an air barrier. While it’s possible to use drywall or OSB for this layer, it makes more sense to use rigid foam, because the foam raises the R-value of the entire assembly.
Steve Baczek, Architect

If you install a skylight in the roof over an attic, you’ll need to build a shaft to connect the skylight with the ceiling below.

Skylight-shaft walls are sometimes vertical, but more typically, they are sloped to create a splayed opening. Because the shaft walls separate the interior of the house from an unconditioned attic, it’s essential that they be well insulated. If the skylight shaft is splayed, it makes more sense to insulate the shaft like a roof rather than a wall. In other words, the higher the R-value of the insulation, the better.

In the past, builders paid little attention to sealing air leaks in skylight shafts, and insulation usually consisted of a few fiberglass batts. As time passed, many of these batts flopped over backward onto the attic floor. Such a casual approach to skylight-shaft insulation is no longer acceptable.

Skylight shafts must be built with close attention to airtightness If there are air leaks in the shaft, the house will have a steady stream of warm air escaping all winter long. The shaft will act like a chimney, robbing heat from the house.

Enclose fiberglass batts

Of all the various types of insulation used in houses, fiberglass batts perform the worst. Unlike blown-in insulation, batts don’t conform well to irregular cavities, and unlike foam insulation products, fiberglass insulation is air-permeable. If you want to use fiberglass batts in spite of these disadvantages, you need to pay close attention to installation details. First, frame the shaft with 2x6s instead of 2x4s to provide more room for insulation. Cut the batts precisely, and install them with care so that all the framing cavities are completely filled with insulation, without any voids or areas of compression.

To perform well, fiberglass batts need to be enclosed by an air barrier on all six sides. The shaft framing must include a top plate and a bottom plate, and any cracks or penetrations in the plates must be caulked. To complete the air barrier on the attic side of the studs, it’s essential to install a layer of plywood, OSB, drywall, Thermo-ply, or rigid foam. This layer should be installed in an airtight manner, with all seams caulked or taped.

Boost R-value

Rigid foam is the best choice for the attic-side air barrier. Foam insulation improves the thermal performance of the assembly in two ways: by adding R-value and by interrupting thermal bridging through the studs. To avoid moisture problems, the rigid foam must be thick enough to keep the stud cavities above the dew point in winter. That means that you’ll need at least 3 in. of rigid foam in northern Minnesota or northern Maine (climate zone 7); at least 2 in. in Montana and Vermont (climate zone 6); and at least 1-1⁄2 in. in Nevada, Nebraska, and Massachusetts (climate zone 5). In climate zone 4 and warmer zones, you don’t have to worry about the thickness of the foam layer.

Any of the three main types of rigid foam—extruded polystyrene (XPS), expanded polystyrene (EPS), or polyisocyanurate— work in this location. All rigid-foam seams should be sealed with caulk, canned spray foam, or a high-quality tape. By far, the easiest type of foam to tape is foil faced polyisocyanurate, which can be sealed with ordinary housewrap tape.

Because rigid foam performs so well, many builders skip the fiberglass and rely solely on rigid foam to insulate a skylight shaft. As long as the rigid-foam layer is thick enough to meet at least minimum code requirements for walls—exceeding minimum code values is even better—this is an excellent approach. If the stud bays remain empty, make sure that the cavities are sealed against air leakage on all sides, and that there are no breaks in the continuity of the rigid foam.

It’s also possible to insulate attic shafts with cellulose, blown-in fiberglass, or mineral-wool batts. Like fiberglass batts, these types of insulation are airpermeable, so they need to be enclosed with an air barrier on all six sides.

If you insulate a skylight shaft with spray polyurethane foam, you can use either open-cell or closed-cell foam. Spray foam works well in this location, because it acts as an air barrier as well as an insulation layer.

Most building codes require that any spray-foam insulation or rigid-foam insulation that faces an attic be covered by a layer of drywall for fire protection. In some jurisdictions, however, building inspectors make an exception for Thermax, a brand of polyisocyanurate foam that has passed fire-safety tests. If you’re using rigid foam and if your inspector allows exposed Thermax in attics, that’s probably the brand you’ll want to use.

Insulating the rough opening

Skylight-shaft walls extend from the ceiling drywall or the top of the ceiling joists to the skylight rough opening. In most cases, the skylight  rough opening will be framed with double 2x10s or double 2x12s. The rough opening should be insulated by installing rigid foam on the attic side of the framing. The foam can be attached with foam-compatible construction adhesive or cap nails. Of course, the thicker the foam, the better.

After insulating a skylight shaft, you should verify that the insulation layer and the air barrier are continuous with the insulation and the air  barrier below the shaft and above the shaft. The top of the skylight insulation should maintain continuity with the rigid foam around the rough  opening. Patch any gaps in the thermal barrier or the air barrier with canned spray foam.

Energy Star-home requirements

Builders of Energy Star homes are required to comply with the requirements spelled out in the Thermal Bypass Checklist. This checklist calls for skylight-shaft walls to have “continuous top and bottom plates or sealed blocking,” the shaft walls to be “fully insulated,” and the insulation to be “aligned with an air barrier at both the interior and exterior.”

The Energy Star-home program recommends, but does not require, that air barriers be made of a rigid material. In other words, Thermo-ply is better than housewrap.

More details

Some of these details are new to Green Building Advisor’s energy-smart collection. GBA Pro members get full access to the detail library, which contains almost 2500 details on building better, tighter, more-energy-efficient houses. To browse through the collection, go to GreenBuildingAdvisor.com/detail-drawings.

Fine Homebuilding Recommended Products

Fine Homebuilding receives a commission for items purchased through links on this site, including Amazon Associates and other affiliate advertising programs.

Roofing Gun

This lightweight, pneumatic roofing nailer is capable of driving ¾-in to 1¾-in coil roofing nails and has a depth adjustment wheel to dial in nailing depth on the various shingle types you're likely to encounter.
Buy at Amazon

Flashing Boot Repair

Prolonged exposure to the sun and weather can compromise the rubber gasket on standard vent flashing. Use this to quickly and permanently fix failed seals or to help protect the gasket in new-construction applications.
Buy at Amazon

Peel & Stick Underlayment

Often required by code, this durable, slip resistant, self-sealing, and self-adhered roofing underlayment is easy to install and ensures maximum protection along roof eaves, rakes, and valleys.
Buy at Amazon

Sign up for eletters today and get the latest how-to from Fine Homebuilding, plus special offers.

Signing you up...

This site is protected by reCAPTCHA and the Google Privacy Policy and Terms of Service apply.
See all newsletters
See all newsletters
×

Get home building tips, offers, and expert advice in your inbox

Signing you up...

This site is protected by reCAPTCHA and the Google Privacy Policy and Terms of Service apply.
See all newsletters
See all newsletters

New Feature

Fine Homebuilding Forums

Ask questions, offer advice, and share your work

  • X
  • facebook
  • linkedin
  • pinterest
  • email
  • add to favorites Log in or Sign up to save your favorite articles

View Comments

  1. MartaSNeal | Jul 13, 2018 02:07pm | #1

    Insulation is the best way to secure your house from climate change.

  2. Suburbanguy | Nov 30, 2019 03:53pm | #2

    I love these wonderful detailed drawings that are never followed in the field. Slap it up and cover it up before anyone can inspect it. ...and that's assuming the general or building inspector knows 1. how it's supposed to be installed and 2. will actually inspect it. ..same thing with window flashing details, zip system, IBS2000 load sharing connectors (special diagonal bracing). About 20 years ago, I even discovered a crack in a backsplash that the installer tried to cover up with caulk, hoping we wouldn't find it.
    Is it just me or...? People will accept any sort of a thrown together multi-hundred thousand dollar home, but a car that will be in the scrap yard in 15 years has to be absolutely perfect in every way.

Log in or create an account to post a comment.

Sign up Log in

Become a member and get full access to FineHomebuilding.com

More Energy-Smart Details

View All
  • Three Ways to Insulate Basement Walls
  • Five Rules for Wall Design
  • Two Ways to Insulate an Old Cape
  • How to Reduce Heat Loss Through Footings
View All

Up Next

Video Shorts

Featured Story

A Classic Paint Sprayer Gets a Thoughtful Refresh

The Titan Impact X 440 offers great coverage with minimal overspray.

Featured Video

Video: Build a Fireplace, Brick by Brick

Watch mason Mike Mehaffey construct a traditional-style fireplace that burns well and meets current building codes.

Related Stories

  • FHB Podcast Segment: Embodied Greenhouse Gas Emissions and the Building Codes
  • FHB Podcast Segment: Roofing on Commercial vs. Residential Buildings
  • How Trump's “Big Beautiful Bill” Will Affect the Inflation Reduction Act
  • A Drip-Free, Through-Window Heat Pump

Discussion Forum

Recent Posts and Replies

  • |
  • |
  • |
  • |
  • |
  • |
View More Create Post

Highlights

Fine Homebuilding All Access
Fine Homebuilding Podcast
Tool Tech
Plus, get an extra 20% off with code GIFT20

Video

View All Videos
  • FHB Podcast Segment: Embodied Greenhouse Gas Emissions and the Building Codes
  • A Drip-Free, Through-Window Heat Pump
  • An Impressive Air-to-Water Heat Pump
  • FHB Podcast Segment: Are Single-Room ERVs the Answer?
View All

Energy Efficiency

View All Energy Efficiency Articles
  • How Trump's “Big Beautiful Bill” Will Affect the Inflation Reduction Act
  • Old House Air-Sealing Basics
  • An Impressive Air-to-Water Heat Pump
View All Energy Efficiency Articles

Fine Homebuilding Magazine

  • Issue 332 - July 2025
    • Custom Built-ins With Job-Site Tools
    • Fight House Fires Through Design
    • Making the Move to Multifamily
  • Issue 331 - June 2025
    • A More Resilient Roof
    • Tool Test: You Need a Drywall Sander
    • Ducted vs. Ductless Heat Pumps
  • Issue 330 - April/May 2025
    • Deck Details for Durability
    • FAQs on HPWHs
    • 10 Tips for a Long-Lasting Paint Job
  • Issue 329 - Feb/Mar 2025
    • Smart Foundation for a Small Addition
    • A Kominka Comes West
    • Making Small Kitchens Work
  • Issue 328 - Dec/Jan 2025
    • How a Pro Replaces Columns
    • Passive House 3.0
    • Tool Test: Compact Line Lasers

Fine Home Building

Newsletter Sign-up

  • Fine Homebuilding

    Home building tips, offers, and expert advice in your inbox.

  • Green Building Advisor

    Building science and energy efficiency advice, plus special offers, in your inbox.

  • Old House Journal

    Repair, renovation, and restoration tips, plus special offers, in your inbox.

Signing you up...

This site is protected by reCAPTCHA and the Google Privacy Policy and Terms of Service apply.
See all newsletters

Follow

  • Fine Homebuilding

    Dig into cutting-edge approaches and decades of proven solutions with total access to our experts and tradespeople.

    Start Free Trial Now
    • Facebook
    • Instagram
    • X
    • LinkedIn
  • GBA Prime

    Get instant access to the latest developments in green building, research, and reports from the field.

    Start Free Trial Now
    • Facebook
    • YouTube
  • Old House Journal

    Learn how to restore, repair, update, and decorate your home.

    Subscribe Now
    • Facebook
    • Instagram
    • X

Membership & Magazine

  • Online Archive
  • Start Free Trial
  • Magazine Subscription
  • Magazine Renewal
  • Gift a Subscription
  • Customer Support
  • Privacy Preferences
  • About
  • Contact
  • Advertise
  • Careers
  • Terms of Use
  • Site Map
  • Do not sell or share my information
  • Privacy Policy
  • Accessibility
  • California Privacy Rights

© 2025 Active Interest Media. All rights reserved.

Fine Homebuilding receives a commission for items purchased through links on this site, including Amazon Associates and other affiliate advertising programs.

  • Home Group
  • Antique Trader
  • Arts & Crafts Homes
  • Bank Note Reporter
  • Cabin Life
  • Cuisine at Home
  • Fine Gardening
  • Fine Woodworking
  • Green Building Advisor
  • Garden Gate
  • Horticulture
  • Keep Craft Alive
  • Log Home Living
  • Military Trader/Vehicles
  • Numismatic News
  • Numismaster
  • Old Cars Weekly
  • Old House Journal
  • Period Homes
  • Popular Woodworking
  • Script
  • ShopNotes
  • Sports Collectors Digest
  • Threads
  • Timber Home Living
  • Traditional Building
  • Woodsmith
  • World Coin News
  • Writer's Digest
Active Interest Media logo
X
X
This is a dialog window which overlays the main content of the page. The modal window is a 'site map' of the most critical areas of the site. Pressing the Escape (ESC) button will close the modal and bring you back to where you were on the page.

Main Menu

  • How-To
  • Design
  • Tools & Materials
  • Video
  • Blogs
  • Forum
  • Project Guides
  • Reader Projects
  • Magazine
  • Members
  • FHB House

Podcasts

  • FHB Podcast
  • ProTalk

Webinars

  • Upcoming and On-Demand

Podcasts

  • FHB Podcast
  • ProTalk

Webinars

  • Upcoming and On-Demand

Popular Topics

  • Kitchens
  • Business
  • Bedrooms
  • Roofs
  • Architecture and Design
  • Green Building
  • Decks
  • Framing
  • Safety
  • Remodeling
  • Bathrooms
  • Windows
  • Tilework
  • Ceilings
  • HVAC

Magazine

  • Current Issue
  • Past Issues
  • Magazine Index
  • Subscribe
  • Online Archive
  • Author Guidelines

All Access

  • Member Home
  • Start Free Trial
  • Gift Membership

Online Learning

  • Courses
  • Project Guides
  • Reader Projects
  • Podcast

More

  • FHB Ambassadors
  • FHB House
  • Customer Support

Account

  • Log In
  • Join

Newsletter

Get home building tips, offers, and expert advice in your inbox

Signing you up...

This site is protected by reCAPTCHA and the Google Privacy Policy and Terms of Service apply.
See all newsletters
See all newsletters

Follow

  • X
  • YouTube
  • instagram
  • facebook
  • pinterest
  • Tiktok

Join All Access

Become a member and get instant access to thousands of videos, how-tos, tool reviews, and design features.

Start Your Free Trial

Subscribe

FHB Magazine

Start your subscription today and save up to 70%

Subscribe

We hope you’ve enjoyed your free articles. To keep reading, become a member today.

Get complete site access to expert advice, how-to videos, Code Check, and more, plus the print magazine.

Start your FREE trial

Already a member? Log in

Privacy Policy Update

We use cookies, pixels, script and other tracking technologies to analyze and improve our service, to improve and personalize content, and for advertising to you. We also share information about your use of our site with third-party social media, advertising and analytics partners. You can view our Privacy Policy here and our Terms of Use here.

Cookies

Analytics

These cookies help us track site metrics to improve our sites and provide a better user experience.

Advertising/Social Media

These cookies are used to serve advertisements aligned with your interests.

Essential

These cookies are required to provide basic functions like page navigation and access to secure areas of the website.

Delete My Data

Delete all cookies and associated data