FHB Logo Facebook LinkedIn Email Pinterest Twitter X Instagram Tiktok YouTube Plus Icon Close Icon Navigation Search Icon Navigation Search Icon Arrow Down Icon Video Guide Icon Article Guide Icon Modal Close Icon Guide Search Icon Skip to content
Subscribe
Log In
  • How-To
  • Design
  • Tools & Materials
  • Restoration
  • Videos
  • Blogs
  • Forum
  • Magazine
  • Members
  • FHB House
  • Podcast
Log In

Fine Homebuilding Project Guides

Insulation

Guide Home
  • Energy Efficiency
  • Air-Sealing
  • Choosing Insulation
  • Installing Insulation
  • Water Management
Energy-Smart Details

Insulating Attic Stairs

The hatch or staircase leading up to an unfinished attic can be a big energy leak. Here are a few tips for sealing it up.

By Martin Holladay Issue 241 - Feb/Mar 2014
  • X
  • facebook
  • linkedin
  • pinterest
  • email
  • add to favorites Log in or Sign up to save your favorite articles

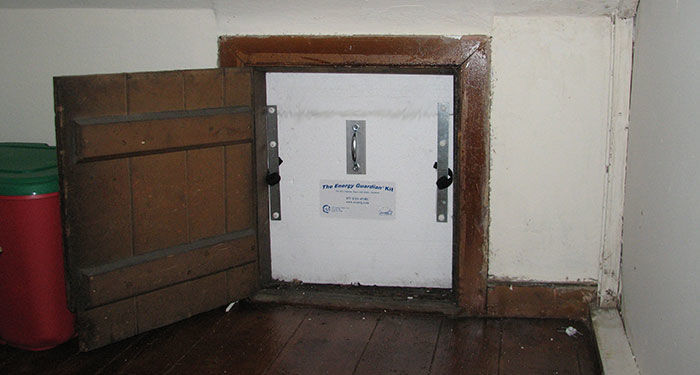
Better bought than built. A tight cap for pull-down attic stairs is hard to build. The weatherstripping details can be tough to execute, and the necessary weight of the hatch can be difficult to achieve. The Energy Guardian, shown here, costs about $185 plus shipping. ESS Energy Products (essnrg.com) also makes kits for kneewall access, walk-up stairways, and more.

Builders of energy-efficient homes often make attic access deliberately inconvenient—for example, by providing a small exterior door in the gable wall of the attic (accessible only with an extension ladder) rather than an interior attic hatch or stairs. That’s because both fixed and pull-down attic stairs present air-sealing and insulation challenges. It’s important to acknowledge the conflict between convenient attic access and energy efficiency. Although most homeowners want convenient access to their attic, it’s actually a bad idea to use an unconditioned attic for storage. If you have no other option, plan for storage by relocating insulation from the attic floor to the roof assembly, creating a conditioned attic.

Retrofit options

Most pull-down attic stairs are leaky and poorly insulated. You can remove the stairs and replace them with a smaller hatch. The hatch should be insulated with at least 6 in. of rigid foam, should have weatherstripping, and should be equipped with two latches that draw the hatch tightly closed.

Note that code requirements for hatches have recently been tightened. According to the 2009 IECC and IRC, “Access doors from conditioned spaces to unconditioned spaces … shall be weatherstripped and insulated to a level equivalent to … surrounding surfaces.” If you live in a climate zone where R-38 attic insulation is required, your access hatch also should be insulated to R-38.

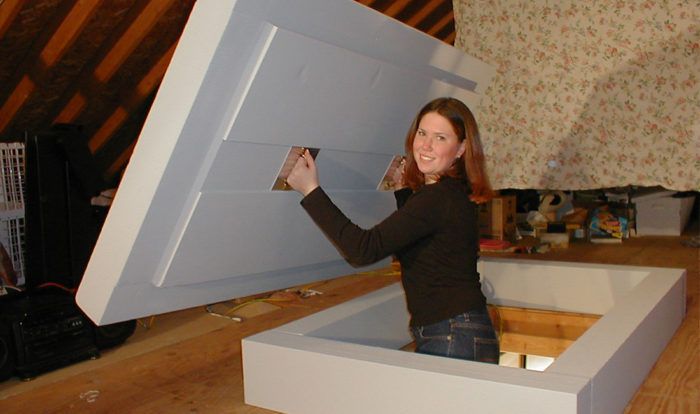
If you insist on keeping your pull-down stairs, you’ll need to purchase or make an insulated lid to cover the top of the stairs. Several manufacturers sell such lids; the best available product at this time appears to be the R-39 Energy Guardian Pull-Down Ladder Kit (photo above).

If you choose to build your own insulated lid, you’ll need to make a strong, airtight box out of thick rigid foam. The lid needs to be heavy enough to compress the weatherstripping at its base.

If your house has fixed stairs leading from a conditioned room to an unconditioned attic, you need to investigate whether the builder provided adequate insulation and air-barrier details. Your first question should be “Where is the air barrier?”

The usual location of the air barrier is at the base of the stairs. In this case, you’ll need to make sure that the door is insulated and weatherstripped. If you don’t want to buy an exterior door, you can attach a layer of rigid foam to the back of your existing door, and you can reduce air leaks by installing weatherstripping.

The two triangular walls on either side of the stairway need to be insulated. The underside of the attic stairs—the sloped ceiling created by the bottom of the stair stringers—also needs to be insulated and air sealed. This can be tricky; treads and risers usually leak air, and there isn’t much room above the sloped drywall to accommodate insulation. One approach is to remove the plaster or drywall under the stairs and to spray polyurethane foam against the treads and risers from below. Or, if the headroom is generous, it may be possible to install one or two layers of rigid foam in this location, followed by a new layer of drywall.

Some attic stairways lead to a small room that encloses the top of the stairway. In this case, there should be a door at the top of the stairs. This type of stairway is part of the conditioned space, and it is easier to insulate than one with the air barrier at the base of the stairs. First, make sure that the door is insulated and weatherstripped. Then check the walls and ceiling of the attic room to ensure they are well insulated. If necessary, install an attic-side air barrier (for example, sheets of foil-faced polyisocyanurate) at these locations to prevent air leaks and to improve the R-value of the insulated assemblies.

New construction details

If you are building a new house with stairs that lead from conditioned space to unconditioned space, you have a couple of options.

In most homes, the drywall is part of the air barrier. To maintain continuity of the air barrier above and below the stair stringers, it’s best to install some type of sheet good behind the stair stringers—usually a sloping band of 1⁄2-in. plywood—with an exposed lip above and below the stringers, in order to provide a surface to tape the drywall to. Another approach is to install a sloped 2×4 as blocking between the stringers and the studs; once the drywall is hung, the gap between the drywall and the 2×4 can be sealed with canned spray foam.

It’s best to insulate the walls on either side of the stairway before the stair stringers are installed. If the treads and risers separate conditioned space from unconditioned space, the underside of the stairs will need to be insulated—either with spray polyurethane foam or with a thick layer of rigid foam. In either case, pay attention to airbarrier continuity and thermal-barrier continuity at the edges of the sloped assembly.

Seal the gap behind the stringers

If there is a door at the bottom of your attic stairs that separates conditioned space from unconditioned space, then the stair assembly and adjacent walls need to be insulated and air-sealed. Because drywall typically is installed after the stairs are framed, you need to find a way to create a continuous air barrier up the walls. One way is to install 2×4 blocking behind the stringers. Once the drywall is installed, you can fill the gap with spray foam. The stairs themselves also need to be insulated, and the bottom of the stringers should be air-sealed with airtight drywall.

Requirements for Energy Star homes

Builders of Energy Star homes need to comply with the Thermal Bypass Checklist, a document that specifies air-sealing and insulation requirements for attic stairs. The EPA’s Thermal Bypass Checklist Guide includes these directions:

Staircases adjoining exterior walls, garages, or attics need complete air barriers throughout the framed assembly … A common area missing an air barrier at staircase walls occurs at small areas under enclosed landings or bottom stairs. Once framed, staircases can be difficult to complete with insulation and air barriers so it is important to coordinate details with the framing subcontractor …


  • Structural sheathing can be used to extend above and below stringers to allow for taping with joint compound.
  • Air barrier shall be fully aligned with insulation and any gaps are fully sealed with caulk or foam …

Similar to attic hatches, attic drop-down stairs represent very large thermal holes to the attic when not fully insulated and sealed … When insulating attic drop-down stairs, the insulation should not be installed between the steps … because it blocks the stairs themselves and is typically compressed in place, undermining its effective R-value …


  • Attic drop-down stair shall be fully gasketed for a snug fit. However, gaps in weatherstripping to accommodate hinge hardware shall be acceptable …
  • Factory made attic drop-down stair assemblies that are fully gasketed and include a rigid insulation panel much like an exterior insulated door are a great simple solution.

Photo: courtesy of ESS Energy Products.

Drawings: Steve Baczek, Architect.

Fine Homebuilding Recommended Products

Fine Homebuilding receives a commission for items purchased through links on this site, including Amazon Associates and other affiliate advertising programs.

Staple Gun

Although powered staplers are very popular, you still need a manual stapler on the job site. This staple gun from DEWALT® is reliable and easy to fire, reducing fatigue over prolonged use.
Buy at Amazon

Disposable Suit

This suit provides full body protection to help you stay clean from head to toe when installing insulation. We recommend wearing sweats underneath for additional coverage.
Buy at Amazon

Caulking Gun

It's important for any insulator to have a good caulking gun for air sealing or adhesives, and this one features a revolving frame that makes orienting the tip a breeze.
Buy at Amazon
Previous: Five Cathedral Ceilings That Work Next: Insulate a Cape Roof to Avoid Ice Dams

Guide

Insulation

Chapter

Installing Insulation

Sign up for eletters today and get the latest how-to from Fine Homebuilding, plus special offers.

Signing you up...

This site is protected by reCAPTCHA and the Google Privacy Policy and Terms of Service apply.
See all newsletters
See all newsletters

Log in or create an account to post a comment.

Sign up Log in

Become a member and get full access to FineHomebuilding.com

Insulation

Insulation

Trusted, comprehensive guidance from the pros for a home that is healthy, comfortable, and energy efficient

View Project Guide

View All Project Guides »

Become a member and get unlimited site access, including the Insulation Project Guide.

Start Free Trial

Energy Efficiency
  • Understanding Energy and Houses
  • Building Energy-Efficient Homes
Air-Sealing
  • Air-Sealing Basics
  • Air-Sealing Tools and Materials
  • Foundations and Floors
  • Walls, Windows, and Doors
  • Attics and Roofs
Choosing Insulation
  • Insulation Basics
  • Material Choices
Installing Insulation
  • Insulating Attics and Roofs
  • Insulating Walls
  • Insulating Floors, Footings, and Slabs
  • Insulating Foundation Walls
Water Management
  • Water-Management Principles
  • Materials
  • Installation Methods

Fine Home Building

Newsletter Sign-up

  • Fine Homebuilding

    Home building tips, offers, and expert advice in your inbox.

  • Green Building Advisor

    Building science and energy efficiency advice, plus special offers, in your inbox.

  • Old House Journal

    Repair, renovation, and restoration tips, plus special offers, in your inbox.

Signing you up...

This site is protected by reCAPTCHA and the Google Privacy Policy and Terms of Service apply.
See all newsletters

Follow

  • Fine Homebuilding

    Dig into cutting-edge approaches and decades of proven solutions with total access to our experts and tradespeople.

    Start Free Trial Now
    • Facebook
    • Instagram
    • X
    • LinkedIn
  • GBA Prime

    Get instant access to the latest developments in green building, research, and reports from the field.

    Start Free Trial Now
    • Facebook
    • YouTube
  • Old House Journal

    Learn how to restore, repair, update, and decorate your home.

    Subscribe Now
    • Facebook
    • Instagram
    • X

Membership & Magazine

  • Online Archive
  • Start Free Trial
  • Magazine Subscription
  • Magazine Renewal
  • Gift a Subscription
  • Customer Support
  • Privacy Preferences
  • About
  • Contact
  • Advertise
  • Careers
  • Terms of Use
  • Site Map
  • Do not sell or share my information
  • Privacy Policy
  • Accessibility
  • California Privacy Rights

© 2025 Active Interest Media. All rights reserved.

Fine Homebuilding receives a commission for items purchased through links on this site, including Amazon Associates and other affiliate advertising programs.

  • Home Group
  • Antique Trader
  • Arts & Crafts Homes
  • Bank Note Reporter
  • Cabin Life
  • Cuisine at Home
  • Fine Gardening
  • Fine Woodworking
  • Green Building Advisor
  • Garden Gate
  • Horticulture
  • Keep Craft Alive
  • Log Home Living
  • Military Trader/Vehicles
  • Numismatic News
  • Numismaster
  • Old Cars Weekly
  • Old House Journal
  • Period Homes
  • Popular Woodworking
  • Script
  • ShopNotes
  • Sports Collectors Digest
  • Threads
  • Timber Home Living
  • Traditional Building
  • Woodsmith
  • World Coin News
  • Writer's Digest
Active Interest Media logo
X
X
This is a dialog window which overlays the main content of the page. The modal window is a 'site map' of the most critical areas of the site. Pressing the Escape (ESC) button will close the modal and bring you back to where you were on the page.

Main Menu

  • How-To
  • Design
  • Tools & Materials
  • Video
  • Blogs
  • Forum
  • Project Guides
  • Reader Projects
  • Magazine
  • Members
  • FHB House

Podcasts

  • FHB Podcast
  • ProTalk

Webinars

  • Upcoming and On-Demand

Podcasts

  • FHB Podcast
  • ProTalk

Webinars

  • Upcoming and On-Demand

Popular Topics

  • Kitchens
  • Business
  • Bedrooms
  • Roofs
  • Architecture and Design
  • Green Building
  • Decks
  • Framing
  • Safety
  • Remodeling
  • Bathrooms
  • Windows
  • Tilework
  • Ceilings
  • HVAC

Magazine

  • Current Issue
  • Past Issues
  • Magazine Index
  • Subscribe
  • Online Archive
  • Author Guidelines

All Access

  • Member Home
  • Start Free Trial
  • Gift Membership

Online Learning

  • Courses
  • Project Guides
  • Reader Projects
  • Podcast

More

  • FHB Ambassadors
  • FHB House
  • Customer Support

Account

  • Log In
  • Join

Newsletter

Get home building tips, offers, and expert advice in your inbox

Signing you up...

This site is protected by reCAPTCHA and the Google Privacy Policy and Terms of Service apply.
See all newsletters
See all newsletters

Follow

  • X
  • YouTube
  • instagram
  • facebook
  • pinterest
  • Tiktok

Join All Access

Become a member and get instant access to thousands of videos, how-tos, tool reviews, and design features.

Start Your Free Trial

Subscribe

FHB Magazine

Start your subscription today and save up to 81%

Subscribe

We hope you’ve enjoyed your free articles. To keep reading, become a member today.

Get complete site access to expert advice, how-to videos, Code Check, and more, plus the print magazine.

Start your FREE trial

Already a member? Log in

Privacy Policy Update

We use cookies, pixels, script and other tracking technologies to analyze and improve our service, to improve and personalize content, and for advertising to you. We also share information about your use of our site with third-party social media, advertising and analytics partners. You can view our Privacy Policy here and our Terms of Use here.

Cookies

Analytics

These cookies help us track site metrics to improve our sites and provide a better user experience.

Advertising/Social Media

These cookies are used to serve advertisements aligned with your interests.

Essential

These cookies are required to provide basic functions like page navigation and access to secure areas of the website.

Delete My Data

Delete all cookies and associated data