FHB Logo Facebook LinkedIn Email Pinterest Twitter X Instagram Tiktok YouTube Plus Icon Close Icon Navigation Search Icon Navigation Search Icon Arrow Down Icon Video Guide Icon Article Guide Icon Modal Close Icon Guide Search Icon Skip to content
Subscribe
Log In
  • How-To
  • Design
  • Tools & Materials
  • Restoration
  • Videos
  • Blogs
  • Forum
  • Magazine
  • Members
  • FHB House
  • Podcast
Log In
Energy-Smart Details

How to Insulate Your Rim Joists

Use spray foam or rigid foam to insulate and air-seal this commonly ignored part of the house

By Martin Holladay Issue 238 - Oct/Nov 2013
  • X
  • facebook
  • linkedin
  • pinterest
  • email
  • add to favorites Log in or Sign up to save your favorite articles

If you want to improve the energy performance of your house, you should probably start by air sealing and insulating your attic. On many older homes, this work was done poorly, or not at all, and it will have more of an impact on your energy consumption and utility bills than most other energy upgrades. Next, look for the big air leaks, and seal them. For example, chases and soffits are often acting as chimneys that exhaust the conditioned air that we want to keep in our homes. This is easily remedied with some air sealing work. You can take a look inside your walls, to see what type of insulation you have, and consider a retrofit. And you can head downstairs and air seal and insulate your basement. This work will likely include upgrading the insulation at the rim joist.

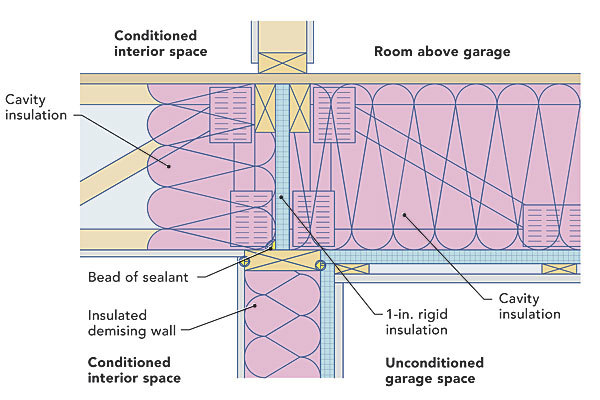
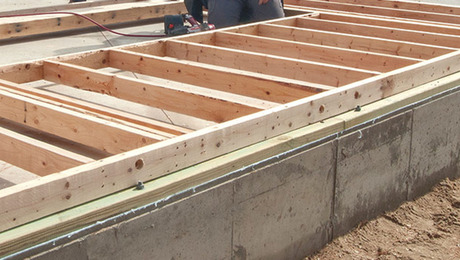
In older homes, rim joists (also called band joists) are often uninsulated, even though the only materials that likely separate them from outdoor air are sheathing and siding. Rim joists are above grade, so it makes sense to insulate the joists to the same level as above-grade walls. At the rim joist area, many building components come together—the foundation wall, the mudsill, the rim joist, the subfloor—so it’s also important to seal all cracks against air leakage.

The time-honored practice of insulating rim joists with fiberglass batts is no longer recommended. Because fiberglass batts are air permeable, they do nothing to prevent warm, humid interior air from contacting the rim joists. During the winter, when the rim joists are cold, condensation can cause mold and then rot.

To prevent these problems, only air impermeable insulation—either rigid foam or spray polyurethane foam should be used to insulate the interior of a rim joist. Two-story homes usually have another ring of rim joists above the first-floor ceiling. If you need to insulate these rim joists, it’s best to hire a cellulose-insulation contractor.

Rigid foam is affordable

If you’re ready to insulate the rim joists in your basement or crawlspace, you have to decide between rigid foam and spray foam. Using rigid foam keeps the material costs low, but it also requires more labor than using spray foam. Rigid foam also has a few other downsides: Compared to spray foam, it’s harder to install in awkward areas (for example, in a tight space where a rim joist is close to another parallel joist). Rigid foam is also fussy to install if the rim joists are the site of lots of wiring and pipe penetrations.

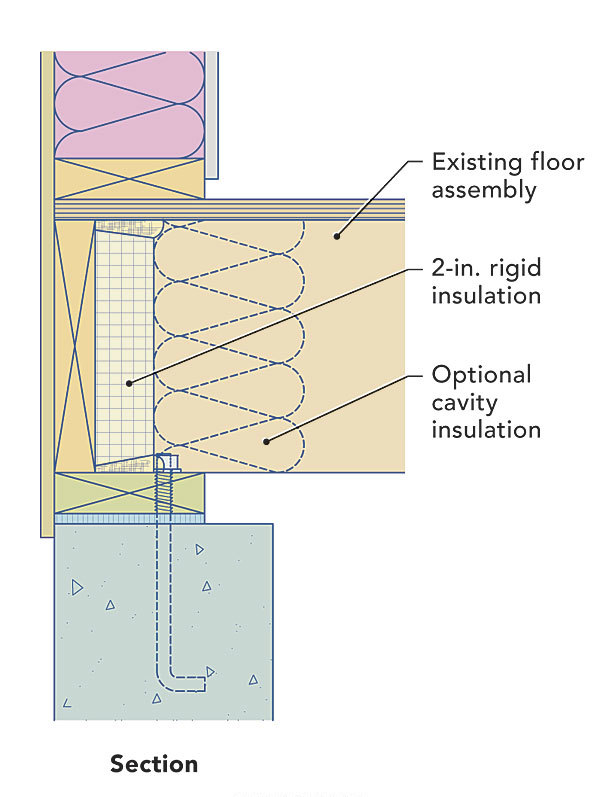
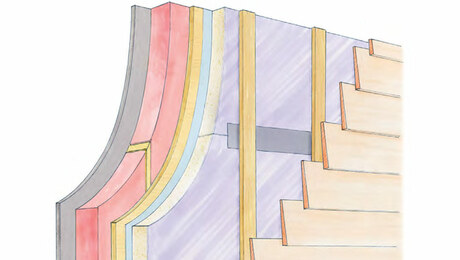
Any of the three common types of rigid foam—polyisocyanurate, expanded polystyrene (EPS), or extruded polystyrene (XPS)—can be installed against a rim joist. Polyisocyanurate is considered the most environmentally friendly of the three foam types; it has an R-value of between R-6 and R-6.5 per in. In colder climate zones, it’s a good idea to install at least 3 in. to 4 in. of rigid foam, either in a single layer or in multiple layers. (For a less pricey approach, you can install 2 in. of rigid foam and a layer of fiberglass insulation.) In warmer climates, 2 in. of foam may be enough.

To ensure that humid indoor air won’t reach the cold rim joist, the crack at the perimeter of each piece of foam (and at any penetrations) should be sealed with caulk or canned spray foam. If you use canned spray foam, you may want to buy a few lengths of flexible vinyl tubing with a slightly larger diameter than the plastic nozzle that comes with the can. This will make it easier to reach awkward corners. Discard the vinyl tubing when it gets clogged.

Spray foam insulates and seals

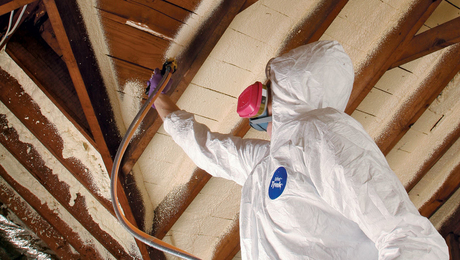
One advantage of using spray foam to insulate rim joists—an approach sometimes called the critical-seal method—is that a single product performs two tasks: sealing air leaks and insulating. In mild climate zones, either open-cell spray foam or closed-cell spray foam will work; however, in climate zone 6 and colder zones, it’s safer to use closed-cell spray foam.

Unless you hire a spray foam contractor for the job, you’ll probably be buying a two-component spray-foam kit. These kits are available at most lumberyards; expect to pay from $320 to $360 for a 200-bd.-ft. kit. If you want to install 3 in. of foam in an area that measures 1 ft. high by 130 ft. long, you’ll need about 400 bd. ft. of spray foam. Once cured, this type of spray foam has an R-value of about R-6.5 per inch. (Most two-component spray-foam kits use closed-cell foam.)

If your basement is cool, store a spray foam kit in a warm location for 24 hours before you begin. Be careful; uncured spray foam is messy. If you get uncured spray foam on your skin, you won’t be able to wash it off. If you get it on objects in the basement, the foam may be impossible to remove. Before spraying, clear movable objects from the work area, and use a tarp to protect things that can’t be moved. Wear a respirator, rubber gloves, goggles, a cheap hat, and either a Tyvek suit or old clothes.

Seal rigid foam in place

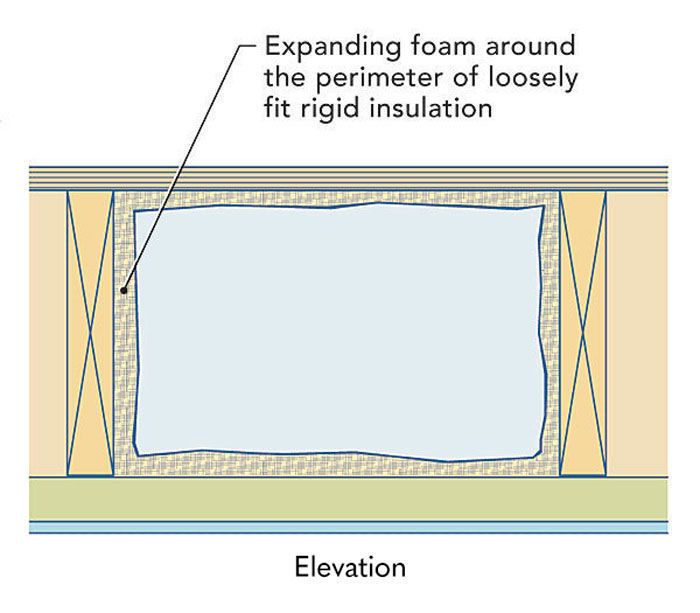
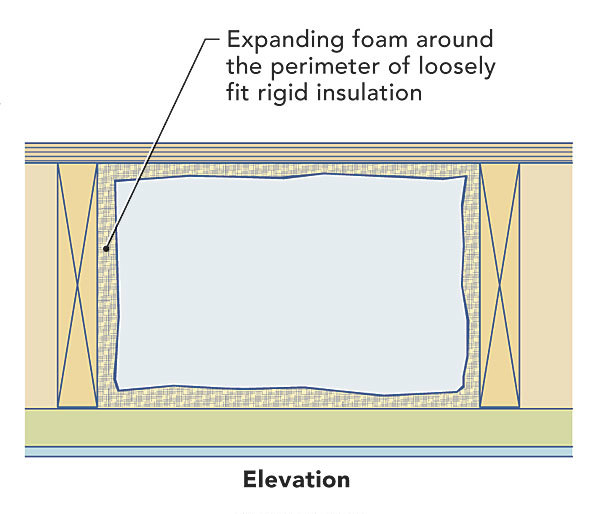
Fiberglass batts should never be installed near a rim joist unless the rim joist is first insulated with at least 2 in. of rigid foam or spray foam. The edges of each piece of rigid foam should be carefully sealed with caulk or canned spray foam. If you’re using canned spray foam, you’ll find that wide cracks are easier to seal than narrow ones, so it’s a good idea to cut the rectangles a little small.

Seal rigid foam in place Insulating Rim Joists

Hit everything with spray foam

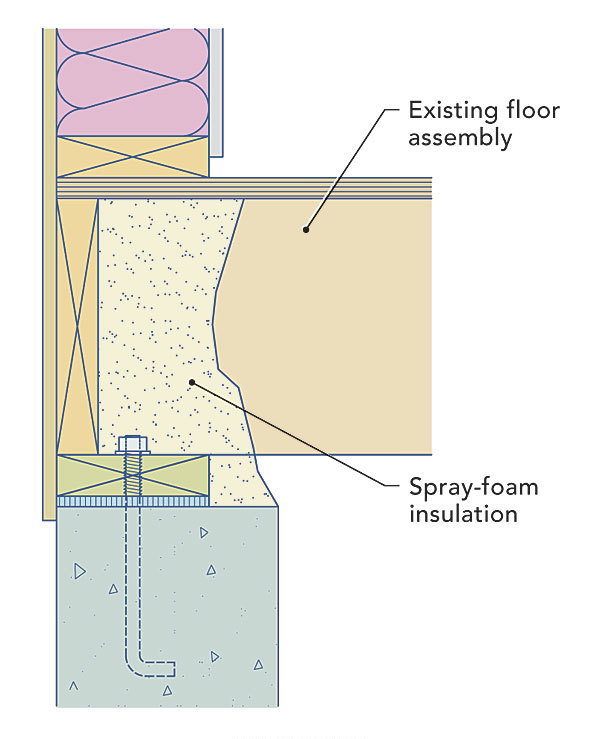
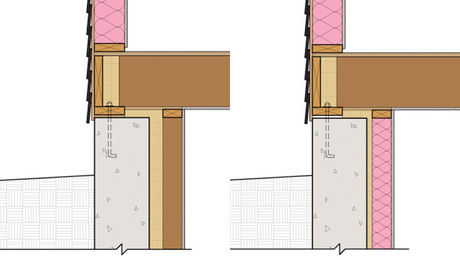
To create an effective air barrier, spray foam should extend from the top of the concrete all the way to the subfloor. For good thermal performance, the foam should cover all of the exposed concrete at the top of the wall.

Hit everything with spray foam

Don’t forget the garage rim

If the floor assembly penetrates the air barrier between a house and an attached garage, rectangles of rigid foam should be installed between each joist to prevent air leaks. Each rectangle needs to be sealed at the perimeter with caulk or canned spray foam.

Don’t forget the garage rim

What the code says

Most building codes require rigid foam to be protected with a layer of 1⁄2-in. drywall as a thermal barrier. The drywall can be screwed to the rim joist through the foam.

Dow Thermax polyisocyanurate, one type of rigid foam, has a facing that has passed fire-safety tests. That means that most building inspectors don’t require Thermax to be protected with a drywall layer, making it a good choice for this application.

Spray-foam requirements differ from those for rigid foam. As long as your cured spray foam is no thicker than 3-1⁄4 in., the International Residential Code (IRC) allows spray foam at the rim joist area to be left exposed, without any protective drywall. The relevant provisions can be found in section R314.5.11 of the 2006 IRC and in section R316.5.11 of the 2009 IRC.

More details online

Some of these details are new to Green Building Advisor’s energy-smart collection. GBA Pro members get full access to the detail library, which contains almost 2500 details on building better, tighter, more-energy-efficient houses. To browse through the collection, go to GreenBuildingAdvisor.com/detail-drawings.

Drawings: Steve Baczek, Architect. Photo: courtesy of Emercor.

Fine Homebuilding Recommended Products

Fine Homebuilding receives a commission for items purchased through links on this site, including Amazon Associates and other affiliate advertising programs.

Utility Knife

This utility knife is well-made and comes in handy when cutting rigid foam insulation. You can extend the snap blade to cut through a 2-inch foam board.
Buy at Amazon

Insulation Knife

If you like insulating with mineral wool, this knife makes cuts that are clean, neat, and easy — it's much better than a utility knife which can be slow and messy.
Buy at Amazon

Staple Gun

Although powered staplers are very popular, you still need a manual stapler on the job site. This staple gun from DEWALT® is reliable and easy to fire, reducing fatigue over prolonged use.
Buy at Amazon

Sign up for eletters today and get the latest how-to from Fine Homebuilding, plus special offers.

Signing you up...

This site is protected by reCAPTCHA and the Google Privacy Policy and Terms of Service apply.
See all newsletters
See all newsletters
×

Get home building tips, offers, and expert advice in your inbox

Signing you up...

This site is protected by reCAPTCHA and the Google Privacy Policy and Terms of Service apply.
See all newsletters
See all newsletters

New Feature

Fine Homebuilding Forums

Ask questions, offer advice, and share your work

  • X
  • facebook
  • linkedin
  • pinterest
  • email
  • add to favorites Log in or Sign up to save your favorite articles

View Comments

  1. Stivergirl | Aug 19, 2016 12:51pm | #1

    We are in the process of building a new new home. Basement floor will be poured in a few days. We plan on using closed cell foam for the basement walls and I just came across this article by EMECOLE stating that new research shows that closed cell is a "grave" mistake because contractors spray the sill plate and rim joist with it. They say that's a problem because the foundation sucks up water from the ground which then is drawn into those wood components and if covered in closed cell foam they can't breathe or dry out, causing mold and rot. Are they just promoting open cell foam, or is this true?

  2. MartinHolladay_GBA | Aug 22, 2016 10:14am | #2

    Strivergirl,
    If your home has a layer of sill-seal between the foundation wall and the mudsill -- most newer homes do -- then the information you read does not apply. It's false.

    If you have an older home without any sill-seal, the information is partially true. Insulating a rim joist on the interior will reduce the ability of the rim joist to dry to the interior. In most older homes, the benefit of the insulation outweighs the risk.

    The riskiest insulation jobs are on homes where the rim joist is close to the exterior grade, and the rim joist is shaded by bushes. Less risky jobs are those where the rim joists is at least 8 inches above the exterior grade, and the exterior is exposed to sunlight and air.

  3. Stivergirl | Aug 22, 2016 12:41pm | #3

    Thank you. While we're on this subject, we plan on using closed cell spray foam on the interior walls and I think the builder is planning on using Tyvek on the exterior. Is that ok?

  4. ecodude | Dec 01, 2016 11:07pm | #4

    Ok, enough of the foam talk, I would use rigid Roxul comfortboard IS or R22 comfortbat in the rim joist, caulk the rim joist first then cut the mineral wool with a serated knife or bread knife and friction fit it in!
    See: https://www.youtube.com/watch?v=JC3f9M1y7tI

  5. ecodude | Feb 01, 2018 08:48pm | #5

    I'm sure that Stivergirl has already gone ahead with her plans above...however, no foam and no Tyvek please, tyvek sucks, literally! (Commercial version better) Foam, thats a poor choise as well, stick with the first comment, caulk-cut-friction fit in with Rozul mineral wool!

  6. user-7368408 | Mar 07, 2019 02:15pm | #6

    The above examples assume there is no rigid insulation over the wall sheathing. When this is the case, is it best to use a batt insulation to mimic what is done in the wall cavity above it? Would sandwiching the sheathing with rigid insulation create any problems?

  7. lloydgack | Sep 09, 2019 12:28pm | #7

    Hello
    I'll be using 2" polyiso pieces sealed all around by spray foam to insulate my rim joists.
    Should the polyiso be pushed in as far as it can go or should i leave a bit of an air gap using some sort of spacer?
    Thank u

Log in or create an account to post a comment.

Sign up Log in

Become a member and get full access to FineHomebuilding.com

More Energy-Smart Details

View All
  • Three Ways to Insulate Basement Walls
  • Five Rules for Wall Design
  • Two Ways to Insulate an Old Cape
  • How to Reduce Heat Loss Through Footings
View All

Up Next

Video Shorts

Featured Story

A New Approach for Millwork Finishes

The LED-cure products from LED Coating Solutions offer a fast-curing, zero-VOC finish that works well for trim and cabinetry in small shop settings.

Featured Video

SawStop's Portable Tablesaw is Bigger and Better Than Before

The 10-in. Jobsite Saw PRO has a wider table, a new dust-control port, and a more versatile fence, along with the same reliable safety mechanism included in all SawStop tablesaws.

Related Stories

  • A Practical Approach to Exterior Insulation
  • FHB Podcast Segment: Designing and Building an Efficient Slab-On-Grade Home
  • Makeshift Foam Tip for Tight Spots
  • Insulation Shield for Wafer Lights

Discussion Forum

Recent Posts and Replies

  • |
  • |
  • |
  • |
  • |
  • |
View More Create Post

Highlights

Fine Homebuilding All Access
Fine Homebuilding Podcast
Tool Tech
Plus, get an extra 20% off with code GIFT20

Video

View All Videos
  • FHB Podcast Segment: Designing and Building an Efficient Slab-On-Grade Home
  • FHB Podcast Segment: Sealing a Floor Cavity in a Slab-on-Grade House
  • Podcast 606: Foam Slabs, Gaps in Click Flooring, and Board and Batten Rainscreens
  • Podcast 587: Members-only Aftershow—Basement Flooring
View All

Insulation

View All Insulation Articles
  • Insulation Shield for Wafer Lights
  • Ranch Redux
  • Save Batt Bags for Reuse
View All Insulation Articles

Fine Homebuilding Magazine

  • Issue 331 - June 2025
    • A More Resilient Roof
    • Tool Test: You Need a Drywall Sander
    • Ducted vs. Ductless Heat Pumps
  • Issue 330 - April/May 2025
    • Deck Details for Durability
    • FAQs on HPWHs
    • 10 Tips for a Long-Lasting Paint Job
  • Issue 329 - Feb/Mar 2025
    • Smart Foundation for a Small Addition
    • A Kominka Comes West
    • Making Small Kitchens Work
  • Issue 328 - Dec/Jan 2024
    • How a Pro Replaces Columns
    • Passive House 3.0
    • Tool Test: Compact Line Lasers
  • Issue 327 - November 2024
    • Repairing Damaged Walls and Ceilings
    • Plumbing Protection
    • Talking Shop

Fine Home Building

Newsletter Sign-up

  • Fine Homebuilding

    Home building tips, offers, and expert advice in your inbox.

  • Green Building Advisor

    Building science and energy efficiency advice, plus special offers, in your inbox.

  • Old House Journal

    Repair, renovation, and restoration tips, plus special offers, in your inbox.

Signing you up...

This site is protected by reCAPTCHA and the Google Privacy Policy and Terms of Service apply.
See all newsletters

Follow

  • Fine Homebuilding

    Dig into cutting-edge approaches and decades of proven solutions with total access to our experts and tradespeople.

    Start Free Trial Now
    • Facebook
    • Instagram
    • X
    • LinkedIn
  • GBA Prime

    Get instant access to the latest developments in green building, research, and reports from the field.

    Start Free Trial Now
    • Facebook
    • YouTube
  • Old House Journal

    Learn how to restore, repair, update, and decorate your home.

    Subscribe Now
    • Facebook
    • Instagram
    • X

Membership & Magazine

  • Online Archive
  • Start Free Trial
  • Magazine Subscription
  • Magazine Renewal
  • Gift a Subscription
  • Customer Support
  • Privacy Preferences
  • About
  • Contact
  • Advertise
  • Careers
  • Terms of Use
  • Site Map
  • Do not sell or share my information
  • Privacy Policy
  • Accessibility
  • California Privacy Rights

© 2025 Active Interest Media. All rights reserved.

Fine Homebuilding receives a commission for items purchased through links on this site, including Amazon Associates and other affiliate advertising programs.

  • Home Group
  • Antique Trader
  • Arts & Crafts Homes
  • Bank Note Reporter
  • Cabin Life
  • Cuisine at Home
  • Fine Gardening
  • Fine Woodworking
  • Green Building Advisor
  • Garden Gate
  • Horticulture
  • Keep Craft Alive
  • Log Home Living
  • Military Trader/Vehicles
  • Numismatic News
  • Numismaster
  • Old Cars Weekly
  • Old House Journal
  • Period Homes
  • Popular Woodworking
  • Script
  • ShopNotes
  • Sports Collectors Digest
  • Threads
  • Timber Home Living
  • Traditional Building
  • Woodsmith
  • World Coin News
  • Writer's Digest
Active Interest Media logo
X
X
This is a dialog window which overlays the main content of the page. The modal window is a 'site map' of the most critical areas of the site. Pressing the Escape (ESC) button will close the modal and bring you back to where you were on the page.

Main Menu

  • How-To
  • Design
  • Tools & Materials
  • Video
  • Blogs
  • Forum
  • Project Guides
  • Reader Projects
  • Magazine
  • Members
  • FHB House

Podcasts

  • FHB Podcast
  • ProTalk

Webinars

  • Upcoming and On-Demand

Podcasts

  • FHB Podcast
  • ProTalk

Webinars

  • Upcoming and On-Demand

Popular Topics

  • Kitchens
  • Business
  • Bedrooms
  • Roofs
  • Architecture and Design
  • Green Building
  • Decks
  • Framing
  • Safety
  • Remodeling
  • Bathrooms
  • Windows
  • Tilework
  • Ceilings
  • HVAC

Magazine

  • Current Issue
  • Past Issues
  • Magazine Index
  • Subscribe
  • Online Archive
  • Author Guidelines

All Access

  • Member Home
  • Start Free Trial
  • Gift Membership

Online Learning

  • Courses
  • Project Guides
  • Reader Projects
  • Podcast

More

  • FHB Ambassadors
  • FHB House
  • Customer Support

Account

  • Log In
  • Join

Newsletter

Get home building tips, offers, and expert advice in your inbox

Signing you up...

This site is protected by reCAPTCHA and the Google Privacy Policy and Terms of Service apply.
See all newsletters
See all newsletters

Follow

  • X
  • YouTube
  • instagram
  • facebook
  • pinterest
  • Tiktok

Join All Access

Become a member and get instant access to thousands of videos, how-tos, tool reviews, and design features.

Start Your Free Trial

Subscribe

FHB Magazine

Start your subscription today and save up to 81%

Subscribe

We hope you’ve enjoyed your free articles. To keep reading, become a member today.

Get complete site access to expert advice, how-to videos, Code Check, and more, plus the print magazine.

Start your FREE trial

Already a member? Log in

Privacy Policy Update

We use cookies, pixels, script and other tracking technologies to analyze and improve our service, to improve and personalize content, and for advertising to you. We also share information about your use of our site with third-party social media, advertising and analytics partners. You can view our Privacy Policy here and our Terms of Use here.

Cookies

Analytics

These cookies help us track site metrics to improve our sites and provide a better user experience.

Advertising/Social Media

These cookies are used to serve advertisements aligned with your interests.

Essential

These cookies are required to provide basic functions like page navigation and access to secure areas of the website.

Delete My Data

Delete all cookies and associated data