Radon-Mitigation Systems
Learn why you need to be concerned with radon levels in your home, and find out what you can do to eliminate this unhealthy gas.
Radon is a naturally occurring and potentially dangerous radioactive gas that is present in nearly all soils. People who live for many years in a house with elevated levels of radon gas have a higher-than-average chance of developing lung cancer. About one in 15 homes has a high-enough level of radon to be of concern.
Radon enters a house via the stack effect, which often causes soil gases to be drawn into houses through cracks in the foundation. High radon levels are possible in new houses as well as old houses, and in tightly sealed houses as well as leaky ones.
It’s possible to have a high indoor radon level in any state in the country, so the only reliable way to determine the radon level in your home is to test the indoor air. If testing reveals radon at levels above 4 picocuries per liter—the standard “action level”—you should arrange for a contractor to install a radon mitigation system in your house.
A variety of do-it-yourself radon test kits are available. These kits must be left in your home for a period of days or weeks, after which you mail them to a lab for analysis. If the results of a short-term test (one that takes less than 90 days) show radon levels near or above 4 picocuries per liter, it’s best to follow up with a long-term test, which will be more accurate than a short-term test. There is no need to test the air in an unfinished basement; instead, test the air on your first floor.
Start passive
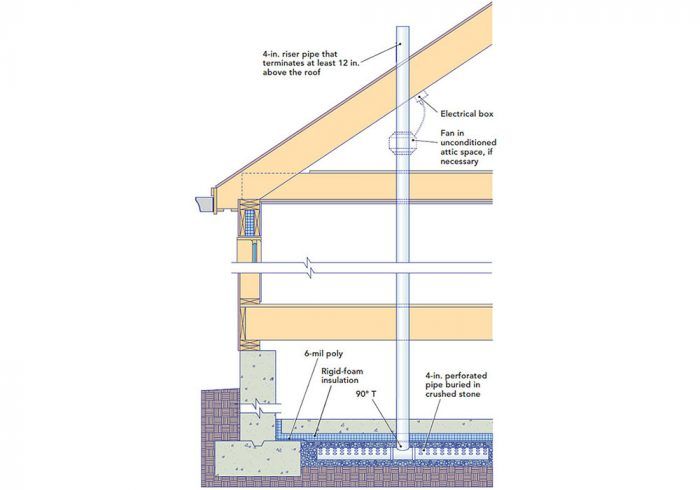
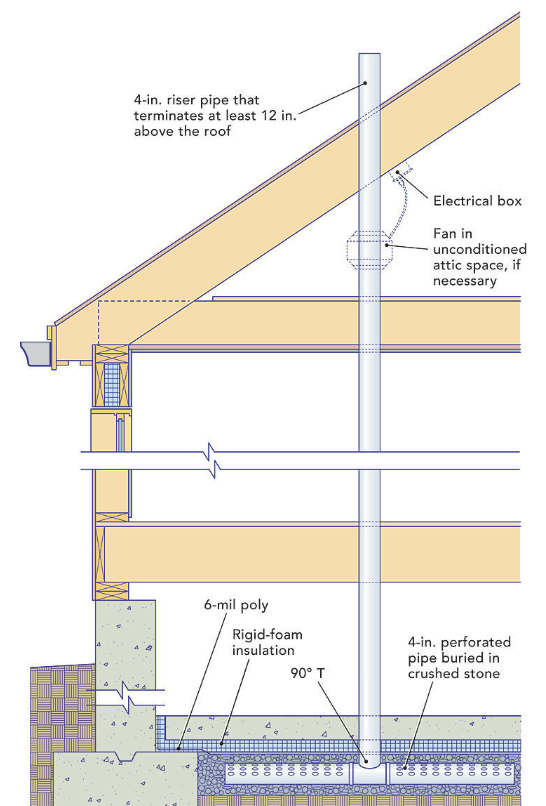
A passive radon-mitigation system allows soil gases to flow from the soil beneath the slab through the vent pipe to the outdoors. The driving force is the stack effect. In most houses, a passive system is adequate to keep radon levels safe. New houses should include these essential system components:
- A layer of clean 3/4-in. crushed stone under any basement slab or a slab on grade
- At least one horizontal length of 4-in. perforated PVC pipe in this layer of stone, with one end connected to an elbow or a T that’s connected on the other end to a nonperforated 4-in. PVC riser (a vertical pipe that penetrates the home’s roof)
- A layer of 6-mil polyethylene above the stone layer
- Caulk or a permanent seal for cracks and seams in the slab and for all penetrations through the slab and the slab perimeter
- An airtight sump lid (if the basement has a sump)
- An electrical power supply in the attic near the vertical vent pipe in case an exhaust fan is needed in the future.
The vent pipe should terminate 12 in. above the roof. Exposed sections of the pipe should be labeled “radon vent system.” If testing shows that radon levels are still high in a house with passive radon mitigation in place, then an exhaust fan can be installed. This turns the passive system into an active system. Radon exhaust fans should not be located within a home’s conditioned envelope; all pressurized lengths of pipe need to be outside the conditioned space. They are usually in the attic.
Radon exhaust fans usually draw between 20w and 100w and are rated at 60 cfm to 200 cfm. The fans need to operate continuously. Low-flow fans work well for homes with a porous layer of crushed stone under the slab; high-flow fans are required when the soil under the slab is dense and damp.
The main drawback to an active radon-mitigation system is the cost of the electricity required to run the fan. At 12.5¢ per kwh, a radon fan costs $22 to $110 per year to operate.
Retrofits are active
Older houses usually lack a layer of crushed stone under the slab, so passive radon-mitigation systems rarely work. Installing an active subslab depressurization system usually costs between $1000 and $2000.
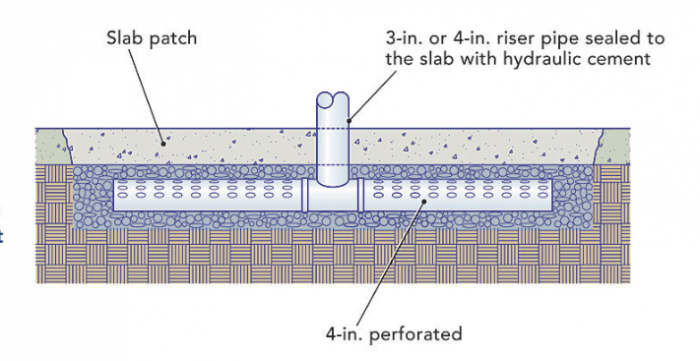
Radon contractors begin a retrofit by drilling a 4-in.-dia. hole in the slab. Unless the contractor discovers a layer of crushed stone under the slab, it’s necessary to remove enough soil to make a void equal in volume to a small wastebasket. Then a 3-in. or 4-in. riser pipe is installed; the pipe originates just below the bottom of the concrete slab. Alternatively, the contractor may break up enough of the slab to add a perforated pipe in a layer of crushed stone, as shown in the center drawing.
In either case, the gap between the pipe and the slab needs to be sealed. The contractor will also seal all visible cracks in the slab. If the basement walls are made of concrete blocks, it may be necessary to seal them, too.
The rest of the system resembles the system described for new construction.
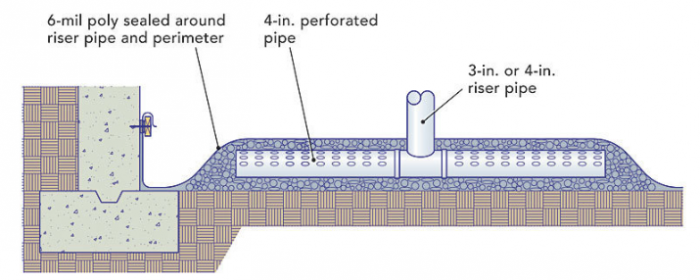
In basements or crawlspaces with a dirt floor, a length of horizontal perforated pipe is installed on the floor. Polyethylene sheeting is placed above the pipe. One end of the perforated pipe is connected to a riser that penetrates the polyethylene through a carefully sealed hole. The rest of the system is similar to systems installed in homes with concrete slabs.
Never mind the granite scare
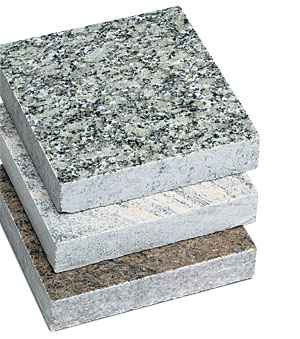
In 2008, a rash of newspaper articles reported that granite countertops may emit radon. These reports caused many homeowners to worry unnecessarily.
After further investigation, most experts have concluded that there is no need to worry about the granite in your kitchen. According to Kansas State University’s radon program, “At this time, EPA does not believe sufficient data exist to conclude that the types of granite commonly used in countertops are significantly increasing indoor radon levels … While a radon-testing professional can test your home for radon, to the EPA’s knowledge, there is no agreed-upon method specifically for measuring radon or radiation from granite countertops. Direct measurements in a building of the gamma radiation or radon emanation from a material, such as granite, is not a reliable indicator of radon concentrations that will be in the air you breathe.”
Information provided by the New York State Department of Health is also reassuring: “The bottom line: No action needs to be taken to remove granite countertops in existing homes.”
New Homes
Start with a passive system
All new homes should include a passive radon-mitigation system that vents radon gas from the soil below the slab through the roof. Once the home is finished, you can test radon levels in the house. If levels are too high, it is simple to add a fan to make the system active and to lower radon levels in the house further.
Retrofit
Dig a hole beneath the slab
In existing homes, you need to create a void beneath the slab, which can be left empty or filled with crushed stone and a perforated pipe. Seal the pipe to the slab well, make sure the slab and basement walls are airtight, and always use a fan.
Dirt Floors
In existing homes with dirt basement or crawlspace floors, lay the perforated pipe on the floor. Cover the pipe and the entire floor with a well-sealed layer of polyethylene. Make sure to seal the riser pipe to the poly.
—Martin Holladay is a senior editor.
Photos: Scott Phillips.
Drawings: Steve Baczek, Architect.
From Fine Homebuilding #244



View Comments
Hi,
I am interested in using a sidewall direct vent radon mitigation system/fan called: Tjernlund RMS160. Does anyone have any thoughts, comments or experience with these fans?
thanks