More Than One Way to Case a Window
You can vary the look with simple combinations of flat boards and stock moldings.

Synopsis: In addition to discussing window casing in general, the author presents six variations of casing an identical window. He covers a range of styles, showing how the use of different moldings can produce totally different aesthetic effects.
Stock trim, such as 1×4 pine or clamshell casing, will always be useful in routine, contemporary construction. But after years of installing these lifeless, standard-issue casings, frustration drove me to cross the frontier. Using as a reference the casings I’d seen in so many period New England houses, I built a simple pediment head casing to surmount square-edge, square-cut side casings. I will not forget that first look back at the result: An ordinary window suddenly had character, grace and purpose; and a client new to classical trim was particularly pleased with a window worth looking at, not just through.
Mitered casings get moldings; butted casings get pediments
In this article, I’ll discuss two approaches to formal casing design: mitered casings as a stylistic option and butted casings, which employ a pediment head, or architrave, as a classical architectural option. In general, mitered casings are developed by adding layers of moldings to the perimeter of a mitered flat casing. With butted casings, the pediment head sits on the square-cut tops of plain or molded side casings, and architectural detail is developed on the pediment itself.
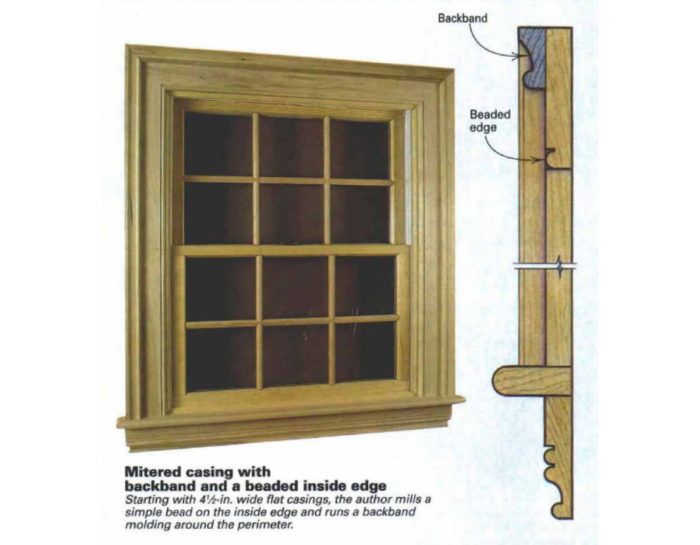
In a mitered casing the simplest alternative is the use of two or more layers of molding. A bead cut on the inside edge of a casing and a backband applied around the outside perimeter of a flat casing will give a strong, three-dimensional appearance. A thin molding interposed between the flat casing and the backhand adds another element of detail and shadowline to the profile.
A formal alternative to mitered casings is the use of a pediment, or architrave, as a head casing with side casings butting into it. The pediment represents an entablature, the lower portion of a classical roof, and its elements are derived from ancient Greek and Roman temples. This style of window trim is commonplace in period architecture, especially in Federal and Greek Revival houses of the 19th century.
All window casings start with the stool cap
Any style of window trim must begin with the stool cap, the piece that finishes the inside edge of the windowsill. You can buy stock stool cap at a lumberyard, but you’ll spend enough time fitting it to the window that you might as well make your own.
I like the stool to stand proud of the casings about an inch. If you’re thinking about a two piece or three-piece mitered casing, you’ll have to figure out the combined thicknesses of the moldings before you cut the stool.
I cut the stool stock long, and I machine a bullnose, or half-round, on the outside edge. I scribe and cut the two horns (horns are the ends of the stool that overlap the drywall on each side), check the fit, then cut the ends to allow about a 1-in, overhang past the outside edges of the side casings. The bullnose returns can be shaped by machine, but I prefer to remove the bulk of the waste with a block plane and finish the job with a sharp file or a piece of cloth-backed sandpaper.
For more photos, illustrations, and details, click the View PDF button below:


