Synopsis: Faced with the prospect of hanging drywall by himself, an owner-builder devises a drywall lift that allows him to hang sheets on the ceiling single-handedly. The lift’s parts and pieces are readily available.
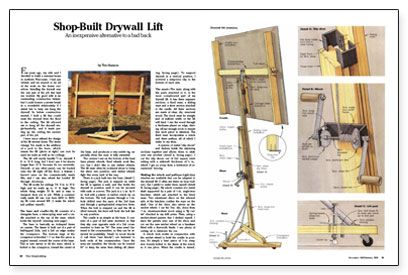
Four years ago, my wife and I decided to build a summer home in northern Wisconsin. I had just retired, and we wanted to do all of the work on the home ourselves. Installing the drywall was the one part of the job that had me worried. My good wife is an outstanding construction helper, but I could foresee a severe break in a wonderful relationship if I asked her to help me hang the drywall. So before construction started, I built a lift that could raise the drywall from the floor to the ceiling. The lift allowed me to hang all the drywall single-handedly, and it made putting up the ceiling the easiest part of the job.
I have since refined the design of the lift several times. The latest change I’ve made is the addition of a jack to the base, which means the lift can now be used for walls as well as for ceilings.
The lift will easily handle 5/8 in. drywall 8 ft. to 12 ft. long, but I don’t use it for sheets longer than 12 ft. because it’s too unwieldy. Drywall, or any other panel, can be loaded onto the lift right off the floor, a feature I haven’t seen on the commercially made lifts, and I can also wheel the loaded lift through doorways.
The lift works for ceilings 7-ft. 9 in. to 10 ft. high and for walls up to 11 ft. high. The whole thing weighs 50 lb. and is easy to transport from job to job. While a commercially made lift can cost from $400 to $600, my lift costs around $35 (I make the winch and pulleys myself).
The base and cradle
My lift consists of a triangular base, a telescoping mast and a cradle attached to the top of the mast, which holds the drywall.
The base is basically an A-shaped frame on casters. The frame is built out of a pair of half-lapped 2x4s, and a 2×4 on edge makes the crosspiece. The bottom edge of the crosspiece is beveled so that the piece is angled inward, toward the center of the base. This in turn serves to tilt the mast, which is bolted to the crosspiece, toward the center of the base, and produces a very stable rig, especially when the mast is fully extended.
The casters I use on the bottom of the base have plastic wheels. Steel wheels work fine, too, but I don’t like to use rubber wheels. The lift must often be jockeyed about to bring the sheet into position, and rubber wheels fight this every inch of the way.
There is a jack built into the base. The jack is stepped on while the lift is against a wall, and that holds the drywall in position until it can be secured with nails or screws. The jack is a 1/2 in. by 8-in. bolt with a plastic or rubber crutch tip on the bottom. The bolt passes through a 1/2 in. hole drilled near the apex of the 2×4 base and through a spring-loaded strap-iron lever. When the bolt is stepped on and the lift is tilted forward, the lever will hold the bolt fast in any position.
For more photos, drawings, and details, click the View PDF button below:


