
Top 10 Deck-Building Mistakes
Avoid these common problems, and build a longer-lasting, safer deck.

The process of building decks is not nearly the same today as it was a decade or more ago. While the outdoor environment and the endless design possibilities have remained constant, emerging technologies and new products and materials require a stronger sense of industry codes and best practices for you to be able to build a deck properly.
As a deck builder, inspector, and plans analyst, I have seen a lot of inferior deck-building practices from professionals and do-it-yourselfers. I’ve also seen an abundance of bad information that perpetuates problematic designs and poor construction practices. A badly built deck is more prone to failure than a correctly built one, and it’s dangerous for those who use it.
Here, I highlight the most common errors I see in deck building and offer solutions to help ensure that your next deck is safe and that it lasts.
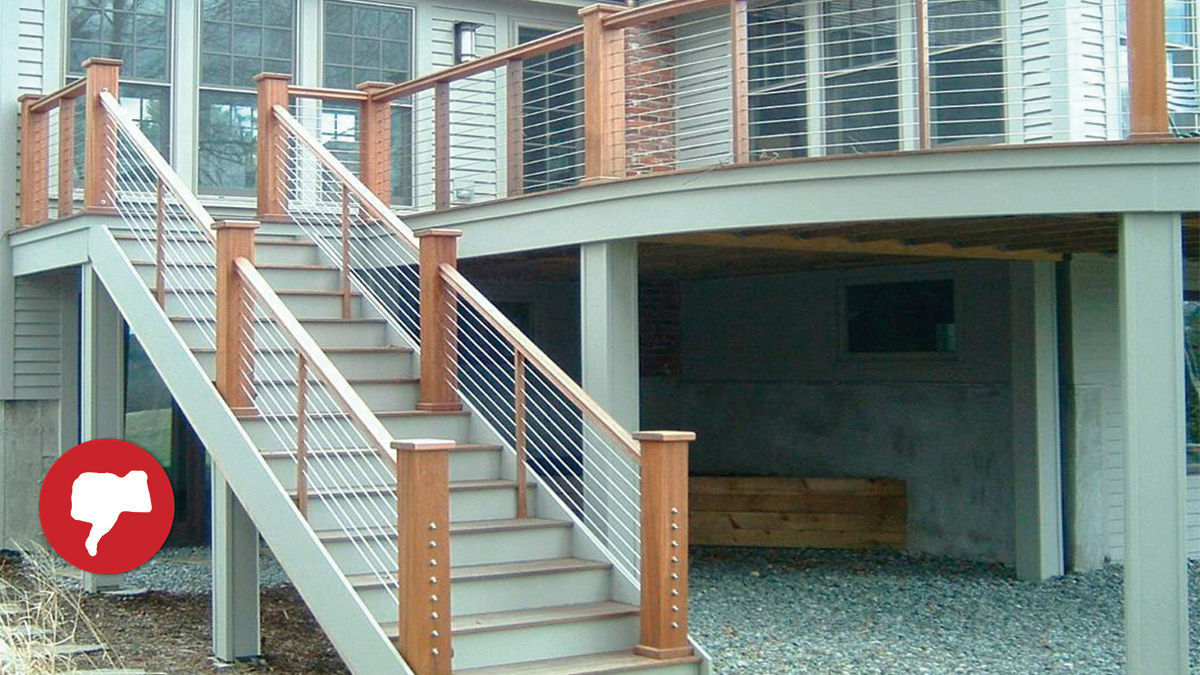
Mistake 1: Failing to install a continuous handrail on stairs
The post in the middle of this flight of stairs interrupts the top of the railing, which was designed to serve as the handrail. An unsightly, continuous handrail had to be added.
The error: For construction or aesthetic purposes, builders regularly interrupt handrails with newel posts. It’s also common to see a guard’s top rail used as a handrail.
The solution: Code provision R311.7.8.4 requires that a continuous handrail be installed on any set of stairs that has four or more steps. A continuous guard free of midspan posts extending through the top can be used as a handrail, but only if it meets specific geometric requirements. To be considered a handrail, the guard’s top rail must be graspable by those walking up and down the stairs. If a post interrupts a guard’s top rail, a true handrail must be added to the guard running along the stairs.
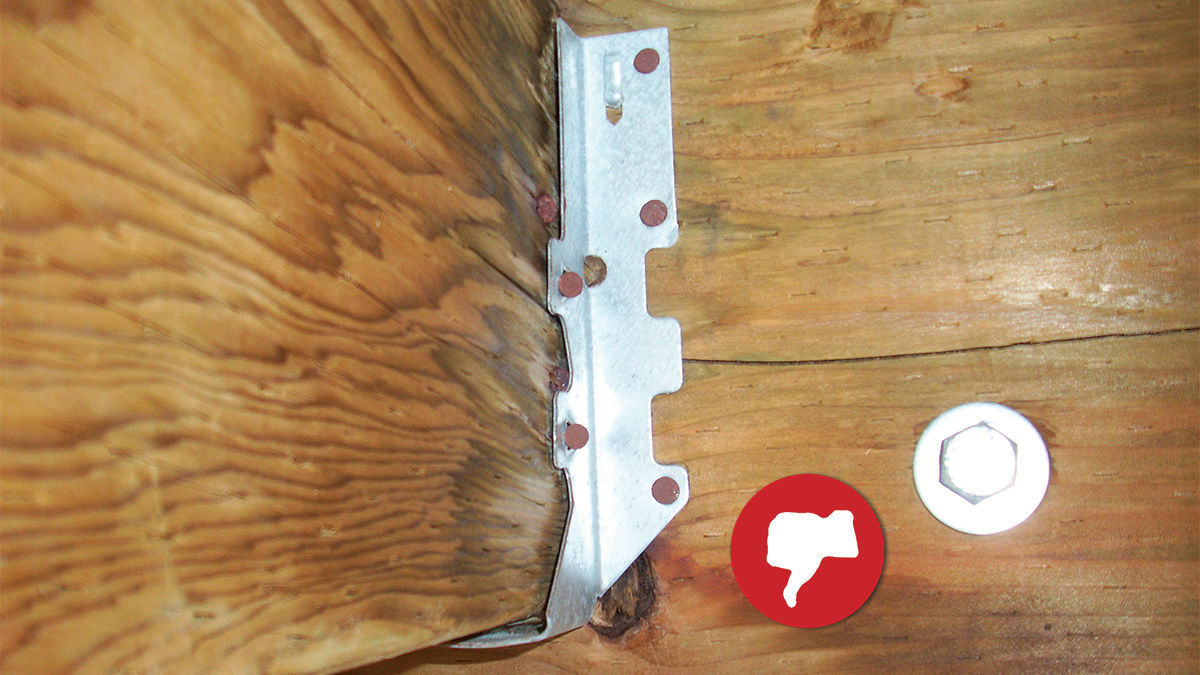
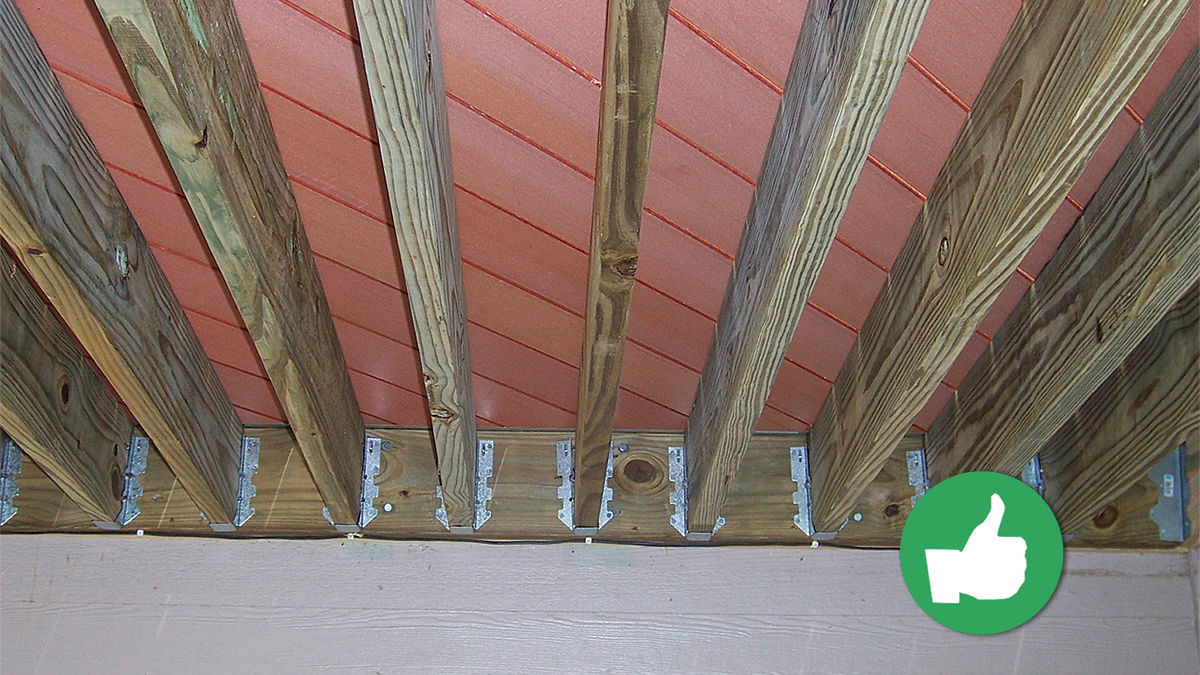
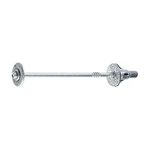
Mistake 2: Installing hardware incorrectly and using the wrong fasteners
Always follow manufacturer guidelines for appropriate fastener types and sizes, and use stainless-steel or galvanized fasteners if you are using pressured-treated lumber.
The error: Incorrect fasteners in hangers are a notorious mistake. For example, deck screws are not a proper way to attach joist hangers, and using 11/4-in.-long 10d nails where 31/2-in. 16d nails are required is a sure sign that manufacturer instructions were not followed.
Fasteners that don’t have the correct corrosion-resistance rating will fail quickly when installed in treated lumber. Also, using only one-half of a two-part post-to-beam connector and installing under-size bolts in 6×6 post bases are common installation errors.
The solution: For hardware to work as the manufacturer claims it will and the way the inspector expects it to, follow the manufacturer’s installation instructions. Proprietary hardware is not specified in the code; therefore, it is considered an alternative. Alternatives are approved via testing or engineering, and that information must be provided to the building official. The only way to be sure hardware will perform as expected is if it is installed as it was tested or designed. Beyond code compliance, valid product warranties depend on proper installation.
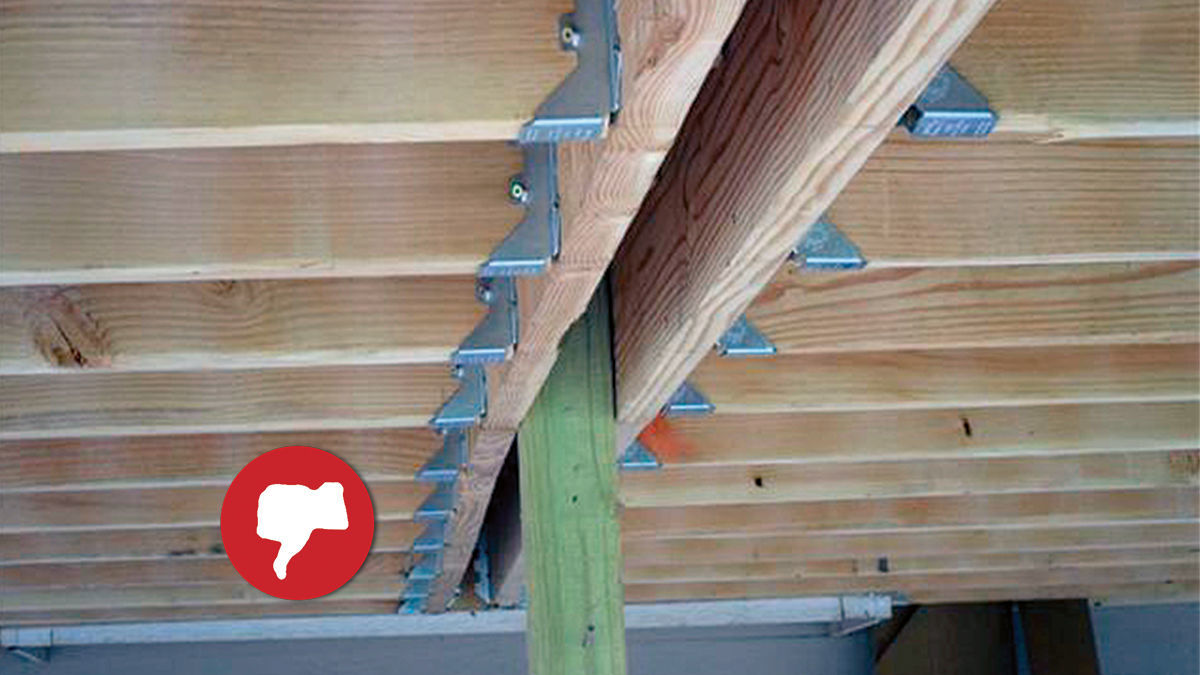
Mistake 3: Bolting beams to the sides of posts
Bolting beams to posts as shown here can result in failure. The bolt may not shear, but the wood can shred. Use a galvanized-steel post cap, and keep the beam firmly seated atop its support post.
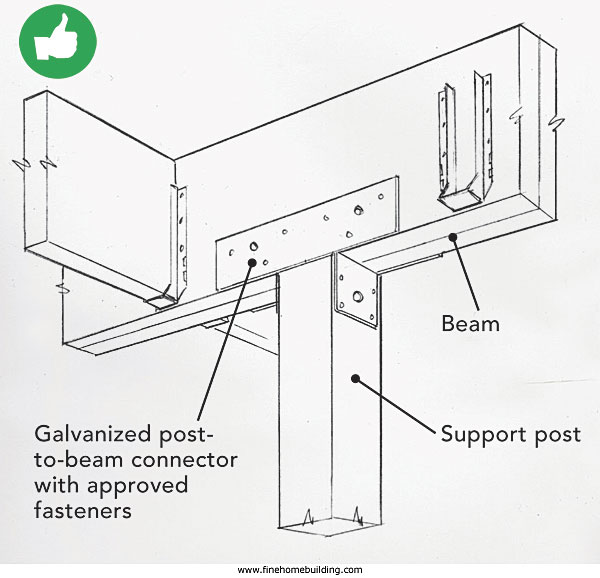
The solution: Each ply of a multispan beam, whether single or multi-ply, must have full bearing on intermediate posts. This can be accomplished by notching a 6×6 to accept a 2-ply beam and bolting the beam to it, or by the use of an approved post cap. With all the hardware available to handle various direct-bearing applications of different-size beams and posts, there is no excuse for disregarding this code requirement.
Mistake 4: Over-spanning composite decking
To meet the span tolerance of this diagonally installed composite decking properly, additional joists and hangers had to be added to the existing deck framing.
The error: The maximum span of wood-and-plastic composite decking generally depends on the type of plastic used in the product. It’s important to follow the span limits of a specific product as outlined in the manufacturer’s installation instructions, which some builders fail to review. Over-spanning composite decking is most commonly a problem when deck boards are run diagonally over joists or when they’re used as stair treads.
The solution: Floor joists for a deck are typically installed at 16 in. on-center, which won’t properly support some composite-decking products when installed on an angle. In new construction, be sure floor joists are installed at the correct spacing. In existing decks, adding more floor joists is the only remedy. Similarly, additional stair stringers might have to be added to stairs where composite decking serves as the treads. Stair treads must be able to resist a concentrated load of 300 lb. over an area of 4 sq. in. This requirement puts a lot of pressure on the actual tread material to support concentrated loads. Some composite products are limited to an 8-in. maximum span when used as stair treads, which requires the support of six stringers in a 36-in.-wide stairway.
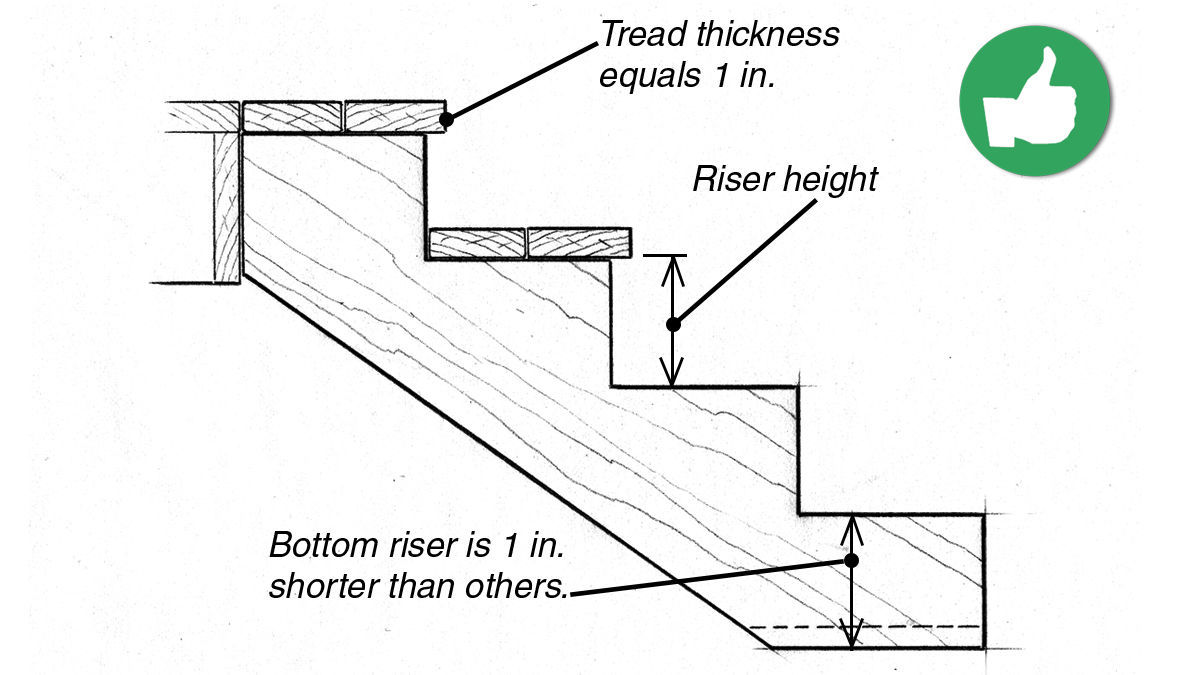
Mistake 5: Building stairs with incorrect riser heights
Once you have determined the rise and run of your stairs, stringer layout is straightforward. One detail, however, is easy to overlook. The bottom riser needs to be one tread thickness shorter than the rest.
The error: Often, the bottom step on a set of deck stairs is roughly 1 in. taller than the rest. Code allows a maximum variation of only 3⁄8 in. between riser heights. This guideline often confuses inexperienced carpenters, who insist that they cut every notch in the stringer the same.
The solution: Every notch cut into a stringer has an identical riser height except for the bottom one. The steps notched out of the stringer in the middle of the flight have treads placed above and below each step, effectively adding the same tread thickness to each riser height so that they remain constant. The bottom step doesn’t have a tread below it, though, so you must subtract the thickness of the tread from the height of the bottom riser, which is the bottom of the stringer.
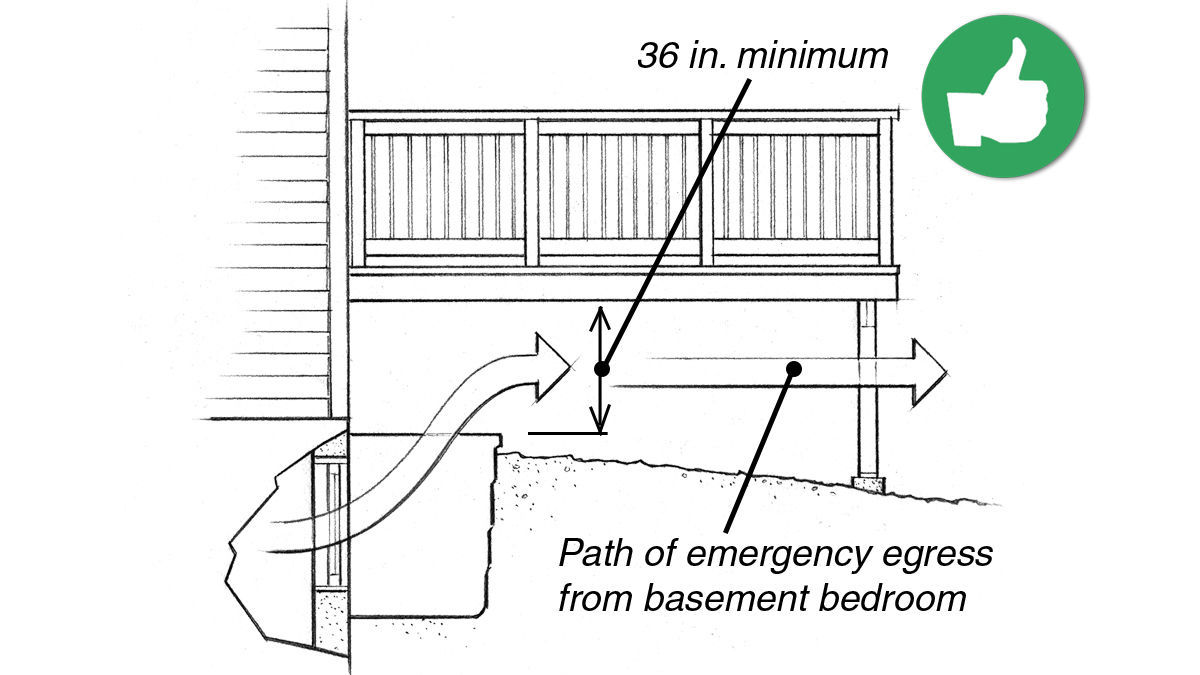
Mistake 6: Ignoring clearances and inhibiting access
Some clearances around a deck are code-required, such as providing a minimum 36-in.-tall escape path from a basement egress window. Others are simply practical, such as ensuring access to hose bibs. Each clearance should be considered with equal diligence.
The error: Although well constructed, some decks are still code violations simply in how they interact with the house. For example, some stairs on multilevel decks end up near windows that the builder has not replaced with tempered-glass units. Other decks are built too close to the house’s main electrical service panel or the service conductors overhead—which need to be at least 10 ft. above a deck or 3 ft. to the side of a deck, according to code (E3604).
The solution: No matter what features exist on the exterior of a home—windows, air-conditioning compressors, low-hanging soffits, exterior lights, outdoor receptacle outlets, dryer vents—identify the required clearances before starting a deck design. While some features will influence the shape and location of the deck, other features may require only that appropriate access be integrated into the design of the deck.

Mistake 7: Attaching deck ledgers poorly
If sistering deck joists to floor joists isn’t an option, adding a beam, posts, and footings can help to relieve some of the stress placed on the fasteners connecting the ledger to the end grain of the cantilevered floor joists.
The error: The majority of deck plans end with a straight, continuous line at the ledger, rather than details as to what the ledger is connecting to. Unfortunately, the way a ledger attaches to a house is one of the most critical elements in deck construction, and many builders get it wrong. For example, they bolt ledgers straight to brick, stucco, or EIFS cladding. These practices violate the code. One of the more egregious ledger mistakes is connecting the ledger to a rim joist nailed to the end grain of cantilevered floor joists—those that support a kitchen bump-out, for example.
The solution: Detailing a ledger properly depends on the building type, the cladding material, and the site conditions. Of all the parts of a deck, the ledger can rarely be treated the same from job to job. Long before construction begins, considerations must be made as to, for example, whether stucco needs to be cut back with new weep screed installed or whether a few courses of lap siding need to be removed to bolt and flash the new ledger properly. Code requires that band joists supporting deck ledgers bear fully on the primary structure capable of supporting all required loads—in other words, they can’t be part of a cantilevered floor. A better option in that scenario is to build a freestanding deck that doesn’t rely on the cantilever to support it.

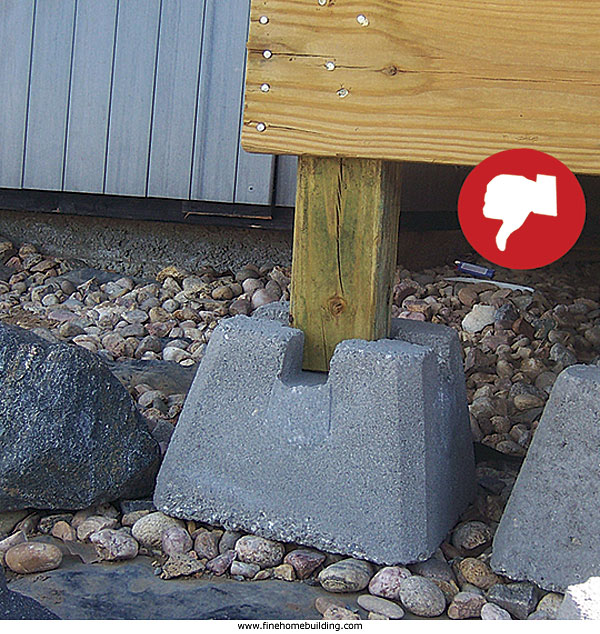
Mistake 8: Setting piers in disturbed soil
The error: When it comes to digging footings for their deck piers, some builders are lazy. Usually, a deck’s foundation piers are not set below the region’s frost line. To avoid deck ledger failures, freestanding decks are becoming popular. But the piers nearest the foundation may be set atop backfill. In areas where the frost depth is not an issue and precast foundation blocks are used, they’re often set on top of the exposed grade.
 |
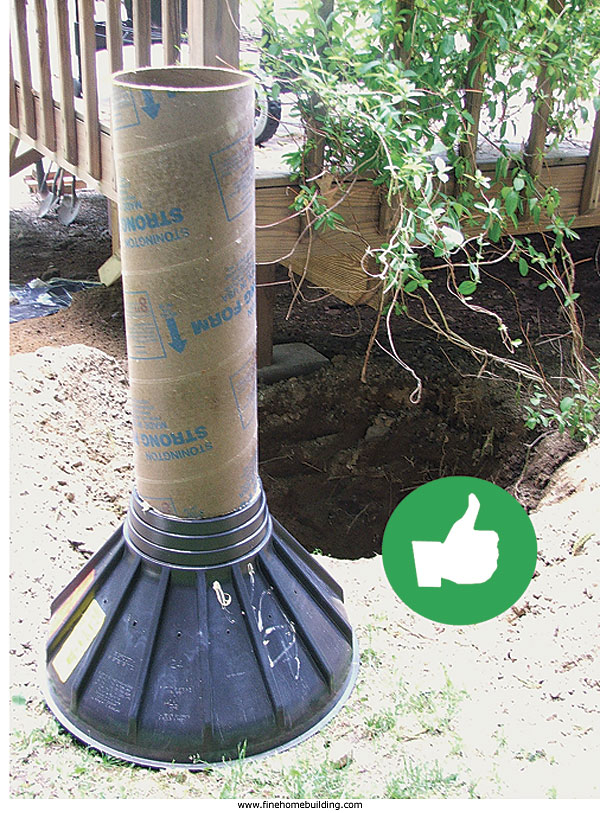 |
The solution: Just about every deck is built on an isolated-pier foundation system. Foundation systems are required to extend a minimum of 12 in. into undisturbed soil (R403.1.4). In cold climates, where the ground freezes in winter, pier foundations for non-freestanding decks must extend to a depth below that which is likley to freeze—in some places deeper than 48 in. This prevents the soil below the pier from freezing and heaving the pier upward.
To install deck piers properly, the piers must bear on undisturbed soil and be set below the frost line in cold-climate regions. However, if the piers are in a backfill region, as is the case with piers nearest the house on a freestanding deck, the footing depth may have to be as deep as 10 ft. to reach undisturbed soil and to comply with code.
Precast foundation blocks must be set at least 12 in. into the ground. However, even in the middle of a lot, the topsoil is tilled roughly 6 in. prior to seeding, so it’s likely that the footing needs to be at least 18 in. deep to comply with code. Assume that all deck piers and foundation blocks require some digging.
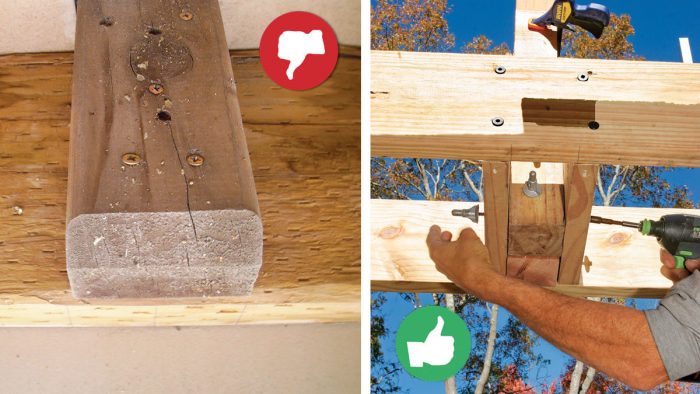
Mistake 9: Incorrectly attaching guard posts
Don’t notch posts or use nails or screws to fasten them to deck framing, as shown (left). Use bolts. More specifically, use blocking and bolts (right), to create a stronger guard system than one with posts connected to rim joists that are nailed only to the end grain of the joists.
The error: Insufficiently connecting a guard post to a deck is among the most dangerous deck-building errors. Fastening guard posts to deck rim joists or floor joists with wood screws is not acceptable. While some builders get the guard-post-to-rim-joist connection correct, they don’t always ensure that the rim joist is attached to the deck framing properly.
The solution: The code (Table R301.5) requires a guard to be designed and constructed to resist a concentrated load of 200 lb. in the outward and downward directions along its top. Depending on the design of the guard assembly, a stout guard-post-to-deck connection can be accomplished with blocking and through-bolts or with horizontally oriented hold-down hardware. In some rail designs, most of the load resistance is handled by the post connection to the deck. In those instances, the post should be attached to the joists, not the rim, because the rim is not usually fastened to the joists in a manner capable of transferring the load. Rims are typically nailed into the end grain of the joist, the weakest possible connection for withdrawal resistance.
The design methods for guard assemblies are as vast as the imagination, and homeowners admire that creative expression. However, serious consideration must be made as to how the guard is ultimately assembled. The strength of a guard system is provided by a lot more than just the post-to-deck connection. The concentrated load must be resisted at any point along the top of the guard. With a common 5-ft. to 6-ft. distance between the posts, the load must transfer through the connection of the horizontal rails to the post. When a continuous top cap runs across the posts, it acts like a horizontal beam to help distribute the load over a larger area. When a post is run long, through the top of the guard’s top rail, there is a considerable increase in the leverage the post puts on its connections.
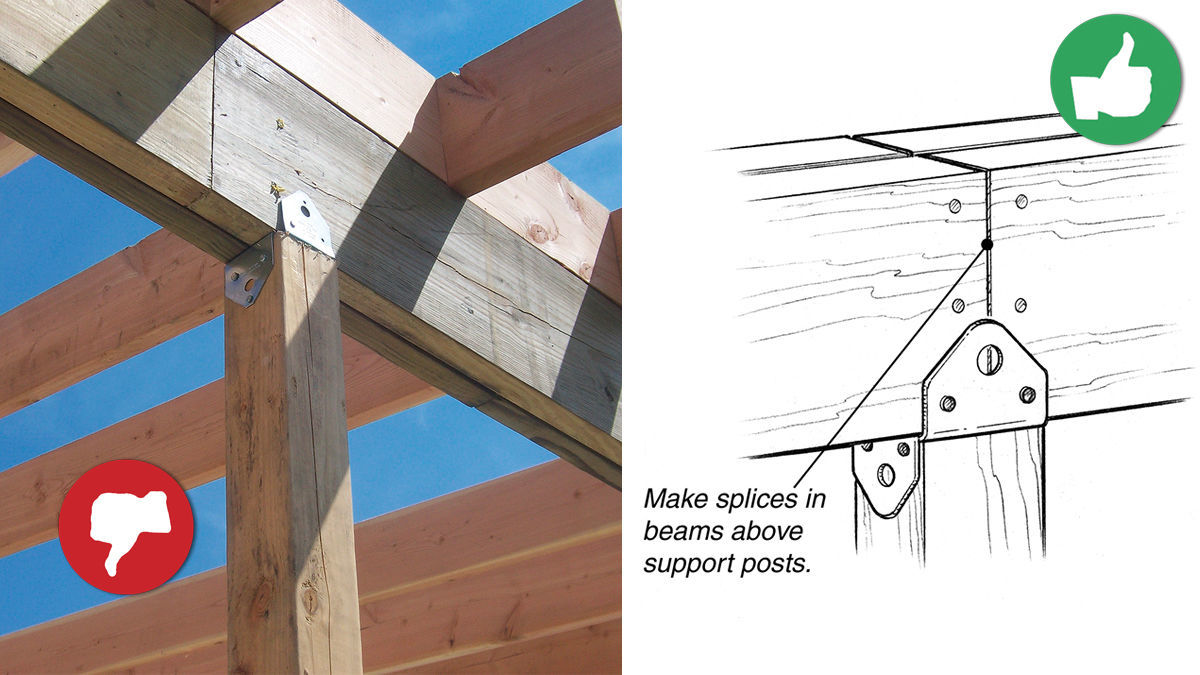
Mistake 10: Making beam splices in the wrong places
Beams suffer the greatest amount of deflection at the center of their post-to-post span. Therefore, strong beams are spliced atop posts. If you can’t stagger splices over different posts, then placing them over a single post is permissible.
The error: When a long built-up beam spans multiple posts, many builders run one ply long and extend it beyond the support posts. Many builders believe this practice is good because splices of opposing beam plies are greatly separated as opposed to being only inches apart on top of a post. Unfortunately in these cases, an engineer’s evaluation or a rebuild of the beam is required.
The solution: Beams are under two stresses: bending and shear. Shear forces act perpendicular to the length of the beam and are greatest near the bearing ends.
Bending changes the beam’s shape, a force called deflection, and is greatest in the center of the beam span. The code lists maximum allowable limits for deflection. In deck beams, the deflection limit is typically reached long before shear limits are a consideration. Any reduction in bending resistance also increases : span, it will be smarter and cheaper to build the beam so that splices land atop posts. Beams suffer the greatest amount of deflection at the center of their post-to-post span. Therefore, strong beams are spliced atop posts. If you can’t stagger splices over different posts, then placing them over a single post is permissible. deflection potential and ultimately ends in code noncompliance.
Beam splices that miss the bearing point by a small amount don’t greatly affect bending or deflection, and the shear strength of one fewer ply is likely still sufficient. In these cases, the cost of an engineer’s review might just get you the OK to build. If a design calls for a splice in the center of a
Drawings: Dan Thorton
Note: The updates to the articles in this collection are aligned with the 2018 International Residential Code (IRC). Your jurisdiction may use a different version of the code—check with your local building department. You can view the 2018 IRC online for free at codes.iccsafe.org/content/IRC2018.
RELATED STORIES
- Ultimate Deck Build
- Is Your Deck Safe?
- How to Build a Deck: Video Series
- First Aid for a Failing Deck
To view the entire article, please click the View PDF button below.
Fine Homebuilding Recommended Products
Fine Homebuilding receives a commission for items purchased through links on this site, including Amazon Associates and other affiliate advertising programs.

4-Gallon Piston Backpack Sprayer
FastenMaster Screw Bolt Fastening System

Lithium-Ion Cordless Palm Nailer

View Comments
just a note to say - great , simple article that spearheads us weekend reno warriors attention to the real important elements of a safe build fast and simply - thumbs up
could add the joist splice element i think also
Hello!
Mistake number ten is explaned incorectley. If there are multiple posts, then the most efective way is to create beam split 1/4 span lenght from post.
This is because you have a moment spike on top of post and aprox 0 moment in 1/4 span leght from post.
If you make split on top of post, then the beam can not be calculated as continious, resulting in biger deflection and biger moment value in the midle of the beam spam.
Actually the splice joint in wood beams is more likely to be about 2.2 feet from the post. If you are an engineer or know how to use beam design programs like Forte you can pinpoint that joint more precisely. 2.2 feet is a 'rule of thumb' given by my engineering professor to all us architect students in our structural engineering class in the early 80's when we didn't have web-based beam calculators. The length of beam spans didn't matter and he proved it. At least in #10's picture, they appropriately placed the wood joints on either side of the post.
This practice means you have a multispan beam and will have to account for deflection over the post. You may need a bigger member to avoid crushing at the post.
I love seeing this same issue on steel supported road bridges, steel and concrete have greater overspans and its fun to watch as they place the interior 'free hanging' piece between these overspans. It can be 80' beams with no 'posts' underneath them.
For us non engineers, now I am confused. Is mistake # 10 in the article correct or not correct? Should the splice for a single post span be on top of the post or 2.2 feet on either side of the post?
ie for a 16 ft span with a single post in the middle
Article you made is very interesting and very useful about Deck-Building Mistakes. Thanks For sharing it with us, and keep it up. https://www.neeffordham.nz/
Really great tips here! We deal with a lot of decks that were done incorrectly from the beginning but sometimes it can be adjusted without redoing the entire thing.
https://www.homerenovationsbarrie.com/decks-and-exterior-builds.html
Maybe it's just that we've been building decks for such a long time but these really seem like common sense errors. I'm assuming that they are mostly from the DIY crowd, but still proper research and preparation should always be done prior to building. Otherwise you'll just end up forking out more money for repairs or replacements. Hopefully more homeowners find sites like this and learn a lot before attempting to build their own deck! Or hire a great company to do it for them so there is no headaches down the road!
-Darlene @ https://www.deckbuilderswinnipeg.com/
This is great thank you for sharing https://www.djservicespgh.com/ http://www.pghcleaners.com/
No matter what features exist on the exterior of a home—windows, air-conditioning compressors, low-hanging soffits, exterior lights, outdoor receptacle outlets, dryer vents—identify the required clearances before starting a deck design.
Regards,
San Antonio Flooring Installer
The majority of deck plans end with a straight, continuous line at the ledger, rather than details as to what the ledger is connecting to.
Robert | Kitchen Remodel Hawaii
The article is quite precise. It tackles the really important elements of a safe build fast, safe and simple. It's worth sharing! :)
Best regards!
Joana | Baltimore Concrete Services
new designs and new ideas. Great! pellet lime vs ag lime
unique designs! keep it up. site
Really like the information you provided here. We're looking to get into the deck business as a unique way to blend with our current landscape business. Thanks for sharing.
Don, https://www.landscapeah.com/
Great post! Thanks for this useful information you shared. Click here
Thank you for giving us these details, planning to renovate our deck next year. https://www.ohiosignaturepainting.com
Hmm. I don't get why it is a mistake but maybe you're right.
https://fingerlakesrealtypartners.com/
Thanks for sharing this informative post. http://www.elitechimneyrepair.com/
This is awesome! Thanks for the share. https://seasafe.com/
Nice designs! Great job. https://creativeresurfacingsolutions.com/
Thank you for letting us know this kind of information. I'm sure I'll remember this in the future.
https://cincinnatiseo.io/
Glad to check this awesome information. https://www.espressorepairsrichmondin.com
To be honest, as a homeowner, this article is extremely helpful. Why? Simple, in every mistake, there's an equivalent solution on how to fix it.
- Melvin | One of the best concrete contractors Tampa FL
Thanks for taking the time in sharing this post. click here
Glad that you shared this info, now I know what will I consider. insuranceranked.com/
Great website. Very well written content. Driveway caulking
I guess a lot of contractors would be guilty of some stuff you've discussed here. I am for one is guilty of committing such a mistake.
https://deanhineslawyer.com/divorce-lawyers-columbus-ohio/
Thank you for sharing such a good content. Deck works colorado springs
Great post! Thanks for this article you've shared on this site. https://wilderrealestate.com/
Glad to check this awesome site here, nice content as well. https://calldoctorclean.com/
You might be looking for one of the most reliable and best pool builders. Definitely check the website.
PS: This is a great heads up for those who are planning to have their deck made.
custom headstone design
I learned something from this! Thank you so much.
Felicity
I really learned a lot from this one!
https://parkdia.com
The majority of deck plans end with a straight, continuous line at the ledger, rather than details as to what the ledger is connecting to. jam fyp tiktok
While some features will influence the shape and location of the deck, other features may require only that appropriate access be integrated into the design of the deck. drywallchicago.com/popcorn-ceiling-removal-chicago-illinois.html
Fastening guard posts to deck rim joists or floor joists with wood screws is not acceptable. While some builders get the guard-post-to-rim-joist connection correct, they don’t always ensure that the rim joist is attached to the deck framing properly. chicagofoundationrepairpro.com/basement-repair-chicago-illinois/
However, if the piers are in a backfill region, as is the case with piers nearest the house on a freestanding deck, https://www.kandlremodeling.io/
Thanks for the information, keep sharing!
http://www.drywallservicesvictoria.com
Your blog has very enjoyable content. Many thanks!
gas fireplace worcester ma
Such a great tip!
gas fireplace worcester ma
To install deck piers properly, the piers must bear on undisturbed soil and be set below the frost line in cold-climate regions. - basement waterproof
What an awesome article, great insight. thank you for sharing
http://www.insulationvictoria.com
Thanks for sharing it to us. Keep on posting. https://www.treeservicementorohio.net/
I guess this would be helpful to our site engineer, I'll forward this to him. I hope this could help since I'm also thinking that perhaps he already knew all of this. Greetings from http://www.massagegrandeprairie.com.
Glad I was able to check this site out! aviva pools
Thanks for sharing here an informative article. about
Glad to check this site, will save this info for future reference. hhplumbingheatingair.com/
When constructing a deck, there are a few things to keep in mind in order to avoid making common mistakes. One of the most important is to have a clear focus for the deck. Trying to build a deck that does too many things will often result in an unfocused and ineffective deck.
Regards,
Melvin | See this: Drywall Companies Phoenix AZ
Thanks for sharing this great article.
Home Remodeling Services Central PA
To be honest, as a homeowner, I find this essay quite useful. Why? Simply put, for every error, there is an analogous method how to correct it.
Marco | https://www.charlottedrywallpros.com
Very informative article you shared here, thanks for keeping us posted. https://pristinewatertx.com/
Glad to found this impressive content.
https://www.fencingwilmingtonnc.com/
https://www.miamifences.org/
https://www.concretecontractorsjacksonvillefl.com/
Glad to visit this site, nice info. https://www.insdepotgroup.com/
Awesome! It looks like this project is durable and handled by professionals. Do you have any idea what is the difference between drywall and sheetrock?
Pretty! This is really a wonderful post. Thanks for providing this details.
Pressure Washing Services
Awesome article thanks!
We have recently wired up some deck lights for a customer in Joondalup and it has made the night ambience incredible and the decking installation looks amazing. Check it out down below on our website
Electrician Joondalup
This deck is just like ourdriveway !
Installation process of tile and deck are so similar. Tile installation Charlotte NC
As a home cleaner one other thing I noticed that is a terrible deck building design is when they block off access to the underside of the deck. Builders sometimes use latticework or plywood to make underneath the deck inaccessible and this is a bad design choice because under the deck is a great place for extra storage. Also, some deck builders don't keep in mind where to put the staircase when considering deck pressure washing. If the stairs are hard to access from the driveway and you have to walk around the whole deck to get up the stairs this makes tasks like pressure washing and moving furniture into the house more difficult.
Thank you for sharing this post, interesting indeed. Franklin Concreters concrete contractor
Thank you for sharing these important ideas to apply in the future. drywall contractor
This article outlines common mistakes in deck building, providing valuable insights for contractors to avoid these pitfalls and ensure high-quality deck construction for their clients. See more here at Clearwater Concrete
The webpage highlights the top 10 deck-building mistakes, providing valuable insights for homeowners and contractors to avoid common pitfalls and ensure the construction of safe and durable decks. See our Stamped Concrete Augusta for more info.
great post! check out how to do safety surfacing here dino safety surfacing
This article outlines the mistakes to avoid, offering valuable insights for anyone planning a deck construction project. Check out more about Concrete Contractor Lawrenceville
The Fine Homebuilding article on "Top 10 Deck-Building Mistakes" provides valuable insights into common pitfalls to avoid when constructing a deck, ensuring a safer, more durable, and long-lasting outdoor structure. Check out more about Concrete Patio Goodyear.
That article highlights common deck-building mistakes, which is great for avoiding costly errors. Are you planning a deck project, or just looking to refine your construction knowledge?
Check out our fence company augusta ga
This article from Fine Homebuilding offers a comprehensive guide to avoiding common deck-building mistakes, emphasizing the importance of proper construction techniques to ensure safety and longevity. It serves as a valuable resource for both DIY enthusiasts and professionals aiming to build durable and code-compliant decks. Click here to know more with Johnson Fencing Company