FHB Logo Facebook LinkedIn Email Pinterest Twitter X Instagram Tiktok YouTube Plus Icon Close Icon Navigation Search Icon Navigation Search Icon Arrow Down Icon Video Guide Icon Article Guide Icon Modal Close Icon Guide Search Icon Skip to content
Subscribe
Log In
  • How-To
  • Design
  • Tools & Materials
  • Restoration
  • Videos
  • Blogs
  • Forum
  • Magazine
  • Members
  • FHB House
  • Podcast
Log In
How-To

Making Raised-Panel Doors on a Tablesaw

With a stacked dado set, you can build Shaker-style cabinet doors in six easy steps.

By Rex Alexander Issue 177
  • X
  • facebook
  • linkedin
  • pinterest
  • email
  • add to favorites Log in or Sign up to save your favorite articles

There are lots of good reasons to build your own cabinetry for kitchens, bathrooms, mudrooms, or the many possible built-ins that make a house look and work well. For one thing, building cabinetry is a rewarding project. But more importantly, when you build custom cabinets, you can squeeze every bit of function out of the space you have and you can get exactly the cabinet style you want. And today there are tools, like track saws, that make the work easier than ever.

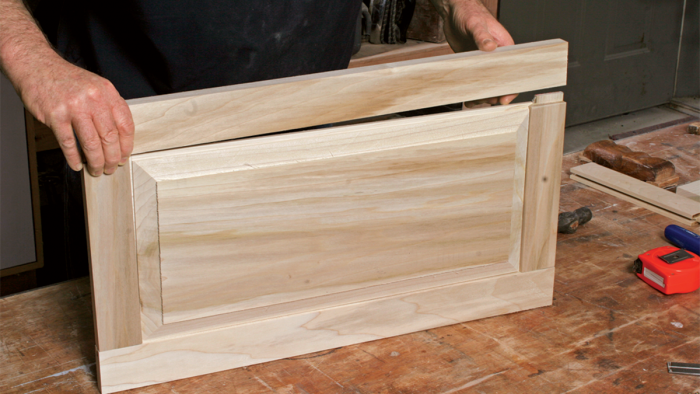
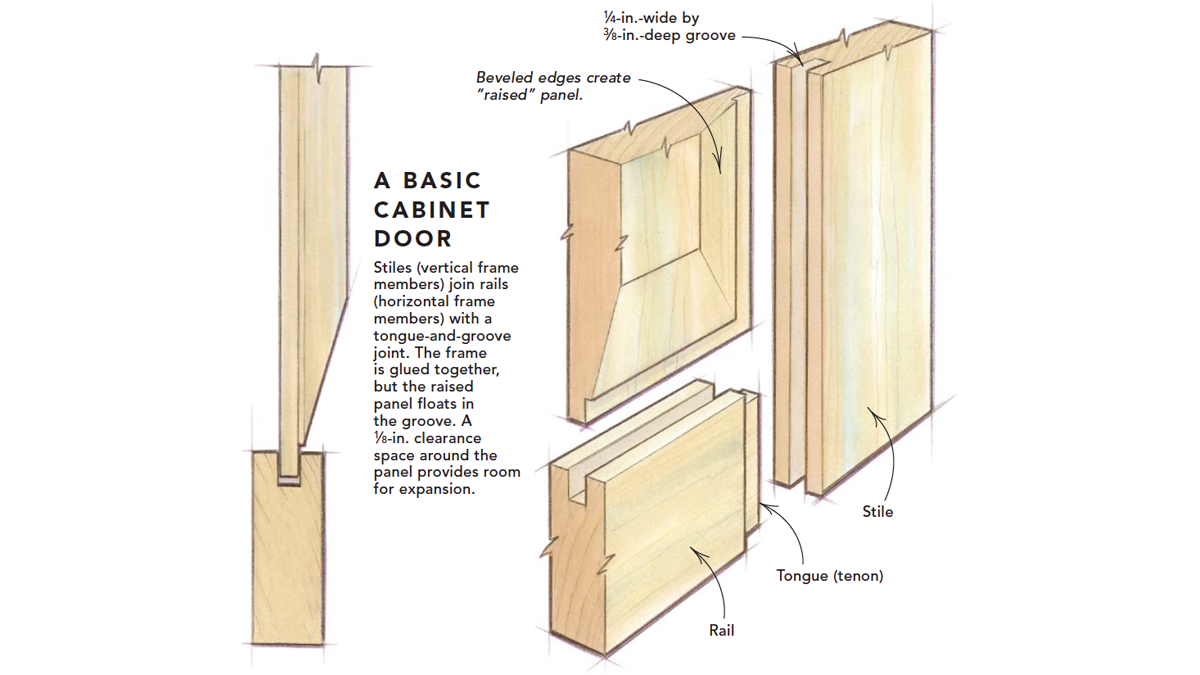
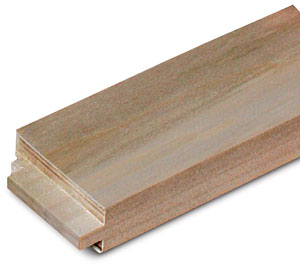
Doors are one of the trickier aspects of making cabinets. And there’s more than one way to make cabinet doors. One classic style of door and door construction is to make a raised panel and join the frame with a tongue-and-groove joint. Cabinet shops that turn out raised-panel doors rely on heavy-duty shapers and cutters or, at the very least, a router-table setup that includes a range of expensive bits. You also can make raised-panel doors with a portable tablesaw. The doors I build this way often are referred to as Shaker style. The vertical stiles and horizontal rails that make up the frame have square rather than contoured edges. The center panel, which floats in the frame, is a raised piece of solid wood (a flat piece of plywood also works).

Whether you make a single door or many using this technique, you’ll need a stacked dado set in addition to a finish-cutting combination blade for your table saw. For best results, the wood you use to build doors should be free of knots, warps, twists, and checks. I frequently use Poplar (shown here) for doors that will be painted. Here’s a drawing of the overall assembly followed by a step-by-step look at the process:


Step 1: Use a dado head to groove the stiles and rails. Replace the tablesaw blade with a stacked dado set. The cutting width should be 1/4 in. Adjust the cutting height to 3/8 in. Position the saw’s rip fence so that the groove will be centered in the frame members. Cutting test grooves in scrap stock (the same thickness as the stiles and rails) is a smart idea to assure you that the setup is right.


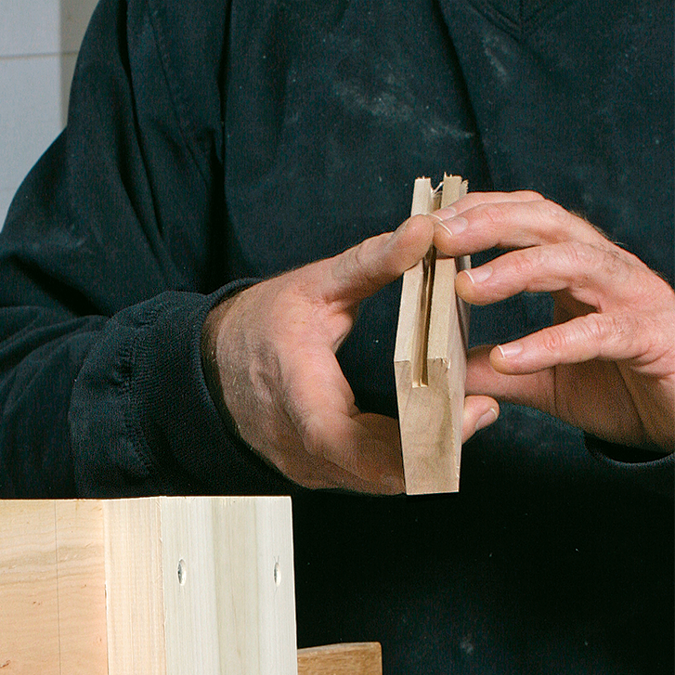
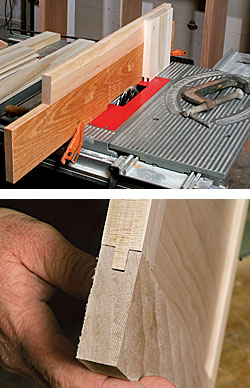
Step 2: Split the dado head to cut tongues in the rails.

Each rail end needs a tongue or short tenon that fits snugly in the grooved stile. You can cut away the waste on each side of the tongue by inserting steel washers between the dado cutters. The space you create needs to match the planned thickness of the tongue. Cut test pieces, adding or subtracting washers as necessary until the tongue fits snugly. The thin washers that come with most stacked dado sets help to fine-tune the fit.

Split the dado head to cut tongues in the rails
The space you create needs to match the planned thickness of the tongue

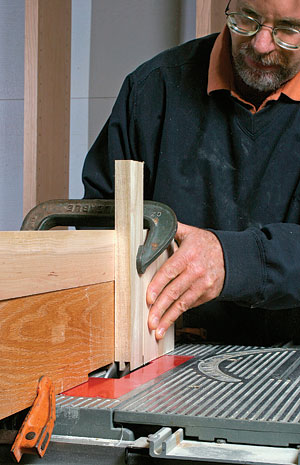
Step 3: To cut tongues safely and accurately, clamp the rails to a sliding cradle.

As shown in the photos, my cradle consists of a vertical guide block fastened to a horizontal runner. The runner slides on the top edge of an auxiliary rip fence.

To cut tongues safely and accurately, clamp the rails to a sliding cradle
Cradle consists of a vertical guide block fastened to a horizontal runner

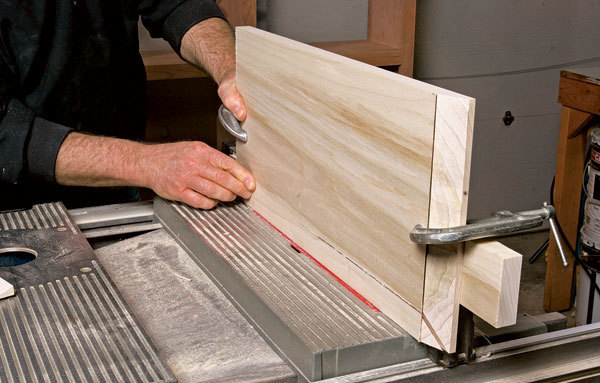
Step 4: Raise the panel edges.

Raise the panel edges

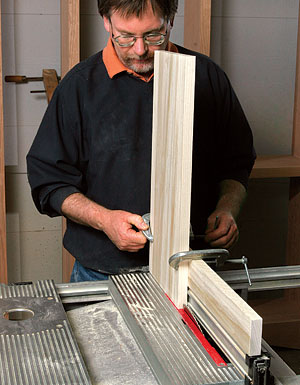
Size the panel as shown in the drawing so that there will be 1/8 in. of clearance space around the panel edges after the door is assembled.

Adjust the tablesaw’s bevel angle to 15°. Adjust the rip fence so that it’s 1/4 in. from the blade, the same distance as the thickness of the panel groove. Raise the blade so that the teeth just penetrate the opposite side of the panel.

Now you’re ready to make the bevel cuts that will create the raised edges. To hold the panel upright, clamp a runner block to the panel so that the block will be guided by the top edge of the rip fence, as shown.


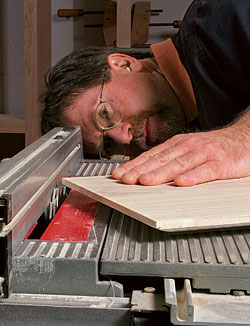
Step 5: Flatten the outer edges.

To fit properly in the grooved frame, the panel edges should have a uniform thickness instead of being beveled. Replace the sawblade with a 1/4-in.-wide dado head. Then place the panel upside down on the saw table, and raise the dado head so that it will remove the beveled edge, leaving a flat edge of the correct thickness. Position the rip fence 1/16 in. away from the dado head; spin the blade by hand to make sure it doesn’t contact the fence. Then turn on the saw and guide the panel against the rip fence to flatten its edges.

Flatten the outer edges

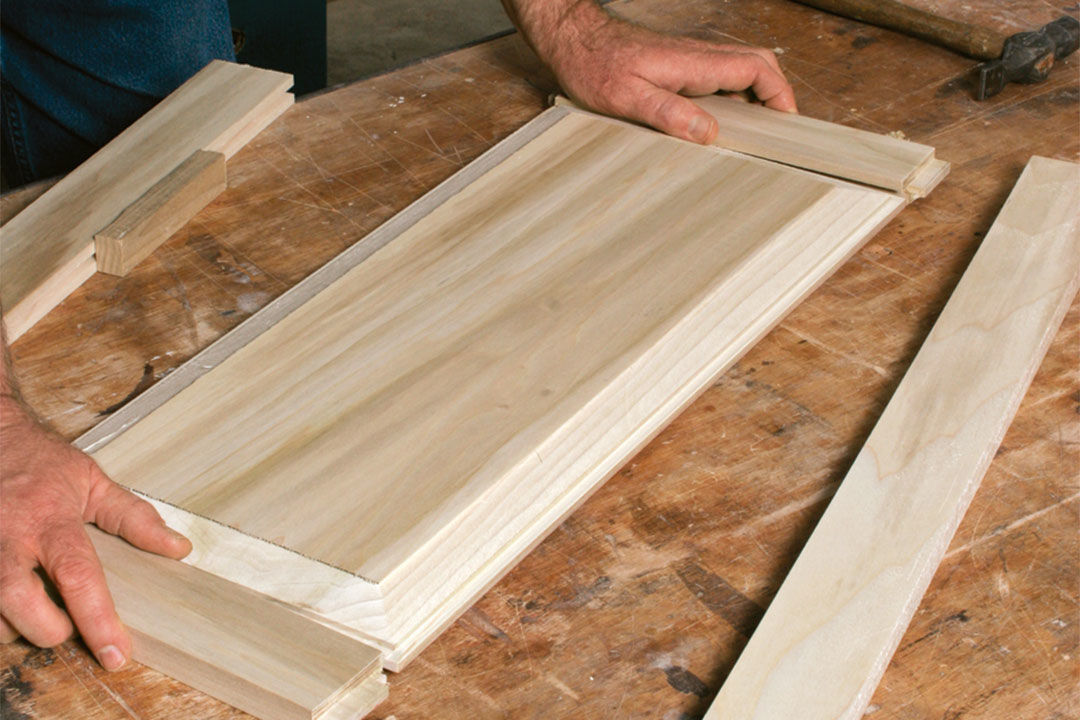
Step 6: Test-fit, sand, and assemble.

Do a dry run through the assembly process to make sure the panel fits into the stile-and-rail frame without being forced. If necessary, you can narrow the panel edge with some 100-grit sandpaper wrapped around a sanding block. When the fit is right, give the panel a final sanding. Use 120-grit sandpaper if the door will be painted, and 220 grit if you plan to use stain or clear finish. When you glue up the door, take care to spread glue only on the tongue-and-groove joints between frame members. Use bar or pipe clamps to keep the joints tight until the glue dries.


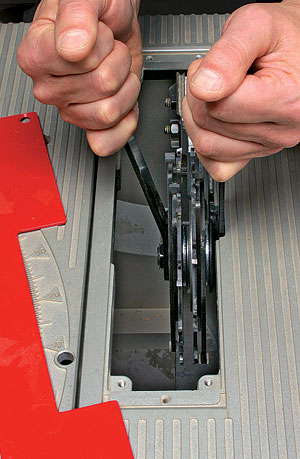
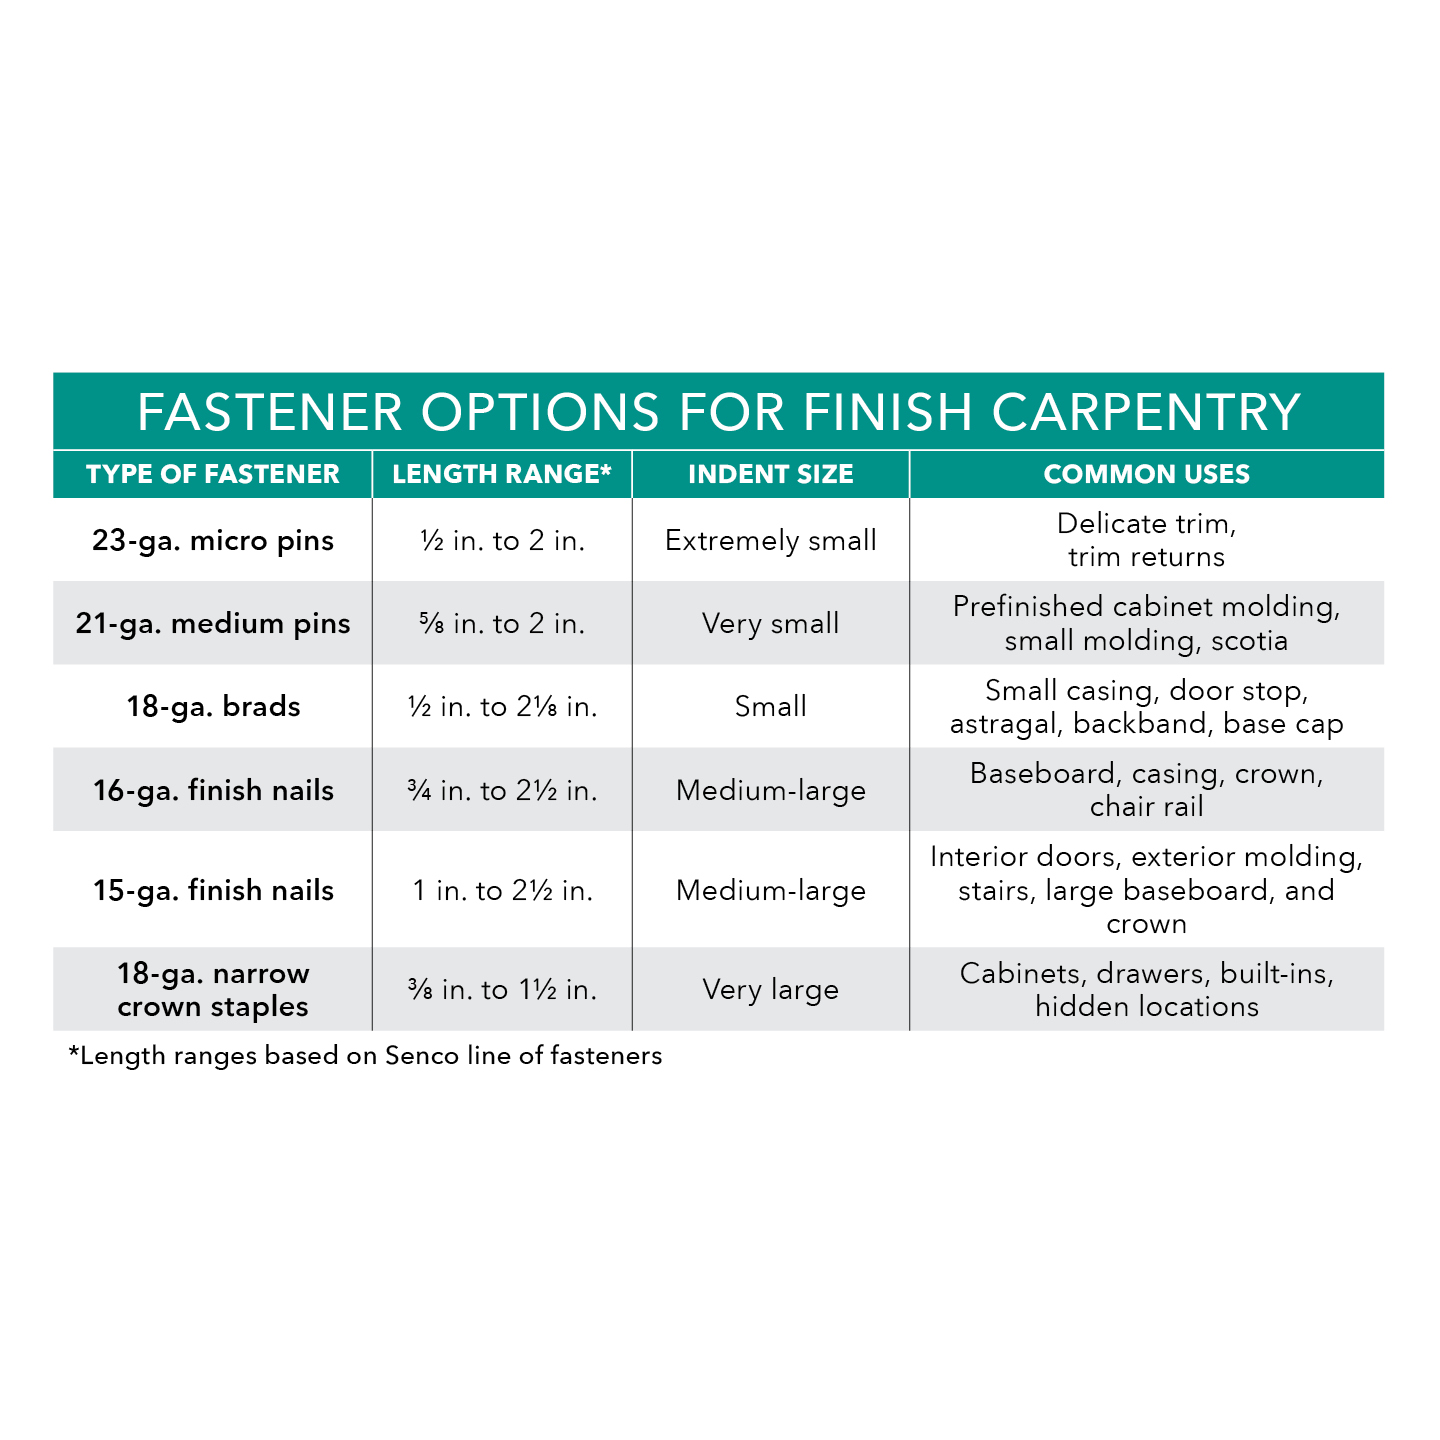
A stacked dado set is a useful accessory

Photo by: Bill Duckworth

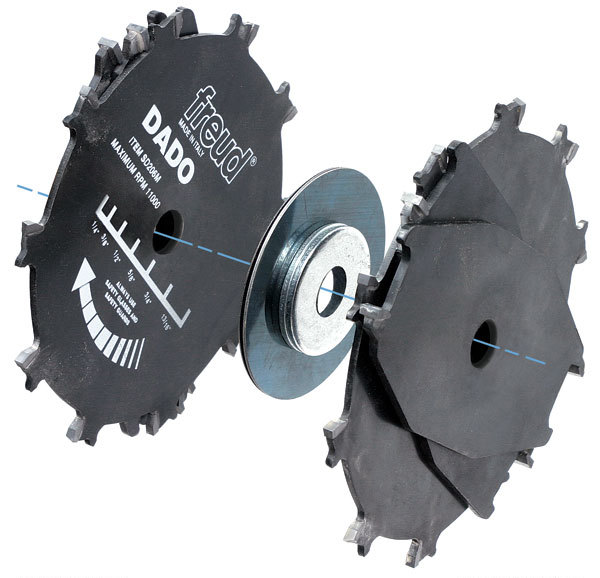
Replacing the tablesaw’s blade with a dado head gives you the ability to cut a wider swath. You can make grooves and rabbets, or (by inserting spacers as explained in step 2) even cut a tongue, or short tenon. Most portable and job-site tablesaws accept a 6-in-dia., stacked dado set like this Freud model ($85; www.freudtools.com), which can cut widths from 1/4 in. to 13/16 in. The dado set includes a pair of sawblade-like cutters, chippers (cutters with just two teeth) in different widths, and large washers in varied thicknesses that serve as spacers between cutters. Arranging the cutters and washers in the orientation shown above enables you to cut a tenon, as shown here.

Photos by Roe A. Osborn, except where noted; drawings by: Dan Thornton

Sign up for eletters today and get the latest how-to from Fine Homebuilding, plus special offers.

Signing you up...

This site is protected by reCAPTCHA and the Google Privacy Policy and Terms of Service apply.
See all newsletters
See all newsletters
×

Get home building tips, offers, and expert advice in your inbox

Signing you up...

This site is protected by reCAPTCHA and the Google Privacy Policy and Terms of Service apply.
See all newsletters
See all newsletters

New Feature

Fine Homebuilding Forums

Ask questions, offer advice, and share your work

  • X
  • facebook
  • linkedin
  • pinterest
  • email
  • add to favorites Log in or Sign up to save your favorite articles

View Comments

  1. buggin | Mar 28, 2017 11:40pm | #1

    I have to say this is by far the best example of a "HOW TO" I have seen.
    Thank you for sharing!

  2. planetparker | Apr 25, 2017 11:14am | #2

    Great tips. I really like the sliding cradle jig idea--thanks for sharing, Rex.

  3. antonettakowalewski | Apr 19, 2018 04:58pm | #3

    If you want to build it yourself just google for woodprix. I know you will find good solutions for all your ideas.

  4. Cornelius99 | Nov 14, 2019 01:37pm | #4

    Where would one get the spacer washers?
    My dado set doesn't have any.

Log in or create an account to post a comment.

Sign up Log in

Become a member and get full access to FineHomebuilding.com

Up Next

Video Shorts

Featured Story

Outdoor Lighting

Lighting up an exterior isn't just about ambiance— it's also about code compliance. Here is what the code says about safety and efficiency when it comes to outdoor lighting.

Featured Video

SawStop's Portable Tablesaw is Bigger and Better Than Before

The 10-in. Jobsite Saw PRO has a wider table, a new dust-control port, and a more versatile fence, along with the same reliable safety mechanism included in all SawStop tablesaws.

Related Stories

  • What Size Nails?
  • Custom Built-ins With Job-Site Tools
  • An Easier Method for Mitered Head Casings
  • Making and Installing Wood Wall Paneling

Discussion Forum

Recent Posts and Replies

  • |
  • |
  • |
  • |
  • |
  • |
View More Create Post

Highlights

Fine Homebuilding All Access
Fine Homebuilding Podcast
Tool Tech
Plus, get an extra 20% off with code GIFT20

"I have learned so much thanks to the searchable articles on the FHB website. I can confidently say that I expect to be a life-long subscriber." - M.K.

Get home building tips, offers, and expert advice in your inbox

Signing you up...

This site is protected by reCAPTCHA and the Google Privacy Policy and Terms of Service apply.
See all newsletters
See all newsletters

Video

View All Videos
  • Building Custom Kitchen Cabinets
  • Podcast 331: PRO TALK With Cabinetmaker Ben Scott
  • How to Use a Pocket-Hole Jig
  • Podcast 128: Worst. Photo. Shoot. Ever.
View All

Tablesaws

View All Tablesaws Articles
  • Sturdy Saw Stand
  • Convenient Dust Collection
  • Dialing In a Job-Site Tablesaw
View All Tablesaws Articles

Fine Homebuilding Magazine

  • Issue 332 - July 2025
    • Custom Built-ins With Job-Site Tools
    • Fight House Fires Through Design
    • Making the Move to Multifamily
  • Issue 331 - June 2025
    • A More Resilient Roof
    • Tool Test: You Need a Drywall Sander
    • Ducted vs. Ductless Heat Pumps
  • Issue 330 - April/May 2025
    • Deck Details for Durability
    • FAQs on HPWHs
    • 10 Tips for a Long-Lasting Paint Job
  • Issue 329 - Feb/Mar 2025
    • Smart Foundation for a Small Addition
    • A Kominka Comes West
    • Making Small Kitchens Work
  • Issue 328 - Dec/Jan 2024
    • How a Pro Replaces Columns
    • Passive House 3.0
    • Tool Test: Compact Line Lasers

Fine Home Building

Newsletter Sign-up

  • Fine Homebuilding

    Home building tips, offers, and expert advice in your inbox.

  • Green Building Advisor

    Building science and energy efficiency advice, plus special offers, in your inbox.

  • Old House Journal

    Repair, renovation, and restoration tips, plus special offers, in your inbox.

Signing you up...

This site is protected by reCAPTCHA and the Google Privacy Policy and Terms of Service apply.
See all newsletters

Follow

  • Fine Homebuilding

    Dig into cutting-edge approaches and decades of proven solutions with total access to our experts and tradespeople.

    Start Free Trial Now
    • Facebook
    • Instagram
    • X
    • LinkedIn
  • GBA Prime

    Get instant access to the latest developments in green building, research, and reports from the field.

    Start Free Trial Now
    • Facebook
    • YouTube
  • Old House Journal

    Learn how to restore, repair, update, and decorate your home.

    Subscribe Now
    • Facebook
    • Instagram
    • X

Membership & Magazine

  • Online Archive
  • Start Free Trial
  • Magazine Subscription
  • Magazine Renewal
  • Gift a Subscription
  • Customer Support
  • Privacy Preferences
  • About
  • Contact
  • Advertise
  • Careers
  • Terms of Use
  • Site Map
  • Do not sell or share my information
  • Privacy Policy
  • Accessibility
  • California Privacy Rights

© 2025 Active Interest Media. All rights reserved.

Fine Homebuilding receives a commission for items purchased through links on this site, including Amazon Associates and other affiliate advertising programs.

  • Home Group
  • Antique Trader
  • Arts & Crafts Homes
  • Bank Note Reporter
  • Cabin Life
  • Cuisine at Home
  • Fine Gardening
  • Fine Woodworking
  • Green Building Advisor
  • Garden Gate
  • Horticulture
  • Keep Craft Alive
  • Log Home Living
  • Military Trader/Vehicles
  • Numismatic News
  • Numismaster
  • Old Cars Weekly
  • Old House Journal
  • Period Homes
  • Popular Woodworking
  • Script
  • ShopNotes
  • Sports Collectors Digest
  • Threads
  • Timber Home Living
  • Traditional Building
  • Woodsmith
  • World Coin News
  • Writer's Digest
Active Interest Media logo
X
X
This is a dialog window which overlays the main content of the page. The modal window is a 'site map' of the most critical areas of the site. Pressing the Escape (ESC) button will close the modal and bring you back to where you were on the page.

Main Menu

  • How-To
  • Design
  • Tools & Materials
  • Video
  • Blogs
  • Forum
  • Project Guides
  • Reader Projects
  • Magazine
  • Members
  • FHB House

Podcasts

  • FHB Podcast
  • ProTalk

Webinars

  • Upcoming and On-Demand

Podcasts

  • FHB Podcast
  • ProTalk

Webinars

  • Upcoming and On-Demand

Popular Topics

  • Kitchens
  • Business
  • Bedrooms
  • Roofs
  • Architecture and Design
  • Green Building
  • Decks
  • Framing
  • Safety
  • Remodeling
  • Bathrooms
  • Windows
  • Tilework
  • Ceilings
  • HVAC

Magazine

  • Current Issue
  • Past Issues
  • Magazine Index
  • Subscribe
  • Online Archive
  • Author Guidelines

All Access

  • Member Home
  • Start Free Trial
  • Gift Membership

Online Learning

  • Courses
  • Project Guides
  • Reader Projects
  • Podcast

More

  • FHB Ambassadors
  • FHB House
  • Customer Support

Account

  • Log In
  • Join

Newsletter

Get home building tips, offers, and expert advice in your inbox

Signing you up...

This site is protected by reCAPTCHA and the Google Privacy Policy and Terms of Service apply.
See all newsletters
See all newsletters

Follow

  • X
  • YouTube
  • instagram
  • facebook
  • pinterest
  • Tiktok

Join All Access

Become a member and get instant access to thousands of videos, how-tos, tool reviews, and design features.

Start Your Free Trial

Subscribe

FHB Magazine

Start your subscription today and save up to 70%

Subscribe

This is your last free article.

Don't miss another expert tip or technique from building pros. Start your free trial today.

Start your FREE trial

Already a member? Log in

We hope you’ve enjoyed your free articles. To keep reading, become a member today.

Get complete site access to expert advice, how-to videos, Code Check, and more, plus the print magazine.

Start your FREE trial

Already a member? Log in

Privacy Policy Update

We use cookies, pixels, script and other tracking technologies to analyze and improve our service, to improve and personalize content, and for advertising to you. We also share information about your use of our site with third-party social media, advertising and analytics partners. You can view our Privacy Policy here and our Terms of Use here.

Cookies

Analytics

These cookies help us track site metrics to improve our sites and provide a better user experience.

Advertising/Social Media

These cookies are used to serve advertisements aligned with your interests.

Essential

These cookies are required to provide basic functions like page navigation and access to secure areas of the website.

Delete My Data

Delete all cookies and associated data