A friend is restoring the staircase in an old farmhouse, and he needed a 6-ft. piece of handrail to complete the banister. He had a short piece of the original railing, which served as our pattern.
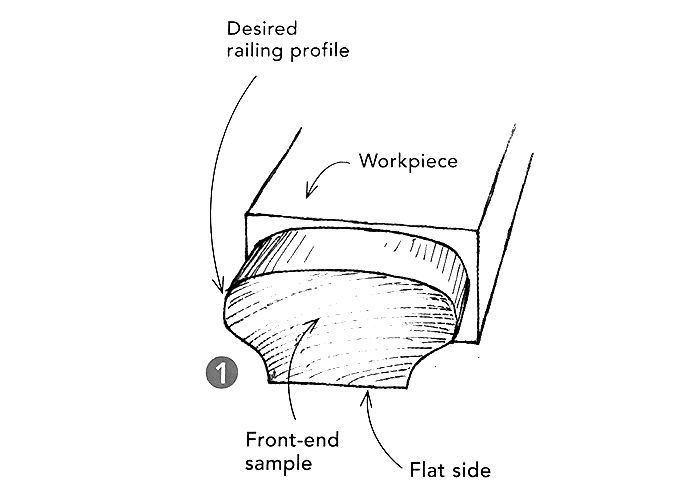
The cross section of the rail is oval across the top and sides (1), then flares into concave contours before turning flat across the bottom. I could have cut the concave shape with a 1/2-in.-radius cove cutter on a router table, but the convex shape across the top and sides needed a different approach. Paying for a set of custom shaper-cutters wasn’t in the budget, so I came up with the following method.
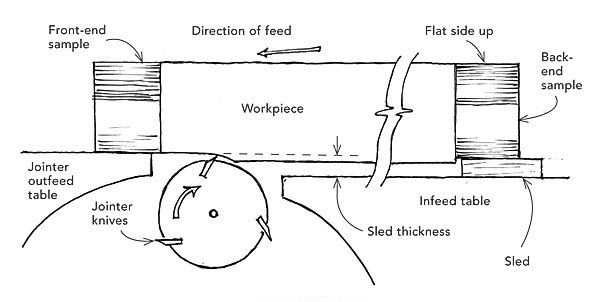
First, I glued up and milled a piece of pine stock with a cross section slightly greater than the dimensions of the railing. Then I cut two short sections from the original-railing sample and glued them to each end of the pine workpiece, as shown in the drawing. The samples were centered precisely at each end, and their flat bottoms were flush with what would be the underside of the finished railing.
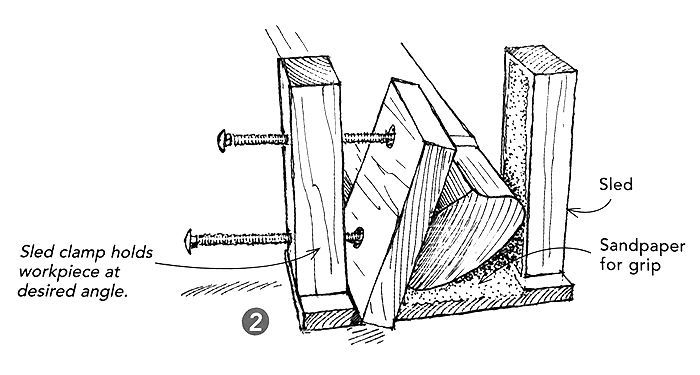
The infeed and outfeed tables of my 6-in. jointer are only 20 in. long, so I rigged temporary extensions for each one out of 3/4-in. medium-density fiberboard (MDF) equal in length to the workpiece plus the glued-on samples. (2) I then devised a “sled” to support the back end of the workpiece. Along with two adjustable bolts, sandpaper glued to the inner surfaces of the sled secured the workpiece at whatever angle that I needed. The back-end sample is supported by the sled at exactly the same plane as the cutterhead and the outfeed table. Said another way, the thickness of the sled’s base is equal to the difference in height between the infeed and outfeed tables.
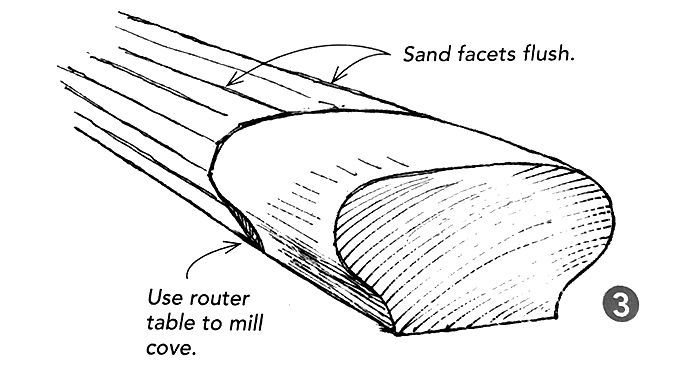
In operation, the workpiece, topside down, is lowered gently so that the front-end sample comes to rest on the outfeed table and the stock onto the spinning cutterhead,as shown in the drawing. The workpiece then is passed over the cutterhead, making a shallow flat cut that aligns exactly with the surface of the sample pieces on each end. This procedure is repeated, shifting the position of the workpiece with each cut until the shape of the new railing conforms closely to the original. (3) In my case, this process took about 20 passes. I was left with a series of small, flat surfaces rather than a single, smoothly curved surface. At that point, I finished it to a smooth curve with a hand plane, and then sandpaper. I milled the concave profiles on a router table, and the railing was ready for its close-up.
—Robert H. Harris Jr., Charlottesville, VA
Edited and illustrated by Charles Miller
From Fine Homebuilding #214
Fine Homebuilding Recommended Products
Fine Homebuilding receives a commission for items purchased through links on this site, including Amazon Associates and other affiliate advertising programs.

8067 All-Weather Flashing Tape

Affordable IR Camera

Reliable Crimp Connectors
