
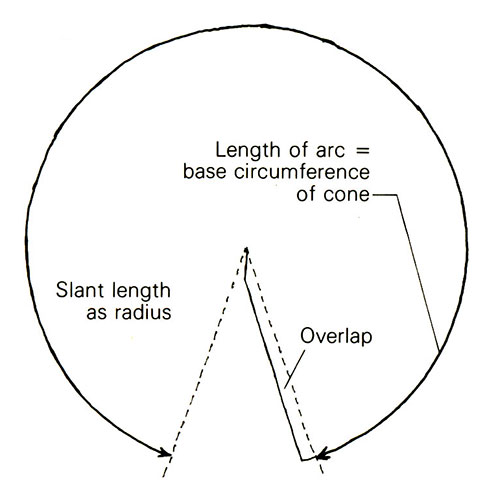
I have been intrigued with this shortcut, which you may find of interest. Cones have several uses, such as sheet-metal chimney caps, but the layout of a cone is puzzling to some craftsmen. Here is a fast method that doesn’t require higher mathematics. The example shows how to lay out a cone 6 in. high with a 24-in. dia. base.
Using the slant length as radius, scribe a circle on the material, and snip. Then measure the base circumference of the cone on the circle, adding at least a 3/4-in. overlap for screws, and cut out the wedge.
—William A. Julien, S. Chatham, MA
Edited and illustrated by Charles Miller
From Fine Homebuilding #4











View Comments
The technique still doesn't explain how to measure that circumference of 75 3/8 inches. One can only presume that one cuts out the circle and then tries to wrap a tape measure around it, marking off the correct length. ....And the definition of frustration is...
With one simple additional formula one can measure the exact number of degrees required for that circle. Everyone has an old drafting protractor (and squares, compass and dividers) in their workshop....
No. of degrees = (360 x 75 3/8) / (2 x pi x 13 7/16)
= 321.6 degrees + 3/4" overlap
(Yes, my protractor is graduated in 1/2 degrees, so that 4th significant digit does have meaning.)
For clarity I've shown the formula using fractions like the author. In reality it is far easier to perform this calculation using decimals as one would have originally obtained using a calculator (or slide rule) ... and yes, I still have a slide rule in my workshop from days gone by.
For a rude'n'crude approach, use the tip to determine and scribe the proper diameter outer circle. You can use the same technique to determine the radius for the center cutout for the pipe. If you want tabs to fasten the flashing to the pipe, scribe a 3rd circle, 1/2" smaller than the center cutout. While you have your compass out, draw a circle on a piece of plywood with diameter equal to the desired finished cone.
Cut the outer circle, cut a radial slit from the outside to the center and then cut out the center opening and any tabs. Now grab the outer corners of the slit, then overlap and pull them together until the OD of the cone matches the circle on the plywood. Clamp & fasten the overlap