Timbers and Templates
An unconventional router bit and particleboard templates make shallow mortising fast and accurate.
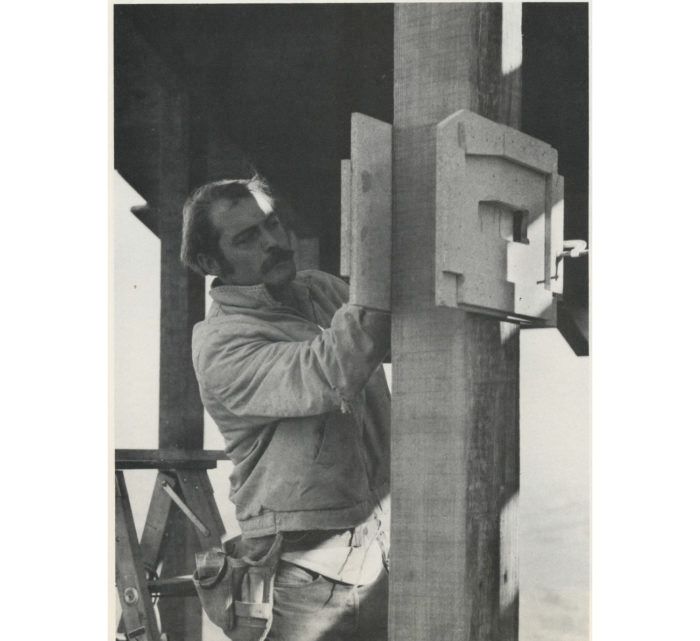
Synopsis: The need to mortise accurately for hundreds of joints of different sizes and for steel fastening straps leads a carpenter and cabinetmaker to use in a new way a router bit designed for flush-cut trimming.
Last summer I worked on a house that required extensive, accurate and repetitious mortising for joints in heavy timbers. Designed by architect and engineer Lawrence Karp to be his residence and studio, the house combines a concrete foundation and first floor with cantilevered steel I-beams supporting a timber-framed second story. The timbers were to be mortised together and left exposed, so it was important to join them precisely. The need to mortise accurately for hundreds of joints of different sizes and for steel fastening straps led me to use in a new way a router bit designed for flush-cut trimming.
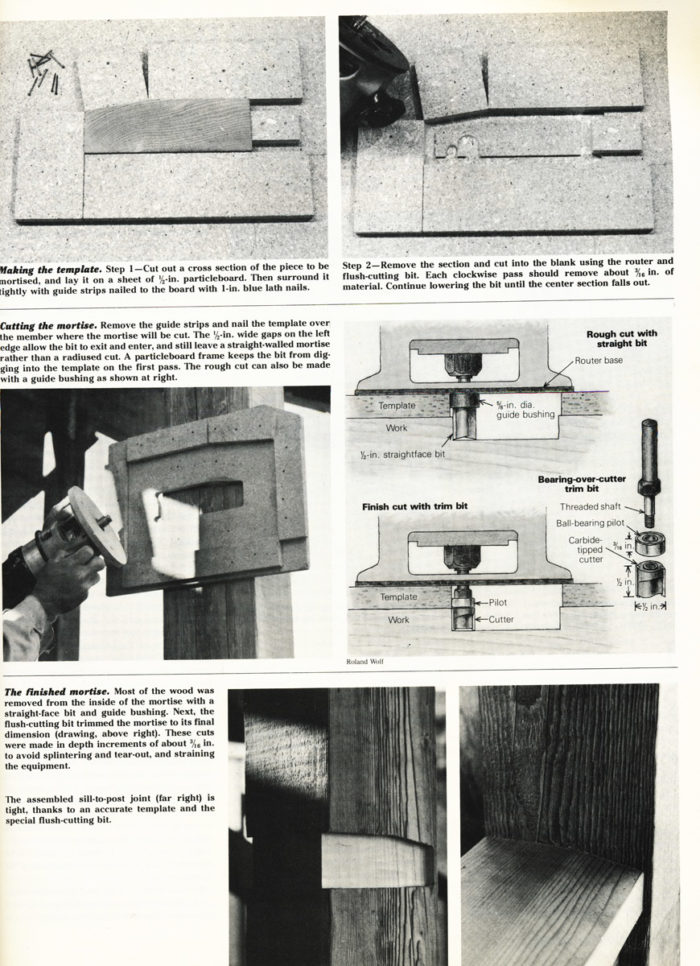
The bit, called a TA 170, is made by the Oakland Carbide Engineering Co. It consists of a 1/4-in. shaft threaded at one end to receive a 1/2-in dia. bearing and a 1/2-in dia., two flute cutter. Unlike most trim bits with pilots attached below the cutter, the TA 170 has a ball-bearing pilot mounted above the cutter. This allows the bit to be used without a guide bushing when routing with a template. The pilot is the same diameter as the bit’s cutting arc, which means that the resulting mortise is precisely the same size as the template you make. The bit cuts exactly the same path traced by the bearing. Using the bit successfully for cutting mortises requires making an accurate template the same size as a cross section of the member to be let in.
I like to use 1/2-in. particleboard for template material; it is easy to cut, has no voids and it’s cheap-no small advantage, since I went through 12 4×8 sheets on this job. It’s important that the template be set square on the work; it must also stay firmly in position while you’re routing. I allow at least a 5-in. wide border around the template edges to give the router base ample bearing surface, and I draw perpendicular guidelines on the blank before laying out the template. To hold the template on the work, I use 1-in. blue lath nails. They go on like needles and come out fairly easily.
The flush-cutting trim bits cuts accurately, but not very quickly. For this reason, I use a 1-1/2-hp router with a 1/2-in. two-flute straightface bit to remove most of the waste in the mortise. To prevent this bit from accidentally gouging the template, I attach a 5/8-in. dia. guide bushing to the router base. Once the mortise has been roughed out, the flushcutter can finish the job. I make each mortise 1/2 in. deep, cutting in increments of 3/16 to avoid burning the wood and overheating the cutter. Once the cut is 1/2 in. deep, the mortise acts as its own template because the pilot rides against the already established mortise walls.
Inevitably, the template will get a ding or two that must be patched to restore the smooth profile. This can be done with fast-setting autobody putty. Overfill the ding and then trim flush with a file or with router and piloted bit. As a precaution, as soon as I make one template and test it for fit, I make and exact copy. This clone saves a lot of trouble.
Fine Homebuilding Recommended Products
Fine Homebuilding receives a commission for items purchased through links on this site, including Amazon Associates and other affiliate advertising programs.
11" Nail Puller
Short Blade Chisel

Tajima Chalk Rite Chalk Line


