Storage Stair
An alternative to conventional framing takes advantage of normally wasted space.
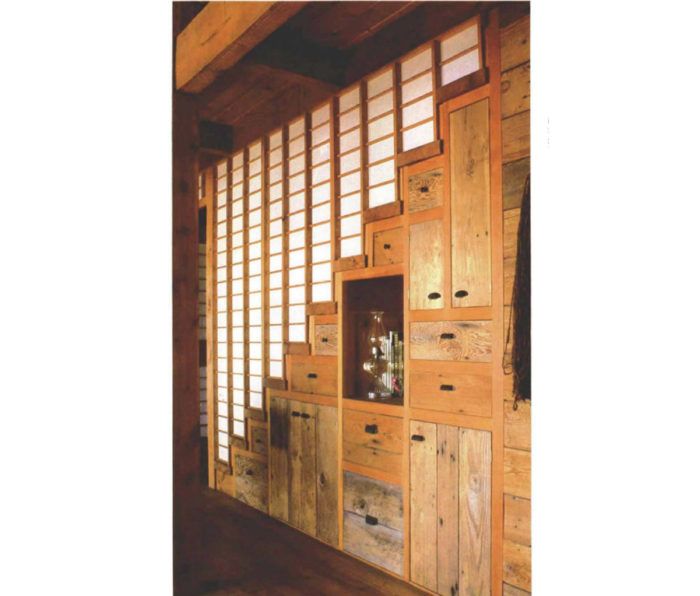
Synopsis: This short article shows how to frame staircases as a series of rectangular boxes that can be used as under-stair cabinets. The author was inspired by a trip to Japan.
A stairway that my wife Lane and I saw in Japan about 10 years ago etched itself in our memories. Instead of being built on notched stringers, it was made up of finely joined chests and boxes of graduated heights. In stepping from the top of one box to the top of another, you arrived at the second floor. Needless to say, when the time came to build a stair in our own house recently, the Japanese stairway was still in our minds. Our stair contains four different kinds of storage units: drawers, cupboards, a roll-out toybox and a book alcove. There’s even a drawer under the lowest tread that pulls out for storing slippers and socks. Considering all the stuff that we’re able to store in this normally wasted space, building the storage stair wasn’t that much work. It was more work, of course, than for a conventional stairway, but no more than for a storage wall.
Design and layout
Our visions of fine Japanese joinery had to adjust to our own reality. We had an old Sears table saw, a skillsaw, a cheap belt sander, and a random assortment of hand tools. Our cabinet shop was a corner of the living room with the rug rolled up. We couldn’t afford good hardwood, and didn’t want a house too precious for people to live in. So we had to make do with the pile of construction-grade fir stacked in our living room, some used shiplap, and someone who had never built a stair before.
The structural system I worked out for the stair is a framework supported by four Vertical partitions that serve as dividers between drawers or cabinets. These are connected by a grid of 2-in. by 1½-in. face-frame pieces that form a base for treads and act as drawer and cabinet bottoms.
I built all the partitions first. Each one is a different height, but they are all constructed the same way. An identical pair of 2×4 uprights was grooved to accept a ½-in. thick plywood panel and notched at the top for the 2×10 riser that is an integral part of each partition. I drew up a checklist of all the framing members and hung it up by the table saw, then crosscut long stock to rough length with my skillsaw and brought it to the table saw for finish cutting. The 2x4s for each partition were cut in pairs, since they would run clear to the floor. I chiseled shallow (1/8-in.) mortises in the 2x4s to accept 1½-in. by 2-in. horizontal face-frame pieces that would connect adjoining partitions and also support the shelves, drawers and treads. These pieces would be joined to the 2x4s with glue and dowels, so I made a cardboard template and stuck a nail through it to mark dowel centers.
For more photos, drawings, and details, click the View PDF button below:
Fine Homebuilding Recommended Products
Fine Homebuilding receives a commission for items purchased through links on this site, including Amazon Associates and other affiliate advertising programs.
Portable Wall Jack

Magoog Tall Stair Gauges

QuikDrive PRO300s


