Designing and Building Stairs
Stairways can be minimal or very elaborate, but they're all based on simple geometry and accurate finish work.

Today, few people can afford the time and expense of building classical 19th-century stairways. Tastes have changed too, and as a result, stairs have become simpler. But the principles of stair design and construction are the same as they’ve always been, and so are the skills that the builder must bring to the task. If modern stairs aren’t ornate, they still remain a focal point of a house—your work is out there for all to see.
One of the problems builders face in cutting stairs is getting rusty. Unlike the master stairbuilders of the past, on-site carpenters typically build only a few stairways a year. Fortunately, designing a stair and laying out the stringers uses the same language and concepts as roof framing. Fitting treads and risers, on the other hand, is nothing more than simple, if demanding, finish work.
Basic stair types
The simplest stairway is a cleated stairway, which relies on wood or metal cleats fastened to the carriages to support the treads. You could use a cleated stairway for a back porch or cellar, but count on repairing the ever-loosening cleats. Wood cleats are typically 1x4s, and screwing them in is a big improvement over nails. But angleiron cleats will last longer.
Another open-tread stairway—one without risers—uses dadoed carriages. The treads have 1/2 in. or more bearing on the inside face of the carriages, and they are either nailed or screwed in place. I use a circular saw, and set the depth of cut to half the thickness of the carriage, to make the parallel cuts. Then I clean up the bottom of the dado with a chisel. A router and a simple fixture built to the stair pitch and clamped to the carriage will also do a quick, neat job.
In the past, dadoed carriages were used mostly for utility stairs for porches, decks and the like, but more and more I’m asked to build open-tread oak stairs that have to be nearly furniture quality. One type, the stepladder stair, can be used when limited space doesn’t allow any other solution.
On finished stairs, the dado is usually stopped (that is, its length is limited to the width of the tread), and squared up at the end with a chisel. If you begin the dado on the front of the carriage, leave the tread nosing protruding slightly. If you start the dado at the back of the carriage, the treads will be a little inset. They can look nice either way.
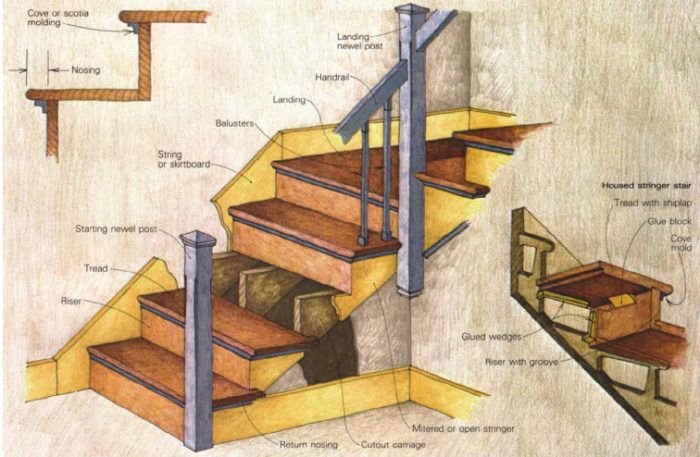
Other stairways use cut-out carriages. The simplest of these is a typical basement stair where the rough carriages are exposed, and risers are optional. The most complicated is a housed-stringer stairway. It is based primarily on patient and accurate work with a router. The stringer is mortised out along the outline of the treads and risers with a graduated allowance behind the riser and tread locations for driving in wedges. Adjustable commercial fixtures or wooden shop-made templates are used to guide the router. Although the first stairway that I built by myself on my own had a housed stringer, I won’t try to give complete instructions here.
A finished stairway that still requires patient finish work, but is much less tedious to build, uses cut-out carriages hidden below the treads, and stringboards or skirtboards as the finish against the stairwall. The treads and risers are scribed to the skirts. The example I’ll be using to describe final assembly is one of these that also has an open side, which uses a mitered stringer. This side of the stair re-quires a balustrade—handrail, balusters, and newel posts—but that’s a separate topic
To learn how to design a stairway and view a glossary of stair terms, click the View PDF button below.
Fine Homebuilding Recommended Products
Fine Homebuilding receives a commission for items purchased through links on this site, including Amazon Associates and other affiliate advertising programs.

The New Carbon Architecture: Building to Cool the Climate

Smart String Line

A Field Guide to American Houses


