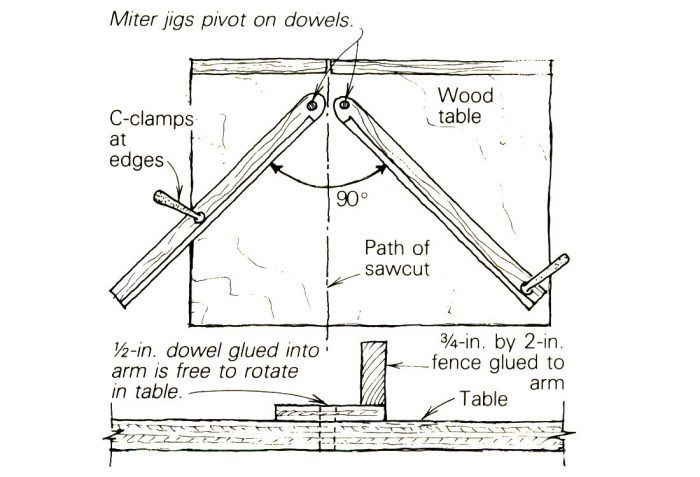
I cut miters on my radial-arm saw with the jigs shown in the drawing. In the plan view, the path of the sawblade should bisect the miter fences — a 45° cut on both sides. But as long as you are cutting stock of the same width using both fences for each joint, and the fences are exactly 90° apart, the miter will fit perfectly even if the saw is slightly off. To make sure of the angle, I hold my framing square between the two arms when I clamp them down.
The arms can be plywood or clear stock — just something that will remain true. I screwed and glued 3/4-in. by 2-in. fences to the arms after I made sure that the saw motor would clear them. The pivots are short sections of 1/2-in. dowels, glued into the arms.
James Baldwin, Chester, NJ
Edited and illustrated by Charles Miller
From Fine Homebuilding #17






View Comments
How do you cut to length?
I am not trying to be negative. My table saw just died, and I am looking for ways to live without it.
For instance, I have a 6 foot board to cut into 4 sides of a frame.
The 1st cut is easy, at the end of the board. Then what? Do you cut the lengths 1st?
I loved my friend's old, Craftsman radial arm saw. We built a huge addition using just that saw. They are not the most accurate, but with a little tweaking, and some jigs, we were able to do everything with that saw.
A couple of critical things about successfully using a RAS:
1) Because they have 3 degrees of freedom, very careful truing of the settings is essential. Yes, because the mechanisms allow such great adjustability, the truing process can be lengthy, but once it’s set, it should stay that way for a very long time and will reward the operator with very flexible, precise cuts without the hassle of fabricating jigs and other aids. It takes me a couple of hours to do a complete tune on my RAS.
2) Just like proper tuning, a dead flat, long-term stable, and true table top is crucial. The most economical path to that is via Baltic Birch plywood, a couple of laminated slabs of MDF, or a section of IKEA cheapo countertop that has P-lam on both sides — I’ve gotten these that came dead flat and another one did not, so check it carefully before cutting.
3) Following on #2 above, after all the expense and effort of fabricating a reference-surface tabletop, experienced operators use a SACRIFICIAL skin for the cutting surface (1/4” hardboard or plywood or MDF) and freely sacrifice the fence as well. With these, the blade’s travel is clearly incised into those surfaces.
So back to Q1, “how to cut to length?” This jig will favor frame lengths small enough to fit on the table or the jig if you want to use stops (just like aTS), otherwise you have to carefully cut to your precisely laid out mark. This is one situation where the RAS has an advantage, and that is because the sacrificial skin is used, the cut mark can be confidently moved to the blade‘s exact path for a very precise cut.
For longer mite cuts, I would probably swing the arm because it is easier to place work supports off to the sides, and my RAS is tuned well enough to give me perfect 45’s.