Synopsis: Here is a description of traditional frame-and-panel wainscoting made from solid lumber. A sidebar offers a plywood alternative to solid raised panels. Joinery, like the look, is traditional.
Installing a traditional raised-panel wainscot is a good way to transform a nondescript room into a more formal space. It’s also a handsome alternative to replastering old walls that have been damaged over the years by feet, furniture and children. A wood wainscot is more durable than plaster or gypboard, and it relieves the unbroken plane of the wall with the delicate array of shadow lines created by moldings and flat surfaces.
The term “wainscot” is often loosely applied to various paneling treatments that cover the lower part of a wall. The raised-panel wainscot shown here is a traditional style based on frame-and-panel construction. The frames consist of vertical members, called stiles, and horizontal members, called rails. They support panels whose beveled borders and raised fields give this particular style its name. Each panel rests in its frame with its grain running vertically. Panel width is limited by the width of your stock, unless you edge-join two or more boards together.
Beneath the bottom rail of the frame, a baseboard extends to the floor. At the top of the wainscot, a molding called a chair rail covers the joint between the top rail and the upper section of the wall.
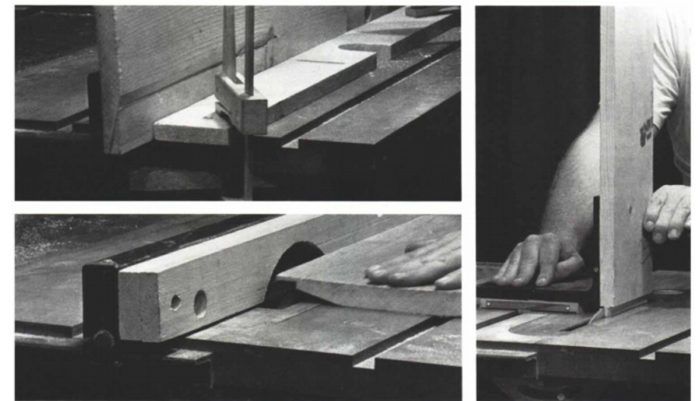
The moldings that I used in making this wainscot can be bought at most lumberyards, and it’s possible to make the raised panels and their frames with a table saw. I used a slot cutter and router table to groove the inner edges of my stiles and rails, but you could handle these as well on a table saw with a ¼ in. dado blade.
Panel design
The wainscot that I installed in the dining room of my late Victorian home is traditional in design. I wanted its top to be about 41 in. from the floor. This finished height would include an existing 7-in. baseboard that could be left in place, and a 4-in. wide chair-rail molding that would overlap the top rail of the raised-panel frame. With the stiles and rails 4 in. wide, the panels would show 22½ in. of height. Their actual height would be 23½ in., since ½ in. of the panel edges would be let into the grooved frame all around.
The width of the raised panels was determined by the distances between corners and the door, window and cabinet frames in the room. In each wainscoted section, I wanted the panel size to be uniform, so I divided each section to allow equal spacings between stiles. The largest section has four panels, each of which is 12¾ in. wide; the smallest section has a single 18-in. wide panel.
I milled the panel stock from 4/4 roughsawn pine boards about 14 in. wide. The wood, originally intended for flooring, was air dried. I had one side planed down to a thickness of 7/8 in., which allowed for a full 1/8 in. of relief on the raised panel and a sturdy ¼-in. thick tongue around the panel perimeter. Tight knots were acceptable, because I planned to paint the finished wainscot.
For more photos, drawings, and details, click the View PDF button below:


