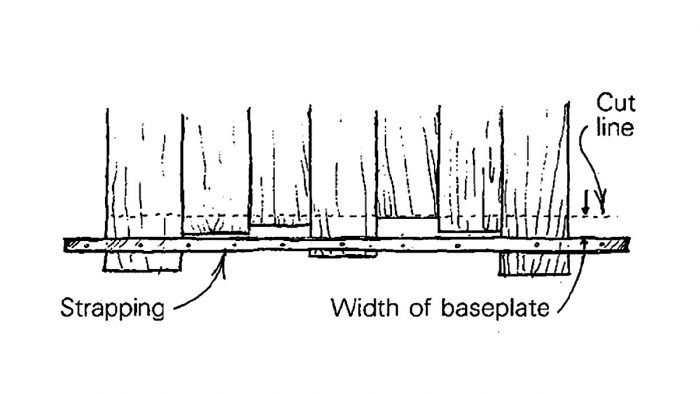
Whenever I finish a building’s exterior with vertical tongue-and-groove, shiplap or rough board siding, I use the method shown here to make straight, neat cuts. Every 3 ft. or 4 ft., I leave a board long by 4 in. to 6 in. Then I snap a chalkline about 1-3/4 in. down from my intended line of cut. This dimension is. the width of my saw’s baseplate from its edge to the blade. A piece of strapping tacked below this chalkline gives me a ready-made saw guide that will produce a crisp, straight line on the board ends.
—Bruce MacDougall, Bridgewater, NH
Edited and illustrated by Charles Miller
From Fine Homebuilding #20








View Comments
How do you prevent cutting the wrb?
Jothampenner,
This article is from the April/May 1984 issue of FH, 33 years ago.
Whoever picks these ancient "How-to" re-runs doesn't evaluate their suitability for today's buildings.
I guess there aren't enough good tips coming in these days.
Whether vertical or horizontal, we always run the bottom of our siding lower ( 1/2", 1", 2" ???) than our sheathing/ wrb. This serves two purposes. (1) Aesthetics: Don't have to worry about sheathing/wrb being visible below siding, (2) more conducive for water to drip off siding to ground as opposed to possibly wrapping around the bottom of siding and wetting the sheathing.
Even old tips are can be and are suitable for today's buildings.
Ughh. Last line should read:
Even old tips are, and can be, suitable for today's buildings.
I can understand the desire to use this technique even though it goes against the old practice of making your cuts on the back side of siding and trim pieces. So, I am wondering how many teeth are on the blades you guys are using so you don't fuzz up the face of the siding
Usually 24 or 36 tooth blade. If worried about tea rout, couple of ways to deal with; score cut line with razor blade, tape over the cut line, make a zero clearance base plate for your saw, or us a track saw.
To make a zero clearance plate, take a thin piece of hardboard, cut it just a little bit smaller than your saw's base plate. Raise your saw completely up so that the blade completely clears the bottom of the base plate. Attach the hardboard plate to the bottom of your saws plate ( hot glue, double sided tape, spray adhesive,....) Plunge cut the saw blade through the hardboard.
Good idea...right up to the middle of the run, but there would need to be additional fasteners ahead as the strapping would just swing away once you get through the next-to-last one like shown in the pic...getting squirrelier as you near the end. Horizontal kick-back or a nice uptick curve is my mental image.