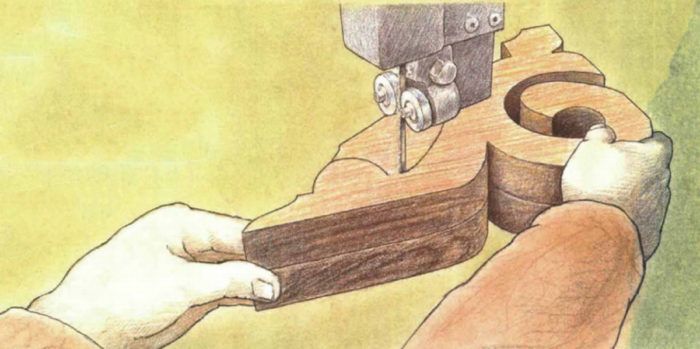
Synopsis: A short explanation of how to make decorative Victorian brackets, used as a trim detail along roof eaves and also to support shelves or hang plants. The author traces out the bracket with a template from his collection and cuts it to shape on a bandsaw.
Hap Tallman lives in Elk, Calif., and makes a wide variety of Victorian brackets, as well as other millwork items. He’s climbed up on many a porch railing to take a pattern off a bracket he liked. Tallman moved to this northern California town from the San Francisco Bay Area in 1970, and began making wooden toys and stick horses. An appreciation for the Victorian architecture of nearby Mendocino got him started making gingerbread brackets, and he gradually built up a collection of over 40 patterns, to which he’s still adding.
“Finding a good pattern is half the work,” he says, “and the best way to lift it is by tracing directly onto hardboard or stiff cardboard”. Lifting patterns is like adapting an old song, Tallman feels it’s been done many times before. Smooth transitions and sweeping curves make all the difference between an elegant bracket and a clumsy caricature.
If the proportions of the original bracket are right, the pattern can be enlarged or reduced without spoiling it. Some photocopying machines will do this, and so will an opaque projector.
For the architectural brackets, Tallman uses vertical-grain redwood. If they are to be painted, he uses Douglas fir. A thickness of 1 1/8 in. is about right for a 5-in. bracket; he uses 2-in. thick stock for one 15 in. long. Avoiding the standard lumber sizes of 3/4 in. and 1 1/2 in. adds vigour to the brackets. Since most brackets are roughly triangular, one can usually flip-flop the pattern to get a pair of brackets out of one rectangular block. By nailing two triangular blocks together, a pair of identical brackets can be sawn out at once. Tallman first edge-joints the pair after nailing them together, and then trims them to length on his radial-arm saw. He traces an existing pattern directly onto the blocks, but if he’s making a new one, he nails it to the blocks and saws it out at the same time as the brackets.
The 1/4-in. skip-tooth blade that Tallman uses on his 20-in. Powermatic bandsaw will cut down to a radius of 1/2 in. Smaller radii must be drilled out before sawing. To prevent tearout as the bit exits, he bores through both pieces until the point of the power-bore bit protrudes, then turns the blocks over and completes the hole from the other side.
The order in which the cuts are made is crucial. All outside cuts are made first so the nails are not accidentally removed with the waste until the final cut. Note how a saw cut enters a hole near the center but exits along a tangent. This is so that the side of the hole can be used as a guide to pick up a curve when entering a cut. Use care when backing out of a long, curved cut, or the blade can bind in the kerf and get pulled out of its guides.
For more photos, drawings, and details, click the View PDF button below:
Fine Homebuilding Recommended Products
Fine Homebuilding receives a commission for items purchased through links on this site, including Amazon Associates and other affiliate advertising programs.

Roofing Gun
Flashing Boot
Peel & Stick Underlayment


