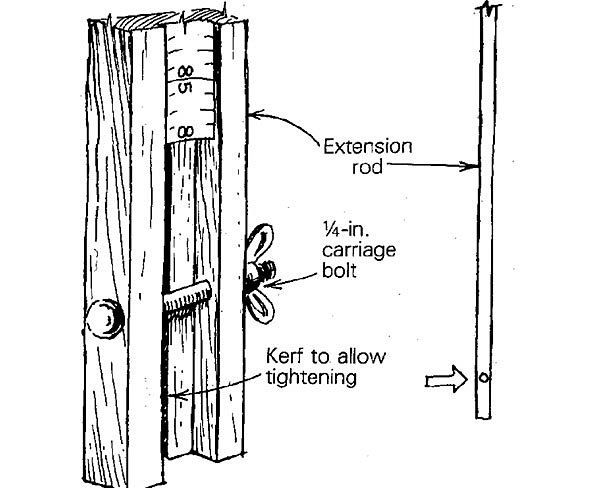
The drawing illustrates an inexpensive design for an accurate, two-piece leveling rod made from a defunct 1-in. wide tape measure. To make the base rod, begin with a piece of straight, knot-free 1x stock, ripped to a full 2-in. width. I think 7 ft. is a good length for this section of the rod. Use a router or a dado head to cut a 7/8-in. wide by 1/4-in. deep groove in the base rod. Use tin snips to cut a 7-ft. section of tape, and press-fit the tape into the groove. It should stay put.
To make an extension rod, cut another groove in a similar piece of wood, an inch or so shy of 7 ft. long. At one end, deepen the groove to 1/2 in. for the first 5 in. of the rod and cut a saw kerf 5 in. long in the center of the groove. Next, drill a hole for a 1/4-in. carriage bolt, as shown in the drawing. Now you can press the continuing portion of the tape into the groove, starting at the end of the kerf.
At the top of the base rod, glue a 7/8-in. wide block, about 5 in. long and 1/2 in. thick. This block has to be notched to accommodate the bolt in the extension rod. To use the extension, press the block at the top of the base rod into the groove in the extension rod. Adjust the extension up or down until its tape is even with the top of the base rod, and tighten the wing nut.
When the extension rod is not in use, I turn it upside-down and reattach it to the base rod, out of the way. This rod is accurate, and I think it’s easier to read than commercial ones, which cost $60 or more.
Jim Reitz, Towson, MD
Fine Homebuilding Recommended Products
Fine Homebuilding receives a commission for items purchased through links on this site, including Amazon Associates and other affiliate advertising programs.

8067 All-Weather Flashing Tape

Reliable Crimp Connectors

Affordable IR Camera


