Installing Manufactured Stair Parts
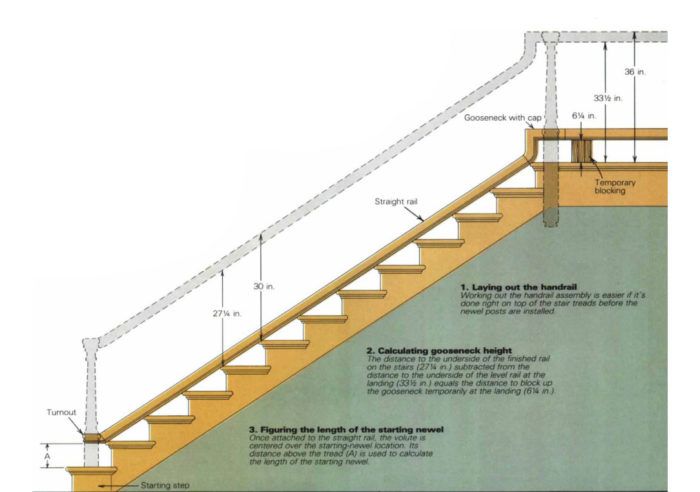
Laying the handrail on the stairs is the first step.
Synopsis: Once you’ve purchased the parts to complete a wood stair railing, there’s the question of how to piece them all together into a unified whole. This article explains how.
In every cowboy movie there’s a barroom brawl where someone crashes through the railing at the top of the stairs. If this could happen as easily as it looks, then our building codes would have outlawed wooden railings long ago. In reality, a well designed and built balustrade is not only beautiful, but it’s also strong.
Like most builders today, I use stock parts for much of my stairwork. I buy the treads, treadreturn nosing, newel posts, balusters and handrail over the counter. All that’s left is the challenge of installing them.
There are two types of balustrades that you can build. A post-to-post system has sections of handrail, either straight or with fittings, that fit between newel posts. This system is easier to install than the other. But for all the kids who enjoy sliding down the banister, it’ll never do.
An over-the-post system uses straight rail joined to fittings, and flows gracefully over the tops of the newel posts. This is the type of balustrade I usually build, and it’s the one I’ll discuss here.
The rough stair
Whenever I can, I frame the rough stair myself, rather than installing finished treads and risers over someone else’s framing. This way I’m sure that the stairs will meet code requirements, and I avoid problems with carelessly installed carriages. At the same time, I can add blocking for newel posts and wall-rail brackets that I’ll need later.
After roughing in the stairs, I pull off the job until most of the other work is done. I like to get back just before the carpeting goes down. Since the stairs are often the only way to move between floors, I work the second shift if possible, to avoid interruptions by other tradespeople working on the house.
Lay it out in place
Some installation instructions included with stair parts tell you just enough to get you into trouble. In particular, the tables that list the heights of newel posts can be misleading. They work fine if your staircase is built just like the diagrams—same rise/run, same handrail heights, and most important, the same newel-post locations. But every installation is different, and most have their quirks.
The best way to build a balustrade is to lay out the handrail, fittings and all, in its exact location, right on top of the stair treads, the same way you lay out the plates of a stud wall. Laid on the stairs, the handrail should touch the nose of each tread. The newelcap fittings should sit directly above the centers of the newel-post locations.
Be aware that there is a procedural catch in the assembly process. The handrails need to be laid out over the locations of the newel posts, and those locations cannot be found easily without the treads in place. But the treads cannot be permanently installed until the risers and mitered stringers are on, and in some cases they can’t go on until the newel posts are in. However, if the newel posts are in, you can’t lay out the handrail on the treads. To cope with this confusion, I don’t install anything permanently until the handrails are assembled.
For more photos and details, click the View PDF button below:
Fine Homebuilding Recommended Products
Fine Homebuilding receives a commission for items purchased through links on this site, including Amazon Associates and other affiliate advertising programs.
100-ft. Tape Measure
Plate Level
Anchor Bolt Marker
