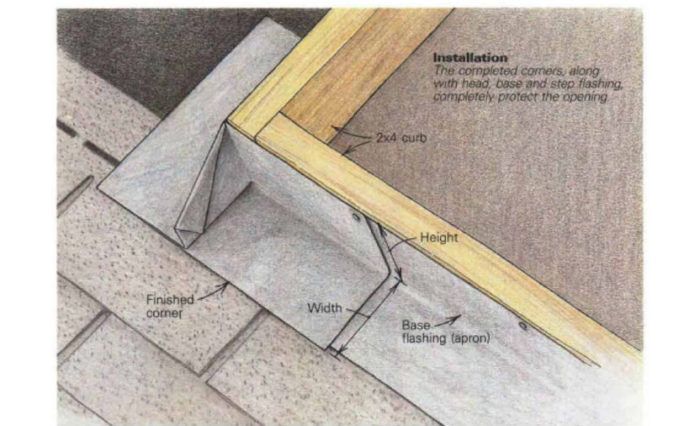
Synopsis: Flashing around roof openings for a chimney or skylight typically leaves small voids at the corners that must be weatherproofed with caulk. This short article shows how flashing can be folded, origami style, to create a corner that doesn’t need any caulk.
I usually use lead flashing when it comes to weatherproofing roof openings, but there are times when sheet copper or aluminum makes more sense. There are various ways of bending either copper or aluminum to form a weather-resistant corner. The ones I’ve seen, though, leave a slight gap at the corners that must be caulked in order to keep out the rain. I don’t like the idea of relying on caulk, so I devised a way of folding light-gauge flashing that doesn’t leave a gap. I’ve used the technique to flash skylights, but it can be adapted to flash any rectangular opening in a roof.
Origami in metal
Basically, I bend metal to form four individual corners, and I use them with head and base flashing to completely encircle the skylight curb. Here’s how to figure the flashing for a typical 2×4 skylight curb. To determine how wide a piece of metal to start with, add together the height of the flashing and its width. The height in this case is 3 in. I usually figure 6 in. for the base, so I’d start with metal that’s 9 in. wide. You can adjust the width of the flashing to make good use of standard metal widths.
The starting length depends on how far you want the corners to extend along the curb. I usually allow 8 in. Multiply this number by 2 and add twice the base of the flashing (2 x 8 plus 2 x 6 equals 28). Each corner in this case will be folded from a 9-in. by 28-in. rectangle of metal. The rest of the job is simple, but you should try the bends with a piece of paper first.
Installation
An opening in the roof needs two left-handed corners and two right-handed corners. To change the hand, make the diagonal fold in step #2 on the opposite side. With the curb in place, I fit the base flashing (apron) into place and nail it into the curb. After putting the two lower corners into place with their projecting wings pointed down the roof, I secure them with nails at the top of each corner.
Step flashing should lap over the corners. It fits in the usual way to the top of the opening. At that point, the two upper corner pieces can be placed over the step flashing projections to the sides and secured with nails. The top flashing fits over the corner pieces and is folded over. The flashing is now complete.
The projecting wings of the corner pieces may look a little bit odd at first, but they serve to direct water away from the sides of the roof opening.
For more photos and details, click the View PDF button below:
Fine Homebuilding Recommended Products
Fine Homebuilding receives a commission for items purchased through links on this site, including Amazon Associates and other affiliate advertising programs.
Flashing Boot

Leather Tool Rig

100-ft. Tape Measure






View Comments
This is genius. Thanks!