Framing With The Plumber in Mind
A few tips to help you keep your sticks and nails out of the way of plumbers.
Synopsis: A list of things that frame carpenters can do to make it easier for the plumber to install rough plumbing. The extra effort saves time, money, and frustration for everyone.
Contrary to what you might believe, most plumbers, including yours truly, do not enjoy chopping a house to pieces in order to get plumbing systems in place. However, I do claim ownership of a carborundum-tipped chainsaw for just this purpose.
When cost estimating, whether I’m on a job site or working from a set of blueprints, I first start looking for the amount of chop time that’s necessary to get the rough plumbing in place. The more wood that I can leave untouched, the cheaper my labor bill is going to be.
Many things will directly influence the labor cost of installing the rough plumbing, including the location of windows, medicine cabinets, let-in bracing, beams and the HVAC ductwork. But some of the most important factors are the direction and position of the floor joists and the availability of unobstructed pathways for vents.
Even minimal plan changes might need clearance from a higher authority, so I’d like to clue you in to those areas you can improve upon with little fuss, very little cost and all by yourself.
Laying down the joists
In the past, I have severed innumerable floor joists because they interfered with toilet wastes or tub and sink drains. Having done some time on framing crews myself, I remember how easy it was to lay joists from one end of the house to the other without thinking about the location of the walls until the subfloor was down. But in relation to plumbing costs, it’s here that the greatest savings in labor (mine and yours) and the biggest gain in structural integrity can be realized.
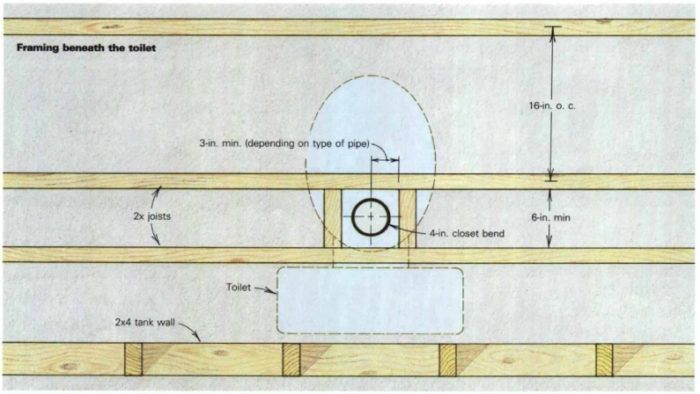
On your next set of prints, look at the location of the bathroom wall behind the toilet. I call it the “tank wall.” For standard toilets, the measurement from the finished wall surface to the center of the toilet drain (or closet bend) in the floor is usually 12 in. I like to use 13 in., which gives more clearance behind the tank for future paint jobs. I’ll need a minimum 3 in. of clearance around this center point to rough in ABS plumbing (about 3-1/2 in. for no-hub cast-iron pipe). This allows room for the pipe (typically 4-1/2-in. in diameter), plus the added hub diameter of the closet flange.
If there’s a floor joist in that forbidden territory, I’m afraid it’s recoil-starter time. When you plan to run joists 16 in. o. c. starting from the tank wall, center your first one about 8 1/2-in. from the finished wall. You can then add a joist on the opposite side of the drain, again placing it at least 3 in. from the center, depending on the type of pipe used. Place an additional joist wherever it’s needed to satisfy the floor’s structural needs.
If joists run perpendicular to the tank wall, I’ll still need at least 3 in. of clearance around the center point of the closet flange. If there’s a joist in the way, shift it over.
For more diagrams and information on framing with a plumber in mind, click the View PDF button below.
Fine Homebuilding Recommended Products
Fine Homebuilding receives a commission for items purchased through links on this site, including Amazon Associates and other affiliate advertising programs.

Bluetooth Earmuffs
Plate Level

Magoog Tall Stair Gauges


