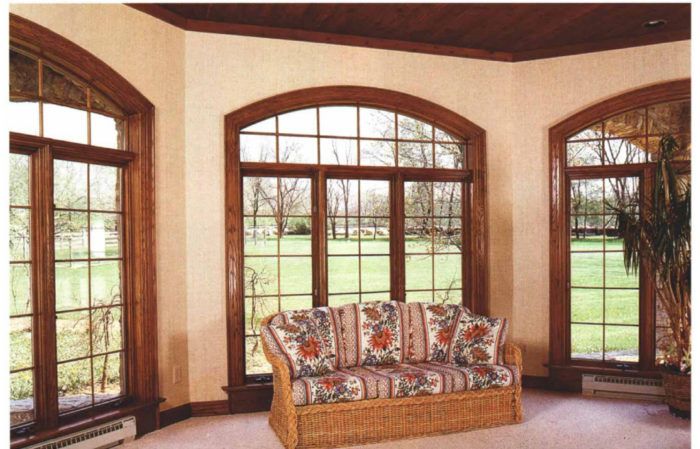
Synopsis: The author explains his technique for fabricating casing for curved windows by ripping molding into thin strips and laminating them around a curved form. A sidebar shows how he uses the same approach to make curved jambs.
A few years ago I was asked to step in and complete the finish work on an 11,500-sq.ft. Tudor home that had taken 18 months to get through drywall. Completing the trim took an additional 12 months and posed many challenges, such as hanging 8-ft. high doors, building four stairways and running thousands of feet of wide casings and base. The house also had many arch-top windows and doorways of various heights and widths. The curved window and door casings had to match the existing straight casing, so I decided to produce the curved casings on site with the help of a talented crew of finish carpenters.
My approach to this challenge was to strip-laminate the arched casings. By alternating strips from two pieces of straight, even-grained casing, we reproduced the casing profile. We ripped the strips from straight casing and then bent them around a form for each window and door. We also laminated extension jambs for each window, using the same bending forms.
Making the patterns
Our first step was to make patterns of all the arched windows and doors. How we produced the patterns varied depending on the particular application — some methods were as simple as tracing on kraft paper (available in long rolls) against the window frame, while others were as involved as mathematically computing arcs and multiple-radius points.
One method we used on some of the more complex windows required a thin, flexible ripping of even-grained wood long enough to follow the arch along a window frame. This strip was clamped or held by helpers against the inside of the frame. We maintained the arch shape by tacking crosspieces to the bowed strip. The more crosspieces we used, the better the shape was held after the clamps were removed. We then transferred the shape of the arch to kraft paper.
With another method, we tacked plywood against the window, using a piece wide enough to contain the unknown radius points. We then used a beam compass to find the radius points on the plywood by trial and error. Again, the arch was then transferred to kraft paper. I came on the project too late to have done it, but in the future I would make tracings of each window frame prior to installation.
Finally, we cut out each pattern and checked it against the corresponding window, making necessary adjustments. The patterns also had to be extended on both ends to allow extra casing length for trimming later. We labeled the patterns for window location and wood species.
Building the bending forms
When the patterns were ready, we built a bending form for each one. We constructed them from 2x stock cut into arcs on a bandsaw. With roundtop casings, the 2x arcs were made using a simple circle-cutting jig fixed to the bandsaw table. We extended the table with a piece of 1/4-in. plywood and ran a screw through it to create a pivot point. The 2x stock was then pivoted around the pivot point on a 1/4-in. plywood carriage.
To cut the more gradual arcs of the bigger windows, we used a 1×3 to extend the pivot point of the circle-cutting jig across the shop. The 2x arcs were screwed to a plywood base or to the subfloor, depending on how big they were.
For more photos, drawings, and details, click the View PDF button below:
Fine Homebuilding Recommended Products
Fine Homebuilding receives a commission for items purchased through links on this site, including Amazon Associates and other affiliate advertising programs.
Anchor Bolt Marker

100-ft. Tape Measure

Smart String Line


