Installing Stair Skirtboards
Notching the skirtboard over the risers for a better-looking job.
Synopsis: This short article explains how to notch a skirtboard around stair risers. The technique eliminates the need to scribe-fit the stair risers and results in a neater job.
I used to trim closed-stringer stairways by installing 1×10 skirtboards first and butting the treads and risers into them. Setting the first riser was simple enough — scribe, cut and nail in place. The difficulty started with the first tread. If it was the least bit long, it pushed the skirtboard, opening the joint below between the riser and the skirt. Installing the second riser then risked opening the joint at the first tread, and so on up the stairway.
A few years ago a young carpenter showed me a technique that involves notching the skirtboard for the treads and risers (it looks like an upside-down carriage). This method still requires scribe-fitting the treads, but eliminates scribe-fitting the risers because they slip behind the skirtboard. It produces a better-looking job quicker and with less aggravation.
Positioning the skirtboards
As an example, let’s consider a straight-run stairway with walls on both sides. I install the outside carriages 3 inches in from the finished walls. This leaves access for work that must be done from the backside. Also, the underside of the stairway should be open (no drywall) for nailing and gluing access.
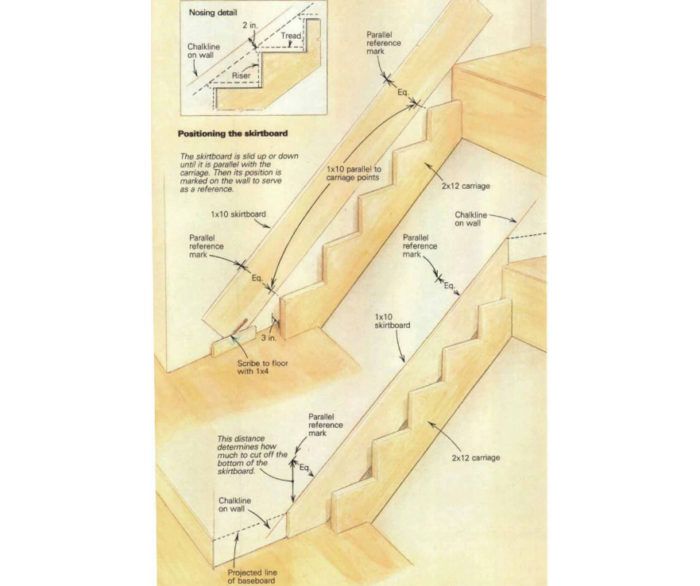
I lay a 1×10 skirtboard against a wall so that the bottom can be scribed to fit the floor. If the carriage was against the wall, then I could rest the skirtboard on the carriage points. But I have to jockey the skirt a bit to make sure it’s parallel to the carriage. With its bottom corner resting on the first floor and its upper edge resting on the second floor, I move the 1×10 up or down until the angle looks right. I check it by measuring the distance from the points on the carriage to the upper edge of the 1×10.
I tack the 1×10 in place and mark the wall along the upper edge of the board — one mark near the top and one near the bottom. These serve as parallel reference marks for determining the skirtboard’s final position.
While the 1×10 is tacked in place I scribe the bottom end to fit the floor. The simplest way to do this is to place a short length of 1×4 flat against the bottom end of the 1×10. The top edge of this piece will be parallel to the floor. Marking along this line will provide the angle at which to cut the skirtboard. Later I’ll calculate exactly how much I need to cut off.
After removing the 1×10, I return to the wall with the parallel reference marks and determine the top edge of where the skirt will eventually go. The skirtboard should sit as high as possible without exposing any wall where the riser and tread meet. The top edge of the skirtboard usually ends up about 2 in. beyond the finished tread nosings. I snap a chalkline on the wall representing the upper edge of the skirtboard; I then use a level to draw the plumb cut at the top and bottom of the wall, where the baseboard will meet the skirtboard. I also draw a plumb line through one of the parallel reference marks and then measure along it between the reference mark and the chalkline. This distance determines how much I need to cut off the bottom of the skirtboard.
For more photos, drawings, and details, click the View PDF button below:
Fine Homebuilding Recommended Products
Fine Homebuilding receives a commission for items purchased through links on this site, including Amazon Associates and other affiliate advertising programs.
Smart String Line
Plate Level
Anchor Bolt Marker


