Synopsis: Here’s a method for framing a valley where two roofs of different pitches meet. The author puts the emphasis on simplicity as he appeals to other trigonometry-challenged builders looking for an easier way to solve this potentially vexing problem.
The intersection of two roofs with unequal pitches involves geometrical relationships not readily visualized or easily understood. Graphic projections can be intimidating to anyone without substantial framing experience. As for me, I want to frame the roof, not tinker with models, pens, paper and a calculator. In fact, I’m convinced that “fear of ciphering” is so common that few framers have anything more than a vague notion of somehow using “strings and levels” to lay out complex roofs. This sometimes translates into blundering through, trial-by-error or fudge-and-fix techniques, with hopes that the client doesn’t show up until the roof sheathing has hidden the mistakes.
That’s how it went for me until a summer when everything I built had a weird roof. I needed a framing method that was fast, accurate, relatively simple and, most of all, non-mathematical. I’ve forgotten all the trigonometry I never learned in high school, so I’m hopelessly doomed to be a string-and-level man. In the article that follows, I’ll describe that method for you and apply it to a house I built that’s fairly typical of unequally pitched roof framing.
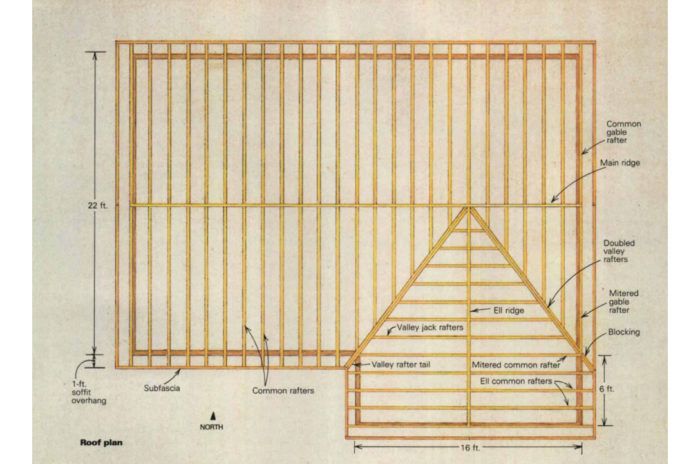
Purists, or those more mathematically adept than I, may find my methods inelegant, or ridgeboard. In this case, that meant 6 ft. (the ell) plus 11 ft. (half the main roof) minus 3/4 in. (half the ridge). So the ell ridge would be 16 ft. 11 1/4 in. long. After cutting the ell ridge to length and marking out the rafter spacing on it (better now than when it’s up in the air), I nailed it into place at the main ridge and atop the ell centerpost. I double-checked to make sure that the end of the ell ridge ended plumb over the gable wall. A temporary diagonal brace run down to the deck held everything in place.
Ell common rafters
Once the ridges and main-roof common rafters were in place, the layout for the ell common rafters was simple: I pinned rafter stock against the end of the ridgeboard and the corner of the wall plate and scribed for the plumb cut and bird’s mouth. No, it’s not elegant, but it works perfectly. The position and depth of the bird’s mouth followed from the rule that the seat cut should begin at the inside edge of the top plate. The length of the rafter tail will determine how far away from the wall the fascia will be, so the rafter tails on the ell had to be laid out to allow the ell fascia to flow continuously into the main fascia. Rather than including this step in the initial layout, I simply made the plumb cut at the ridge and the bird’s-mouth cuts, leaving ample tail stock to be trimmed later. I cut two rafters and tacked them to the ridge to test the fit.
For more drawings and details, click the View PDF button below:
Fine Homebuilding Recommended Products
Fine Homebuilding receives a commission for items purchased through links on this site, including Amazon Associates and other affiliate advertising programs.
Ladder Stand Off
Sledge Hammer

Protective Eyewear


