FHB Logo Facebook LinkedIn Email Pinterest Twitter X Instagram Tiktok YouTube Plus Icon Close Icon Navigation Search Icon Navigation Search Icon Arrow Down Icon Video Guide Icon Article Guide Icon Modal Close Icon Guide Search Icon Skip to content
Subscribe
Log In
  • How-To
  • Design
  • Tools & Materials
  • Restoration
  • Videos
  • Blogs
  • Forum
  • Magazine
  • Members
  • FHB House
  • Podcast
Log In
How-To

Installing joist hangers

By Fred Misner Issue 75
  • X
  • facebook
  • linkedin
  • pinterest
  • email
  • add to favorites Log in or Sign up to save your favorite articles

Q:

U-shaped joist hangers are a standard item on most framing jobs, but installing them accurately, with the right height and spacing, can be tedious and time-consuming. Can anyone suggest a jig, a fixture, a clamp or a technique that would make the job faster and easier?

Donald Matthews, Coeur d’Alene, ID

A:

Fred Misner of Edmonds, Washington, replies: Because I usually work alone, I developed the following method of installing joist hangers. I nail the hanger flush with, or a little back from, the end of the joist. This ensures a tight fit (otherwise the hanger could hold the joist away from the beam). Next I clamp a short 1×2 or 2×2 stick to the top of the joist with about 1 in. extending past the joist end, using a sliding bar clamp or pipe clamp. Then I set the joist in place with the extending stick resting on top of the beam—this automatically lines up the top edges. Next I hammer home the two barbs on the hanger. When nailing off the hanger to the beam, I angle the nails in opposing directions to reduce the pullout potential.

If a clamp isn’t available or if you prefer a low-tech method, nail the hanger on the joist end, then line things up to your liking and use the barbs on the hangers to rough set the joist. Finetune, if necessary, by adjusting the hanger with your hammer until it’s in place, then nail it off to the beam.

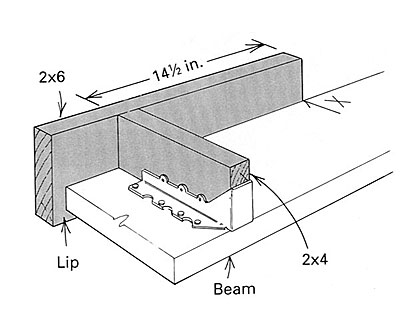
Todd Sauls of Santa Barbara, California, replies: In most cases I attach joist hangers to the beam before installing it. This eliminates the hassle of trying to nail from a ladder or bending over and working from above. First make a T-shaped jig out of scrap pieces of 2×6 and 2×4 (see drawing below). The length of the 2×4 should equal the width of the joists. Nail the scraps together with one edge flush, which leaves a lip on the back where the 2×6 overhangs the 2×4. You can lay out spacing for joist hangers, or you can cut the 2×6 long enough to serve as a layout tool. Hook the lip over the top of the beam, slip the joist hanger over the 2×4 and nail it off.

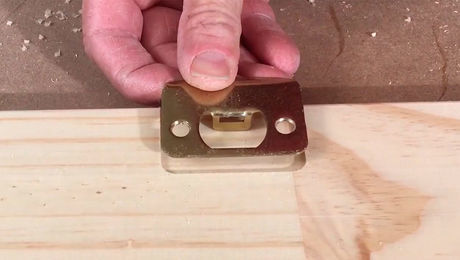
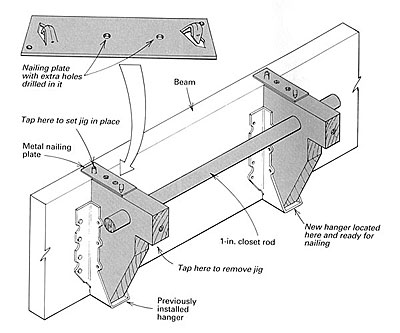
Fred Mocking of Skokie, Illinois, replies: The drawing below shows a jig that I use to lay out and install joist hangers. It’s made with scraps of joist stock and a length of 1-in. closet rod. On top of each block I install a 4-in. metal nailing plate with barbs on each end—the kind used to protect plumbing runs from nails. I screw the plate to the block, with the plate overhanging the block about 3/4 in.

You have to install the first hanger without the jig. Then you slip the next hanger over one block and insert the other block in the first hanger. Tapping the barbs into the jim joist or beam will hold the jig in place while you install the hanger. To remove the jig, tap up on the block.

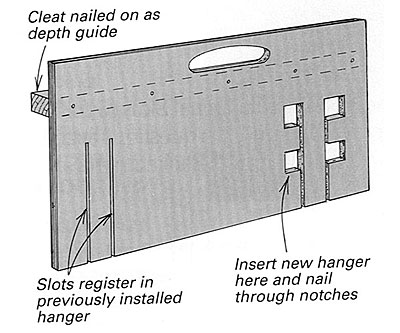
Steve Chassereau of Portland, Oregon, replies: Here’s a jig that not only aids in the installation of joist hangers but also spaces them the correct distance apart. To make the jig, use a 2-ft. scrap of plywood 10 in. or 12 in. wide. In one end of the plywood cut two slots that will register in a previously installed joist hanger (see drawing below). Measure for the on-center spacing of the joists and cut another pair of slots. Slide a joist hanger into these slots, mark where nails will go and cut notches around the nail locations. On the back of this plywood jig, nail a cleat spaced up from the bottom edge a distance equal to the width of the joists. This will act as a depth guide. You can even cut a hole in the plywood to serve as a handle.

To use the jig, insert a joist hanger into the second set of slots—spring tension should hold it in place—slide the first set of slots over the previously installed joist hanger and rest the depth guide on the rim joist or beam. Then, nail the new joist hanger in place.

Chris Cartwright of Middlebury, Vermont, replies: Because joists can vary in width as much as 1/4 in., installing joist hangers before installing joists won’t always result in precise framing. I’ve found the best technique is to toenail the joist in place first, then install the joist hangers.

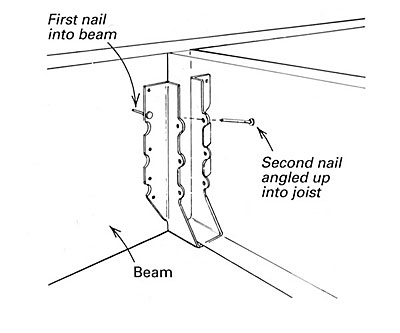
Snug joist-hanger installation is accomplished by nailing the hanger to the beam first and then securing the hanger to the joist with a second nail (see drawing below). Angle the second nail up so that when it is driven home, the joist hanger is drawn up tight against the bottom of the joist. This done, the joist hanger can be nailed up the rest of the way. And yes, all the holes should get a nail. The load-bearing capability of the joist hanger is calculated on the basis of a full complement of approved joist-hanger nails working to resist shear.

Sign up for eletters today and get the latest how-to from Fine Homebuilding, plus special offers.

Signing you up...

This site is protected by reCAPTCHA and the Google Privacy Policy and Terms of Service apply.
See all newsletters
See all newsletters
×

Get home building tips, offers, and expert advice in your inbox

Signing you up...

This site is protected by reCAPTCHA and the Google Privacy Policy and Terms of Service apply.
See all newsletters
See all newsletters

New Feature

Fine Homebuilding Forums

Ask questions, offer advice, and share your work

  • X
  • facebook
  • linkedin
  • pinterest
  • email
  • add to favorites Log in or Sign up to save your favorite articles

Log in or create an account to post a comment.

Sign up Log in

Become a member and get full access to FineHomebuilding.com

Up Next

Video Shorts

Featured Story

Ranch Redux

An architect and a handy homeowner team up for an exterior upgrade with energy efficiency, comfort, and durability as part of the plan.

Featured Video

How to Install Exterior Window Trim

Learn how to measure, cut, and build window casing made of cellular PVC, solid wood, poly-ash boards, or any common molding material. Plus, get tips for a clean and solid installation.

Related Stories

  • Tall Deck on a Sloped Lot
  • Makeshift Foam Tip for Tight Spots
  • Rescuing Old Hardware
  • Mortising a Hinge without a Router

Discussion Forum

Recent Posts and Replies

  • |
  • |
  • |
  • |
  • |
  • |
View More Create Post

Highlights

Fine Homebuilding All Access
Fine Homebuilding Podcast
Tool Tech
Plus, get an extra 20% off with code GIFT20

Video

View All Videos
  • Why You Should Use Screws Instead of Nails for Drywall
  • Podcast 193: Understanding Permeability, Insulating Behind Fiberboard Sheathing, and Building a Patio Door
  • Must-Have Router Jigs: Mortise Door Hardware With This Custom Guide
  • Podcast Episode 125 — French Doors, Kitchen Remodels, and the Gamification of Home Building.
View All

Nails and Fasteners

View All Nails and Fasteners Articles
  • Tall Deck on a Sloped Lot
  • Nail-Set Upgrade
  • Podcast 591: Members-only Aftershow—Hidden Costs of Construction
View All Nails and Fasteners Articles

Fine Homebuilding Magazine

  • Issue 331 - June 2025
    • A More Resilient Roof
    • Tool Test: You Need a Drywall Sander
    • Ducted vs. Ductless Heat Pumps
  • Issue 330 - April/May 2025
    • Deck Details for Durability
    • FAQs on HPWHs
    • 10 Tips for a Long-Lasting Paint Job
  • Issue 329 - Feb/Mar 2025
    • Smart Foundation for a Small Addition
    • A Kominka Comes West
    • Making Small Kitchens Work
  • Issue 328 - Dec/Jan 2024
    • How a Pro Replaces Columns
    • Passive House 3.0
    • Tool Test: Compact Line Lasers
  • Issue 327 - November 2024
    • Repairing Damaged Walls and Ceilings
    • Plumbing Protection
    • Talking Shop

Fine Home Building

Newsletter Sign-up

  • Fine Homebuilding

    Home building tips, offers, and expert advice in your inbox.

  • Green Building Advisor

    Building science and energy efficiency advice, plus special offers, in your inbox.

  • Old House Journal

    Repair, renovation, and restoration tips, plus special offers, in your inbox.

Signing you up...

This site is protected by reCAPTCHA and the Google Privacy Policy and Terms of Service apply.
See all newsletters

Follow

  • Fine Homebuilding

    Dig into cutting-edge approaches and decades of proven solutions with total access to our experts and tradespeople.

    Start Free Trial Now
    • Facebook
    • Instagram
    • X
    • LinkedIn
  • GBA Prime

    Get instant access to the latest developments in green building, research, and reports from the field.

    Start Free Trial Now
    • Facebook
    • YouTube
  • Old House Journal

    Learn how to restore, repair, update, and decorate your home.

    Subscribe Now
    • Facebook
    • Instagram
    • X

Membership & Magazine

  • Online Archive
  • Start Free Trial
  • Magazine Subscription
  • Magazine Renewal
  • Gift a Subscription
  • Customer Support
  • Privacy Preferences
  • About
  • Contact
  • Advertise
  • Careers
  • Terms of Use
  • Site Map
  • Do not sell or share my information
  • Privacy Policy
  • Accessibility
  • California Privacy Rights

© 2025 Active Interest Media. All rights reserved.

Fine Homebuilding receives a commission for items purchased through links on this site, including Amazon Associates and other affiliate advertising programs.

  • Home Group
  • Antique Trader
  • Arts & Crafts Homes
  • Bank Note Reporter
  • Cabin Life
  • Cuisine at Home
  • Fine Gardening
  • Fine Woodworking
  • Green Building Advisor
  • Garden Gate
  • Horticulture
  • Keep Craft Alive
  • Log Home Living
  • Military Trader/Vehicles
  • Numismatic News
  • Numismaster
  • Old Cars Weekly
  • Old House Journal
  • Period Homes
  • Popular Woodworking
  • Script
  • ShopNotes
  • Sports Collectors Digest
  • Threads
  • Timber Home Living
  • Traditional Building
  • Woodsmith
  • World Coin News
  • Writer's Digest
Active Interest Media logo
X
X
This is a dialog window which overlays the main content of the page. The modal window is a 'site map' of the most critical areas of the site. Pressing the Escape (ESC) button will close the modal and bring you back to where you were on the page.

Main Menu

  • How-To
  • Design
  • Tools & Materials
  • Video
  • Blogs
  • Forum
  • Project Guides
  • Reader Projects
  • Magazine
  • Members
  • FHB House

Podcasts

  • FHB Podcast
  • ProTalk

Webinars

  • Upcoming and On-Demand

Podcasts

  • FHB Podcast
  • ProTalk

Webinars

  • Upcoming and On-Demand

Popular Topics

  • Kitchens
  • Business
  • Bedrooms
  • Roofs
  • Architecture and Design
  • Green Building
  • Decks
  • Framing
  • Safety
  • Remodeling
  • Bathrooms
  • Windows
  • Tilework
  • Ceilings
  • HVAC

Magazine

  • Current Issue
  • Past Issues
  • Magazine Index
  • Subscribe
  • Online Archive
  • Author Guidelines

All Access

  • Member Home
  • Start Free Trial
  • Gift Membership

Online Learning

  • Courses
  • Project Guides
  • Reader Projects
  • Podcast

More

  • FHB Ambassadors
  • FHB House
  • Customer Support

Account

  • Log In
  • Join

Newsletter

Get home building tips, offers, and expert advice in your inbox

Signing you up...

This site is protected by reCAPTCHA and the Google Privacy Policy and Terms of Service apply.
See all newsletters
See all newsletters

Follow

  • X
  • YouTube
  • instagram
  • facebook
  • pinterest
  • Tiktok

Join All Access

Become a member and get instant access to thousands of videos, how-tos, tool reviews, and design features.

Start Your Free Trial

Subscribe

FHB Magazine

Start your subscription today and save up to 81%

Subscribe

We hope you’ve enjoyed your free articles. To keep reading, become a member today.

Get complete site access to expert advice, how-to videos, Code Check, and more, plus the print magazine.

Start your FREE trial

Already a member? Log in

Privacy Policy Update

We use cookies, pixels, script and other tracking technologies to analyze and improve our service, to improve and personalize content, and for advertising to you. We also share information about your use of our site with third-party social media, advertising and analytics partners. You can view our Privacy Policy here and our Terms of Use here.

Cookies

Analytics

These cookies help us track site metrics to improve our sites and provide a better user experience.

Advertising/Social Media

These cookies are used to serve advertisements aligned with your interests.

Essential

These cookies are required to provide basic functions like page navigation and access to secure areas of the website.

Delete My Data

Delete all cookies and associated data