Q:
I recently purchased a 130-year-old farmhouse in southern Ontario. Upon inspecting the foundation under an attached summer kitchen, I found that the 12×12 sill beam had been resting on the ground for all those years and is rotting. I suspect the joist ends that are mortised into the beam have also rotted. I was intending to jack up the summer kitchen (a relatively light one-story frame structure), pour a concrete bond beam on grade and replace the sill beam and the joist ends. But how do I install jacks when there’s no room under the joists? Also, do I need piers below the frost line under the bond beam? And if so, how do I dig out the space directly below the beam?
Andrew Golbourne, None
A:
George Nash, author of Renovating Old Houses, replies: You don’t mention what the soil is like under the farmhouse in question. Unless the house sits on well-drained sand or gravel, you’ll need footings dug below the frost line. When founded on soil that is subject to frost heave, an entire building can move up and down a few inches each winter. But because your sill beam is continuous, this effect probably isn’t very noticeable; however, freezing and thawing soil will take your bond beam along for the ride. I’m not sure from the drawing you supplied whether or not the opposite foundation wall extends below the frost line, either. It should.
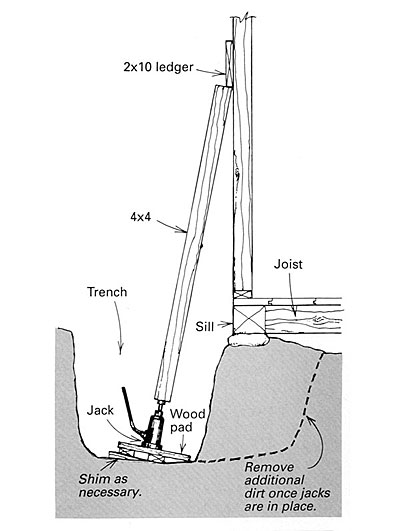
Without inspecting the building myself, I can only offer a tentative solution. I’d excavate a trench along the length of the sill beam down to the frost line (4 ft. below grade is a safe bet). This should be 3 ft. or 4 ft. wide so that you can work comfortably in it. To hold the building, I’d spike a 2×10 ledger to the outside wall, directly into the wall studs. If possible, remove enough siding to accommodate the ledger. Set each jack on a wood pad in the bottom of the trench as close to the line of the sill as you can get it. Insert 4×4 posts between the jacks and the ledger. Try to keep these lifting posts at a 60° angle or steeper. The idea is to hold the wall, so apply only enough pressure to lift the sill barely off the stones it rests on. Do this at each end and every 8 ft. or so along the wall. I’m assuming that because this is a light stud-framed structure, it shouldn’t take much to hold it in place. If it’s a timber frame, lift on each corner and on any intermediate posts. Then come back with the backhoe and dig out under the sill and as far back under the joists as you can reach. This should give you enough room to slide a timber under the joists to support them temporarily while you remove the rotted sill.
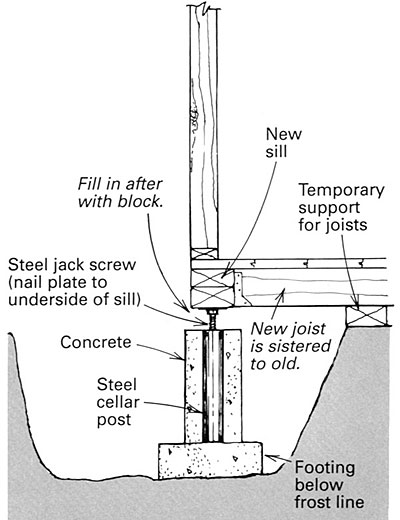
Next, form and pour a concrete footing. Because you’ll probably have a hard time finding a 12×12 timber for the new sill, I’d double up two 6x12s (flat) or some other combination to give the necessary support above. Jack this sill up from the footing tight to the flooring. If you use steel cellar posts (you might have to cut them down a little) that have built-in jack screws, you can leave them in place and pour the new wall around them. I’d sister new joists alongside the old ones (this is why you dig under the sill with the backhoe) and secure them to the back of the new sill with metal joist hangers.
I’d pour about 32 in. of concrete foundation wall (borrow or rent some form panels or build them from plywood) and then cap it off with a course or two of concrete block. Unless the soil is expansive clay, you can build the entire wall from block. Fill in any gap between block and sill with pressure-treated wood and a layer of insulating compressible foam. You may have to raise the sill slightly higher to do this.
An alternative is to construct the foundation wall before you replace the sill. The sistered joists extend to the new wall and onto a conventional mudsill and rim joist built up with treated dimension lumber. In either case, don’t forget to provide some sort of access opening (if there isn’t one already) to get under the crawl space. Provide proper drainage when you backfill the trench and be sure that the finish grade is at least 8 in. below the bottom of the sill.
