If you’ve ever laid decking using spacers to keep the rows parallel and straight, you know how frustrating things can become. Try as you may to prevent it, the rows have a way of wandering, and the bigger the deck, the more unsightly the wandering lines become.
For spacers to work, all the decking has to be exactly the same width. If not, the spacers will eventually move the material away from a straight line. And because even the best grade of decking isn’t precisely the same width, I use a system of guide rows that avoids spacers altogether. Here’s how it works.
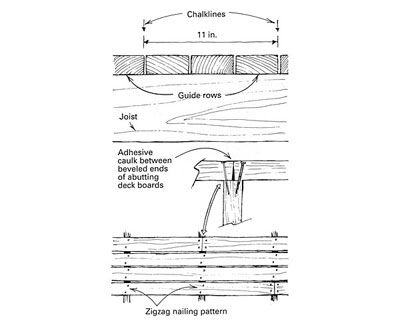
I snap lines on the deck joists for every third row of decking, as shown in the drawing below. I determine the distance between the lines by adding the sum of three rows of decking plus three spaces. For example, I typically use air dried Western red cedar 2x4s for deck boards and space them 3/16 in. apart. Therefore, three rows of decking at 3-1/2 in. per row plus three gaps at 3/16 in. equals 11-1/16 in. [round this off to 11 in. If your decking is green, consider using smaller gaps to account for the greater shrinkage.
With lines snapped, I nail down every third row over the entire deck, taking great care to follow the chalkline exactly. Then I lay deck boards between the guide rows. By eye, and with the help of a thin steel bar or piece of wood, I align the boards until the gaps are equal. Because the spaces you’re adjusting are confined to the joist right in front of you, your eye easily judges the distance between them, and the resulting job is surprisingly rapid and precise.
I nail each board in a zigzag pattern for two reasons. First, to me it looks better than a straight line, which is hard to keep perfectly straight anyway. Second, a straight nailing pattern is likely to split a joist, and that risk is eliminated with the zigzag pattern.
Where two pieces of decking butt on one joist, I undercut the decking ever so slightly — about 1/16 in. total — and spread adhesive caulk over one end. The joint is tight to the eye and sealed against moisture soaking into the end grain. Then I nip the points off four 12d nails and angle them into the joist. This technique prevents splitting without having to drill pilot holes for the nails.
David Bright, Lynden, WA
Fine Homebuilding Recommended Products
Fine Homebuilding receives a commission for items purchased through links on this site, including Amazon Associates and other affiliate advertising programs.
Speed Square

Lithium-Ion Cordless Palm Nailer

Bluetooth Earmuffs
