Shop-Built Window Frames
Simple joinery, #2 pine and stock sash make inexpensive custom windows.
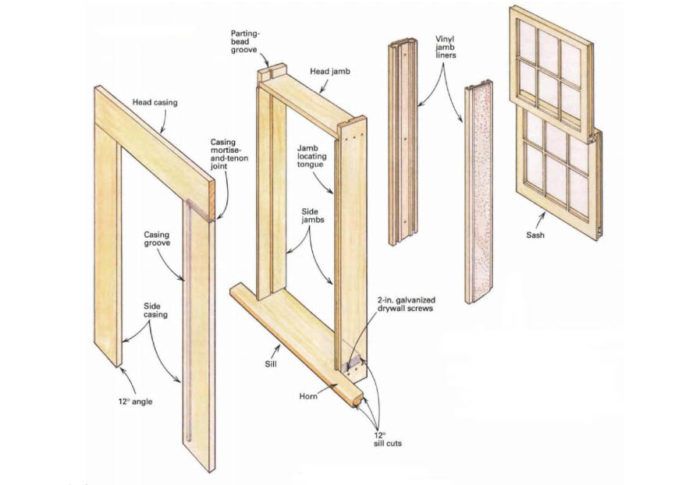
Synopsis: This is a step-by-step guide to making simple double-hung sash windows. The author uses common shop tools and readily available materials. Not high-tech, but custom, inexpensive and especially well suited to replacing windows in old houses.
The window frames in my 1855 house were in varying states of disrepair; some of them needed only a little rebuilding, but a lot of the window frames and most all of the sash were beyond hope. A practical renovation demands modern thermal efficiency at a tolerable cost, as well as some sense of original appearance. These goals can be satisfied by the methods I used for building new window frames.
To attain some degree of thermal efficiency in my windows, I decided to use vinyl jamb liners intended for direct retrofit in existing window frames. If the V word makes the hair on your neck stand up, then you share my first reaction. But in a finished window the jamb liners are quite unobtrusive. A jamb liner is a heavy-gauge, cream-colored vinyl extrusion with full weatherstripping and integral spring counterbalances.
Windows have been built to standard sizes for a remarkably long time; I was a little surprised that I could get replacement sash for my house with dimensions the same as the rotted ones I wanted to replace. But stock window frames are another story.
Most stock window frames (the frames on manufactured windows) are built to fit a contemporary 4 1/2-in. wall and require jamb extensions to suit the thicker walls in an old house. Factory-applied jamb extensions are an option, but the thickness of the walls in an old house often vary considerably, which renders the stock jamb extensions a marginal-to-useless convenience.
Flat exterior casings are a stock option, but they do not match the width of my original casings. Finally, stock windowsill are usually built of thin material, typically 1 in. to 1 1/4 in. And on some stock frames the sill sticks past the outside edge of the casing only 1/2 in., which isn’t wide enough to add a 3/4-in. backhand to the casing after the window is installed.
To build my own frames, I use #2 pine for the jambs and casings and kiln-dried 2x8s for the sills. I picked the stock to avoid loose knots, pitch pockets, checking and wild grain. Clear pine is an option, but it is very expensive, with no advantage of stability or appearance. Remember, the jambs are not exposed in the finished window, and the sill and the casings are painted on all visible surfaces.
Start with the windowsills
Windowsills are set at an angle to shed water. I used a 12° pitch to match the average angle of the original windowsills. I cut the sill stock a few inches longer than the final size, ripped one edge at 12°, planed it for a smooth finish, then ripped the inside edge to 12°.
When you duplicate old window dimensions, you may find that the inside edge of the sill is short of the inside edge of the jambs. This is not a mistake or an example of Yankee frugality. The inside of the sill need extend only an inch or less in front of the inside of the bottom sash rail, enough to provide nailing for the window stool (the shelflike piece of interior window trim that most people think of as the inside windowsill).
For more photos, drawings, and details, click the View PDF button below:
