Building a Curved Balustrade
A carpenter uses router templates, laminations, and fiberglass packing tape to trim a staircase.
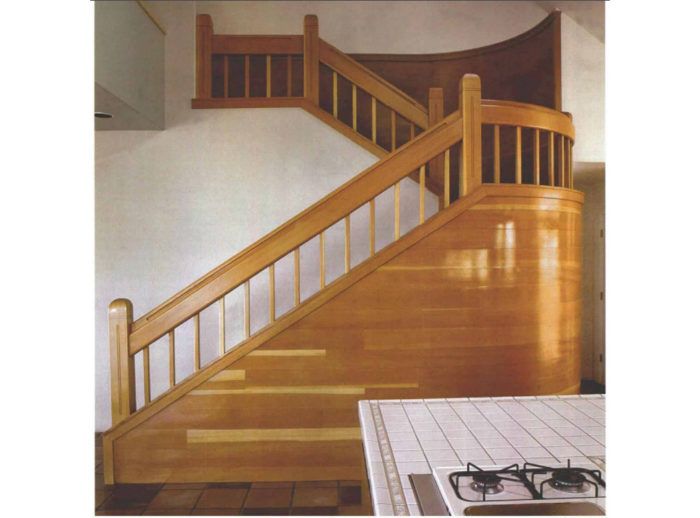
Synopsis: A complex, curved stair becomes the focal point in a house. The author details the process of laminating the handrail and bending thin laminations to form curved wall surfaces. A simple router jig allows speedy detailing on newel posts.
When I got a call from Ken Aguilar about installing the newels, the balusters, and the handrails in the house he was building for himself, he gave me no clue about the custom nature of the work I was about to undertake. I envisioned a stock installation of manufactured stair parts—the kind of work I do all the time. Off I went to meet him, armed with my briefcase full of catalogs from various stair-part manufacturers.
When I saw the plans, my first impulse was to throw out the whole briefcase. The staircase was a switchback design with a curved landing that created a kind of pulpit overlooking the kitchen. Nothing called for in the drawings was stock; every part—from the laminated 6×6 newel posts to the curved handrails—would have to be fabricated from clear, vertical-grain Douglas fir.
Laminated newel posts
The stairs had already been rough-framed when I took the job. My first task was to build and install the newel posts before the drywall was hung. Each post was made from four clear, vertical-grain Douglas-fir 2x6s, laminated face to face. The plans actually called for attaching the 2xs with finish nails, but I used biscuits and yellow glue for strength and alignment. I knew the nails would interfere with planing and detailing the newels.
I removed the fence from my Porter-Cable biscuit joiner because the distance from the 2×6 edges was greater than the fence would allow. I used a straightedge clamped to the 2x6s to register the tool, locating the biscuits 1-1/2 in. from the boards’ edges. Pairs of biscuits were cut at 6-in. increments along the length of the 2xs.
Because the newels were so massive, and because they had to support the unusually large handrails, I notched the newel posts and anchored them into the stair framing so that they would be as strong in function as they were impressive in size.
Sheathing the curved walls with plywood
After the posts were set, my next step was to create the curved wall. The plans called for a curved wall with a radius of slightly less than 4 ft. The concave and convex sides of the curved wall were to be paneled with horizontal rows of clear, vertical-grain Douglas fir.
The curved wall had been built by the framers with 2×4 studs spaced approximately 16 in. o. c., with curved top and bottom plates cut from 3/4-in. plywood. One of the difficulties with a curved wall framed with vertical members is that the studs do not scribe a true arc, but rather they are a series of straight segments whose end points touch the arc.
For more photos and details, click the View PDF button below:
