Laying Out Three-Tab Shingles
Spend a little time measuring and striking lines, and the rest is fairly easy.
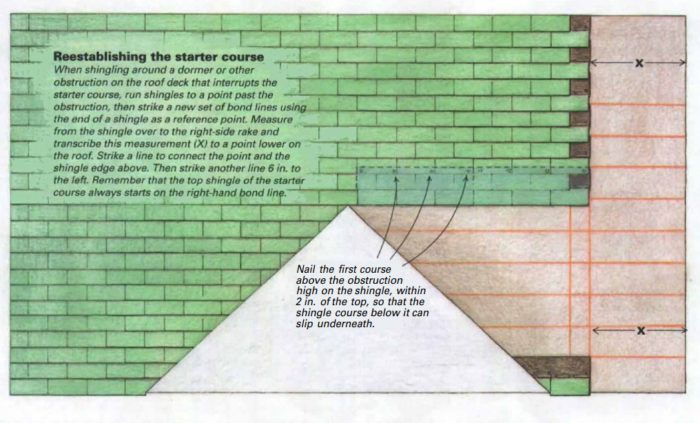
Synopsis: North Carolina builder John Carroll shows you how to lay out and apply three-tab asphalt roofing shingles. Clear diagrams in the PDF below make the procedure quickly comprehensible.
Many roofers take pride in the fact that they can shingle a house without the benefit of measured lines. It can’t be denied that such people install leak-proof roofs that look pretty good from the ground. Unfortunately, their eyeballed roofs often have wavy, inconsistent courses; and when viewed from atop the house, they look simply unprofessional. When I finish a roof, I enjoy looking at straight courses, and I don’t begrudge myself the half-hour or so it took to measure and strike lines. More than that, I’m convinced that I recover the time invested in laying out the roof as I nail down shingle after shingle without worrying about the courses getting wavy or crooked.
For the sake of simplicity, I’ll limit my discussion to the ubiquitous three-tab asphalt roof shingle, scorned by aesthetes but found on houses from the Carolinas to California.
On a rectangular roof without dormers, valleys or other obstructions, there are three basic layout steps: establishing the overhang, striking the bond lines and striking the horizontal lines.
Establishing the shingle overhang
Before shingling a roof, it is essential to know how far the shingles will overhang the bottom (or eaves) and sides (or rakes) of the roof deck. Ideally, all trim has been installed along the roof edges, and if used, metal drip edge is also in place. In these cases I leave a 1-in. overhang along the eaves and the rakes of the roof. Most shingle manufacturers recommend a ¼-in. to 3/8-in. overhang, presumably to reduce the chance of the wind snagging the edge of the roof.
Unfortunately, eaves and rakes (especially those on older houses) often diverge more than 3/8 in. from a straight line. To compensate for irregularities in the straightness of rake boards and fascia boards, I’ve found that a 1-in. overhang allows me to work proficiently and provides for a straight, secure roof. I’ve never had a problem with shingles blowing off.
If I install the shingles before the roof trim is complete, I need to know how far the trim pieces and the drip edge will extend the roof deck, and I allow for that extension. For example, if a 1×6 rake board and a piece of molding, totaling 1½ in., will be added to the existing sheathing, I know I should let the shingles overhang the sheathing by 2½ in. to get a final overhang of 1 in. Because shingles are easy to cut, it is better to err on the side of too much as opposed to too little overhang. If need be, I can go back later and trim the overhanging shingles.
For more photos and details on laying out three-tab shingles, click the View PDF button below.
Fine Homebuilding Recommended Products
Fine Homebuilding receives a commission for items purchased through links on this site, including Amazon Associates and other affiliate advertising programs.
Hook Blade Roofing Knife
Roof Jacks
Original Speed Square


