Q:
I’m interested in building a barrel-vault drop ceiling but haven’t the slightest idea how to frame and sheathe it. Are arched trusses manufactured for these ceilings?
Vern Overall, FPO AP 96464-0002, None
A:
Dan Daley, a framer in Bend, Oregon, replies: You can buy arched trusses, but they’re expensive; you have to special-order them and then wait for delivery. I’ve found it’s faster and more economical to make a pair of arched ledgers and to fasten them to the gable walls, then run joists to span between the ledgers to frame the barrel vault.
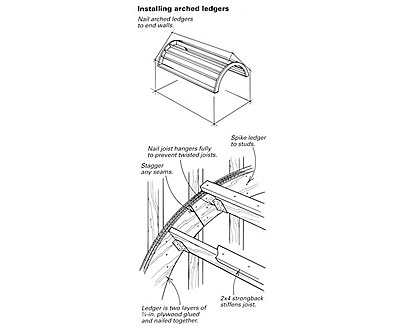
The ledgers are two layers of 3/4-in. plywood with staggered seams. To make them, cut the plywood into strips at the desired radius. First you’ll have to cut a pattern from which you’ll scribe all other pieces. You’ll need a big trammel arm to scribe the radius of this pattern. Snap a reference line on the subfloor, and center a piece of plywood on the reference line with the long side of the plywood perpendicular to the line.
With your tape measure and an 8d nail, experiment by moving up and down the line to find the pivot point for the desired radius. Tack the nail at the pivot point and hook your tape on the pivot nail. With no slack in the tape, hold your pencil at the radius measurement and carefully swing the tape across the face of the plywood. Allow only the pencil point to touch the plywood, and you should be able to draw an arc.
Move the pencil and scribe a second arc. The location of the second arc depends on the dimension of your joist material. For example, if you’re using 2×8 joists and the first radius is 7 ft., scribe the second at 7 ft. 7-1/2 in. Then use a jigsaw or a circular saw to cut out the plywood-arch section. If it comes out well, make it your pattern to scribe the rest.
Chances are you won’t be able to get a full arch from one piece of plywood, so you’ll have to line up several sections and stagger the seams in the top layer over the seams in the bottom layer. I’d lap the seams at least 2 ft. Glue up the layers with construction adhesive and nail them together.
Carefully align the ledgers on the end walls and spike them with 16d nails to the studs. Then install the joists. Lay out the joists radially, not plumb, as shown in the drawing. Situating the joists this way gives plenty of backing for hanging the drywall. Use joist hangers with nail holes all the way down the back flange of the hanger, and put nails in all the holes; otherwise, the joists will twist.
With the joists installed radially, they’ll probably sag. I’d either tie the joists to the roof rafters or glue and nail 2×4 strongbacks to the top edges of the joists to stiffen them. Check with an engineer to be sure your design will bear its own weight.
The smaller the radius of your arch, the more joists you’ll need. Sixteen in. o.c. works for a 20-ft. radius, but for a 7-ft. radius, 8 in. o.c. affords more backing for the sheathing.
As for interior sheathing, I’d put up two layers of 1/4-in. drywall because you can bend it; you may need to wet it if you’re building a tight radius. Try wetting the back of the drywall, then draping it over a Sonotube laid across a couple of sawhorses. The weight of the drywall will cause it to take on a radius all by itself.
If your cutting and taping skills are up to snuff, you could score the back of 1/2-in. drywall so that it will conform to the arched frame. However, scoring can backfire on you because the scores telegraph through to the face of the drywall. You’ll need lots of joint compound to smooth out the creases.
