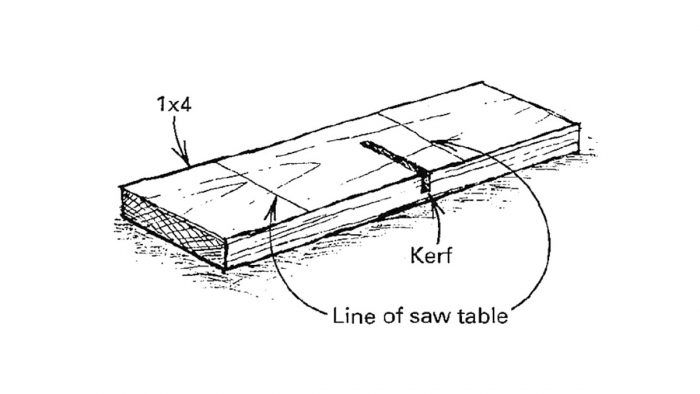
I often find it easier, especially doing built-in units on site, to bring some hand-held power tools to the lumber and plywood pile rather than hauling the material back to the shop. I use a circular saw to make my cuts, and with the help of a kerf block, 1 can make the cuts quickly with accuracy that’s around plus or minus 1/16 in. What’s a kerf block? Read on.
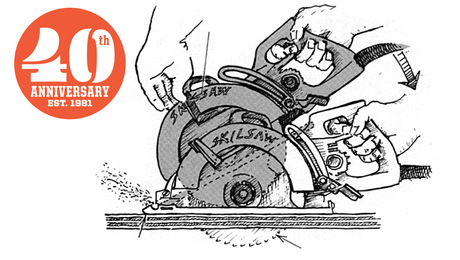
First, I set the depth of cut on my circular saw. Once it’s set, I don’t change it, or I’ll have to make another kerf block. Next, I grab a scrap piece of wood. A 1-ft. long piece of 1×4 is good for this process. Now, using my square, I start cutting across the block. I stop the cut midway, and with the saw stuck in the wood, I use a sharp pencil to mark the edges of the saw’s table on both sides of the cut. The block should look like the one in the drawing.
Now when I want to make a cut in a sheet of plywood, I mark the dimension on the plywood and hold the block on the work so that the kerf lines up with the mark. Then I note the edge of the saw table (whichever side is most convenient) with a pencil mark on the plywood. I use these marks to position a clamped-on straightedge to guide my circular saw. This method works equally well when dadoing with a router.
—Randall C. Smith, Barrington, NH
Edited and illustrated by Charles Miller
From Fine Homebuilding #98










View Comments
make a video of this . Cant seem to get this in my head
Great Idea it solves a guessing game for the cuts
I had to read it twice. The "table" is the circular saw base. The drawing is incorrect as it does not show the kerf cut through. So , you line up the left or right kerf edge with your mark on the work piece and then mark the left or right saw base mark on the work piece to show where to clamp the straightedge. Simplified , cruder self aligning straightedge you can build with two layers of plywood or hardboard . This would work work best with longer cuts I think.
Not a bad idea but the picture and the description are awful and make a simple idea seem very complicated. "First, I set the depth of cut on my circular saw. Once it’s set, I don’t change it, or I’ll have to make another kerf block." This makes no sense to me. What does the depth of the kerf have to do with the distance of the blade from the edge of the saw base (table)?
Why not cut the board off at the lines with a chop saw so you can accurately run your pencil along the edge rather than measure to a line. This will also make your template smaller and may fit right in your circ. saw tool case.
This is a variation on a shooting board- It's a home-made version of a track-saw.. To make one, you attach a thin strip, say 1/8 x 8" x 54", to a thicker one, say 1x4 x 54" (or the factory edge of a plywood cutoff) which has a very straight edge. (You end up with a cross-section that's sort of a blunt L.) You trim the thin piece by running your circular saw along the straight edge, using either side of the saw shoe.
To use the shooting board, you place the previously trimmed edge on your cutline, clamp the shooting board to the board you're cutting and use the factory edge to guide the saw.
If you make the shooting board for the narrow side of the saw shoe, you don't have to worry about hitting the clamps, but it's not as stable. If you use the wide side of the shoe, that rides on the thin board and it's more stable, but the motor can hit the clamps. One solution to that is to make the guide board wider than the motor. You can also make a 2 sided shooting board- looks like a blunt T.
BobboMax,
Got a drawing or photo on that one?
Here's a sketch of a 2-sided shooting board, length as needed.