Q:
I am re-siding our house, first removing layers of old siding to expose 1×10 Douglas-fir sheathing. I’d like to shear over the old 1×10 sheathing with plywood. Is this structurally sound? Also, could screws be used to attach plywood? Nailing the plywood might cause nail pops and cracks in interior drywall and trim work. If I use screws, what is the proper spacing?
Larry G. Goodwin, Pleasant Hill, CA
A:
Thor Matteson, a P. E. in San Luis Obispo, California, replies: Plywood added over existing sheathing should perform fine as long as it’s installed properly. In some ways, installing plywood over the original 1×10 sheathing will make the job easier. First, attach the old 1x10s securely to the studs and replace any deteriorated boards. Split boards are okay; just fasten each segment of the board at both edges.
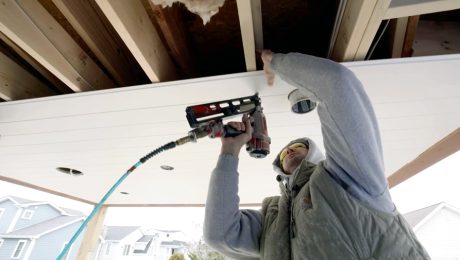
Attaching the plywood to the 1×10 sheathing with screws should reduce the chances of nail pops or cracking in the interior drywall. Gun-driven nails will also work, but screws won’t tend to split the old sheathing as readily as air-driven fasteners.
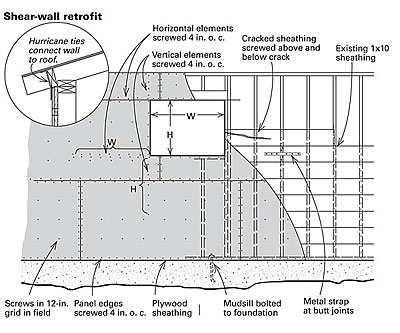
Make sure you use standard wood screws just long enough that the tip barely projects through the inside of the 1×10. For a single-story house, #8 screws spaced 4 in. apart along all panel edges should be sufficient for all of the outside walls. For the panel field, install screws in a 12-in. square grid pattern. I recommend predrilling with a bit that drills lead, shank and countersunk holes simultaneously to save time. I know everyone will want to use drywall screws, but until we see test values for them, engineers will specify standard wood screws.
The ideal shear wall would consist of a single, huge sheet of plywood covering an entire wall from foundation to roof. But plywood comes in smaller sheets, so several sheets of plywood must be fastened together to act like a single sheet. To achieve that end, you must keep several things in mind.
The edges of each sheet must transmit shear forces to the adjacent sheet. In new construction, vertical edges of adjacent sheets attach to the same stud, and the stud transfers force from one sheet to the other. At the horizontal plywood joints, a row of blocks between the studs is supposed to transfer forces.
The existing sheathing on your walls will help form a continuous diaphragm (essentially the bottom lamination for the huge sheet of plywood mentioned before). Because you are working on a solid substrate, the vertical plywood joints don’t have to fall on studs. Simply fasten the panel edges to the 1x10s. Your old siding will also serve as backing for horizontal plywood joints. Just make sure that the plywood on each side of the joint is fastened to the same 1×10. Stagger the fasteners generously to help avoid splitting the old sheathing.
The second thing to keep in mind when creating a shear wall is cutting holes for windows. When you cut a hole in a wall for a window, you create two unconnected wall segments, one above and one below the window opening. Forces carried by a wall segment above a window must somehow be transferred around the window to the segment below. Adjacent wall sections can transfer forces around a window opening, but they must be connected to the wall segments that are both above and below the window.
Continuous structural elements must extend both vertically and horizontally from each corner of the window opening to connect the wall segments above and below the window to the main shear wall. The king studs on either side of the window framing serve as the vertical elements, and plywood should be screwed into them through the 1×10 sheathing with the same spacing used at panel edges. These vertical rows of screws should be extended past the corners of the opening to a distance equal to the opening height, or to the roof or floor, whichever is less.
For the horizontal elements around window openings, the 1×10 sheathing will perform adequately if there are no butt joints within an opening-width’s distance from an opening corner. Reinforce any butt joints in the 1×10 within this distance with steel-strap ties. The plywood is then fastened to these boards the same distance out from the window opening as its width, using screws in the same pattern as for a panel edge.
Last, remember that shear walls typically transfer loads from the roof (and upper floors of multistory buildings) to the foundation. Shearwall connections to the roof and foundation must transfer these forces, or you will end up with a heap of strong walls and a roof that collapsed for want of being connected.
The new plywood sheathing should be attached to the roof sheathing and pressure blocks (or frieze blocks) between the rafters with hurricane ties. The detail drawing shows a typical retrofit connection to roof eaves. At the foundation, shear panels must be connected to the mudsill, which in turn has to be securely bolted to the foundation.
These recommendations should head you in the right direction. For further advice, you should consult a qualified engineer who can more closely analyze your specific situation.
