Retrofitting a Threshold
A three-piece threshold provides extra weather protection, especially in exposed locations.
Synopsis: This article explains how to add a three-piece metal threshold at an exterior door. The step-by-step photos show how the aluminum parts are cut and fitted to the opening to keep water out.
I used to install the ordinary type of metal thresholds available at hardware stores. Every time it rained, I’d worry. I’d worry about water sweeping in as the door swung open, water trickling in around the sides of the door or water entering through the screw holes. I’d worry about water warping a hardwood floor or staining a Persian rug.
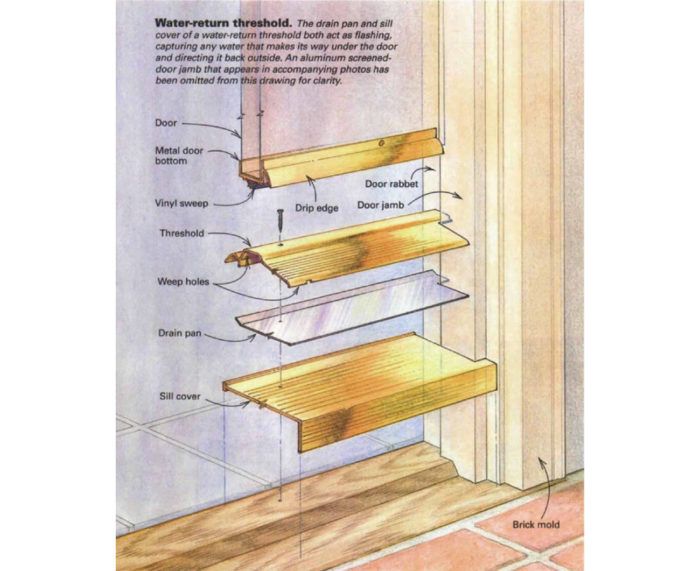
Now I use ordinary thresholds only in protected openings. Experience has taught me that three-piece water-return thresholds are the safest bet. I often use thresholds made by Pemko Manufacturing (Ventura, Calif.). A water-return threshold consists of a threshold, a drain pan and an interlocking sill cover. Although a water return threshold is a little tough to install, the techniques I use make it simple enough, and the extra effort is worthwhile because it saves all of that worrying when it rains.
This example involves a door and frame already in place. While new, prehung-door units typically come with serviceable thresholds, the techniques discussed here could be used to add water-return thresholds to new doors.
Start with the sill cover
Sill covers are lifesavers. They are essentially the flashing for the threshold and cover the rough edge of a concrete slab or the exposed grain of a wood floor. They are also the perfect cure for elevation problems that can be created when, for example, a tile floor is laid right up to an original oak threshold and oak sill. This problem was the case in the door opening featured here.
I start by deciding how the sill cover should be notched around the jamb and exterior trim. Usually the sill cover butts against the door jamb or the brick mold. On this job, a screened-door jamb had been added, and the sill cover had to remain behind that jamb so that the screened door would shut.
First, I cut the sill cover off square at the longest dimension needed, in this case from brick mold to brick mold. To cut the sill cover, I use a small circular saw equipped with a metal-cutting blade. With the sill cover cut off square, I tip it into the opening and align it with the back of the screened-door jamb and with the rabbet for the main door. Using a pencil or a utility knife (scratch marks made by a knife are easy to see on most aluminium products), I scribe marks for the notch. I repeat the process for the opposite side of the jamb. I’ m using the jamb in place of a tape measure and square.
For more photos, illustrations, and details, click the View PDF button below:


