Q:
I’m a full-time carpenter studying to become an architect. I love the rich look of groin vaults, and I’m hoping to incorporate one in my next project. Unfortunately, I’ve been unable to dig up any information on how to build a groin vault. Can you help?
Greg Nisius, Duluth, MN
A:
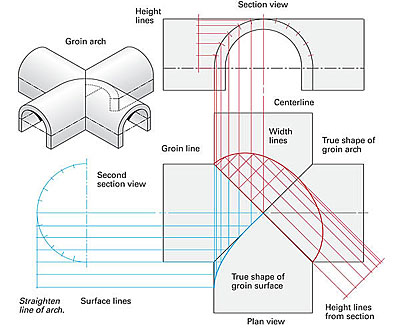
William F. Doran, a consulting civil engineer in Pasadena, California, replies: I, too, like the looks of a groin vault, or groin arch, which is the intersection of two barrel or arched ceilings at right angles (see drawing). Vaulted ceilings were a popular design element in many older churches and public buildings; if the plan of the building is in the shape of a cross or an “X,” the groins that are created add a striking architectural detail. A house with barrel-vaulted ceilings in a cruciform layout could also create many architectural possibilities.
Although figuring out a groin vault might seem like a real head scratcher, perhaps it would help to visualize the groin vault in more common utilitarian forms, such as the intersection of two circular tunnels, pipelines or other types of circular conduits, such as airconditioning ducts. The geometry used to solve these everyday puzzles is the same used to figure out groin vaults in architecture. The groin-vault formula can be arrived at mathematically using analytic geometry, but I prefer descriptive geometry, which uses a graphic approach to solve the problem.
We need to determine two elements, the first being the shape of the groin arch, which is the line where the two vaults intersect. In building terms, the groin arch is the valley between the two vaults and establishes the curve of the valley rafter. The second element we need to find is the curve that you have to cut into the roof sheathing so that it follows the groin arch. This process is called developing the surface of the groin vault.
For the first exercise, draw a section of one of the semicircular arches that form the roof (see drawing). Below the section view, draw a plan view showing the full intersection of the vaults. You’ll be transferring lines from one view to the other, so it’s important to line up both views along the same centerline.
In the section view, step off a given number of points spaced evenly along the arch. (For these drawings I’ve used six points, but the exact number isn’t important as long as you’re consistent in all parts of the drawing.) On one side draw lines from each of the points perpendicular to the centerline. These lines represent the height of the arch at each of the points, so I’ll call them height lines. Transfer these height lines to the plan view starting from the groin line and running parallel to it.
Now, from the same points in the section view, project lines down to the groin line parallel to the centerline. These lines step off the width of the arch, so I’ll call them width lines. Where each of the width lines intersects with the groin line, draw a line perpendicular to the groin line. Extend the perpendicular lines to intersect with their corresponding height lines (the ones you transferred to the plan view). A curved line drawn through these points of intersection is the true shape of the groin arch, which again is the curve of the valley rafter that will frame the groin.
Now we’ll figure out the curved edge of the sheathing. Off to the side of the plan view, draw a second section view identical to the one above. Essentially what you do next is straighten out half of the arch (using a compass; see arrow on drawing) so that you have a straight line with six equally spaced points.
From each of these points, draw lines over to the plan view. (Because these lines will establish the shape of the vault’s surface, I call them surface lines.) Now extend the width lines of the original section view beyond the groin line until they intersect with their corresponding surface lines. A curved line drawn through these intersection points is the shape of the vault surface along the groin line.
When you’re ready to build, I suggest making a full-scale drawing of what we’ve done here, a process called lofting. With these two shapes drawn full size, you should be able to fabricate all the various components you need to build your groin vault.
