Simple Tools for Faster Framing
An expert framer describes how to get more done in less time with the help of patterns, templates and jigs.
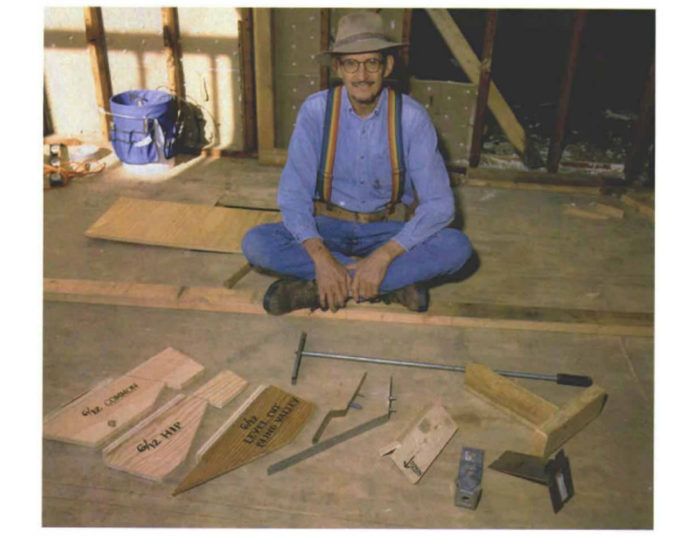
Synopsis: Larry Haun shares his tips for saving time on a framing job by cutting many identical pieces at the same time and by using simple tools and jigs to speed layout.
When I was a child, long western-Nebraska winters kept me inside and close to the kitchen stove. In the 1930s, with no television and no department stores, there wasn’t much to do except help my mother sew. It was then that I learned to make patterns and templates.
Some years later, when we built the roof on the first house I worked on, the master carpenter laid out and cut a full-length common rafter that became the pattern. Its outline was marked, one board at a time, on a pile of 2x rafter stock. As with my mother’s clothing patterns, the hardest part was making the first one.
In this article, I’ll describe some devices, patterns, templates and tools that I’ve used to make repetitive work easier. Some you might have seen before, some not. Either way, these examples might spark your own ingenuity. On any decent-size framing job, it’s productive to make a template. A simple tool takes a few minutes to make, but it’ll save you time in the long run.
Mark anchor-bolt locations with a simple steel tool
When framing on a concrete slab or foundation, I mark locations of anchor-bolt holes in the sill with a bolt-hole marker. These markers are available commercially (Pairis Enterprises, Temecula, Calif.) but are easy to make.
To use the bolt marker, place the mudsill plate on the foundation with the edge of the sill temporarily on the opposite side of the chalkline from where it normally would go. Check to make sure the plate is positioned directly on the line and that the end of the plate is in the right spot. Hold the notch in the bolt marker against the anchor bolt and perpendicular to the plate. Tap the screw or bolt in the tool with a hammer to leave an indentation on the sill, marking the location to be drilled. Drill the holes, and drop the mudsill over the bolts. The mudsill should fall in place right on the line.
Layout stick quickly marks stud location
The layout stick has been around as a simple framing tool for 50 years. It’s used to lay out the locations of study. Mine was made of aluminium, but you can make a good one from wood. Cut a strip of 3/4-in. plywood or 1x stock 1 1/2 in. wide and 49 1/2 in. long. (That’s the dimension, outside to outside, of four studs 16 in. o. c., and this length seems to be the most manageable.) To this stick, attach strips of plywood 1 1/2 in. wide and 9 1/2 in. long at 16 in. o. c., or whatever spacing the layout calls for. Let the strips overhang 3 in. on one side and 5 in. on the other. The 3-in. legs allow you to mark stud locations on the edges of top and bottom plates at the same time. The 5-in. legs make it easy to mark two plates laid side by side or two plates and a header at the same time.
For more photos, drawings, and details, click the View PDF button below:
Fine Homebuilding Recommended Products
Fine Homebuilding receives a commission for items purchased through links on this site, including Amazon Associates and other affiliate advertising programs.
Large-Capacity Lightweight Miter Saw
Spyder Stinger Spade Bit
Protective Eyewear
