Roof Flashing
Installation details can make the difference between a trouble-free roof and an expensive callback.
Synopsis: Roofs offer many opportunities for water leaks. This article explains how to install flashing to prevent the problem, covering roof edges, valleys, vent pipes and chimneys. The author provides details on how to flash a skylight in a metal roof and the advantages of using synthetic materials like EPDM instead of metal.
I once heard about a man with a perpetually leaking roof. He said that he couldn’t very well fix it in the rain, and that when the sun was shining, he didn’t need to. Most likely, the problem could have been avoided if the roof flashing had been done right in the first place.
My previous article discussed sidewall flashing. Now I’ll take a look at roof flashing. Although the underlying principles are the same for both systems, roof flashings are more severely tested; rain strikes a roof directly, and the sun bakes it throughout the day. Good sidewall flashings can extend the life of a structure, but roof flashing keeps the living room from turning into a rice paddy.
Edge flashings go on first
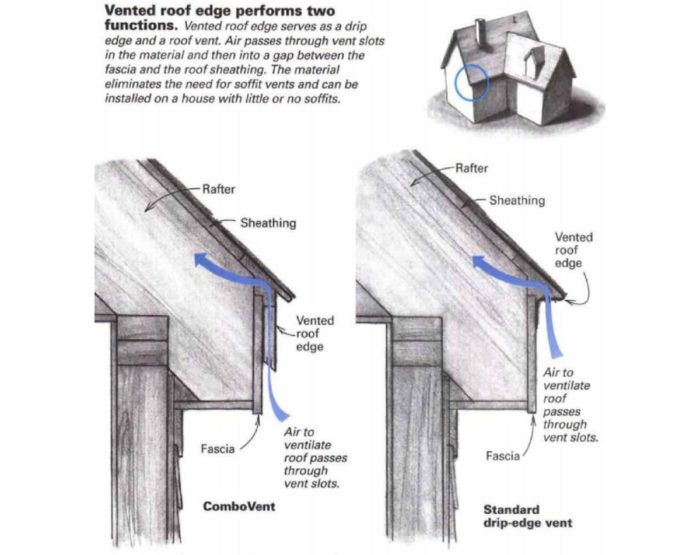
The first flashing to be installed on a typical roof is the edge flashing. Metal roof edge, also known as drip edge, protects the edge of the roof sheathing from water splashing out of the gutter and from the moisture present in gutter debris. It also fends off moisture that gets drawn under shingles by capillary action. Finally, it makes for a neat appearance, especially along the rake.
In northern climates, where ice dams are a problem, the use of self-adhesive bituminous sheeting at the eaves is becoming almost routine. Typically, one 3-ft. wide sheet of bituminous membrane is installed at the eave with the rest of the roof covered in overlapping courses of roofing felt. Nail the drip edge to the deck along the eaves and nail it over the roofing felt and bituminous sheeting along the rakes.
Metal roof edge generally is available in one of two profiles, one that resembles an L and another that looks like a lopsided T. I like the T-profile because it supports the shingle over hang. Drip edges are sometimes available in a variety of widths; if you’ve got a choice of materials, wider is better than narrower. With the wider stock, nails can be placed slightly higher on the roof, thereby reducing the risk of water damage to the sheathing.
I nail roof edge directly to roof sheathing, about 12 in. o. c., placing the nails as high as possible without weakening the flashing. At the corner where the rake meets the eave, I run the eave flashing first. The small overhang that sticks out past the eave is allowed to project a bit past the rake as well. When the rake flashing comes down, it captures the overhang. A slit along the crease of the rake flashing then allows its vertical fin to bend around the corner.
For more photos, drawings, and details, click the View PDF button below:
Fine Homebuilding Recommended Products
Fine Homebuilding receives a commission for items purchased through links on this site, including Amazon Associates and other affiliate advertising programs.
Ladder Stand Off

Peel & Stick Underlayment
Flashing Boot Repair


