Building a Curved Deck With Synthetic Decking
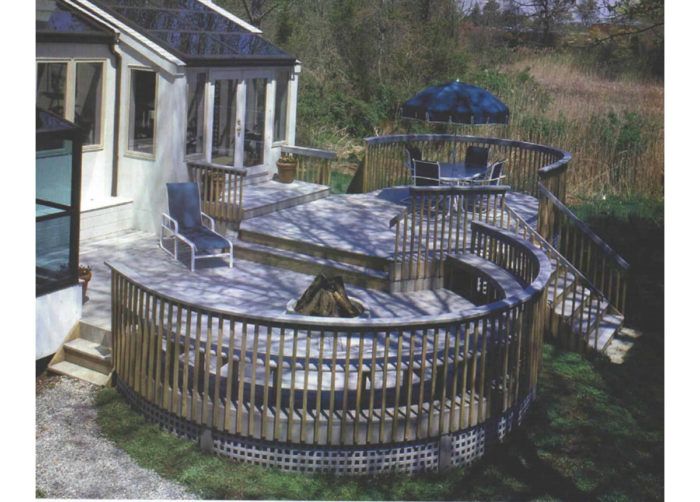
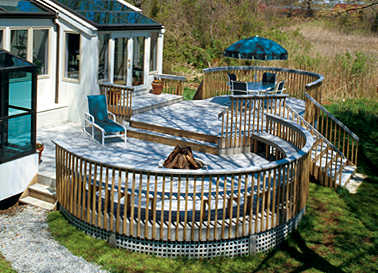
A multilevel deck with built-in benches and a barbecue pit turns a backyard into a living room.
For me, part of the challenge of custom remodeling has been the opportunity to try something new. When I saw the potential to combine an interesting deck design and new materials, I immediately went to my prospective clients, who received the ideas enthusiastically.
From their house near Long Island Sound, my prospective clients had a wonderful view of a salt marsh and the estuary beyond. They also had a small yard and wanted a backyard deck for recreational space.
After several meetings, we drew up a plan for a stacked semicircular deck. The family could watch marsh birds from the top level or sit around a cozy fireplace/barbecue on the lower deck. A grand staircase facing the water, a wraparound bench and a small side stair completed the basic design.
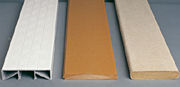
My clients also wanted a deck that would withstand constant exposure to salt and the weather extremes of New England. Although we would use pressure-treated yellow pine for the framing material, we ruled out pressure-treated decking because it tends to crack and check after a few seasons. Wooden lumber would also have required steam-bending to fit the desired curves. Having had four years of experience building decks with wood-polymer composites, I suggested Trex decking (www.trex.com), which fit the bill perfectly. (For alternatives, see Sources for synthetic decking.)
Sources for synthetic decking
During the past decade, consumers and manufacturers have expressed a growing interest in recycled building materials, including decking. There are now several types of decking made from recycled plastics and/or wood products, as well as others made from plastics such as vinyl. While by no means inclusive, the list of manufacturers below will provide some useful sources. Your local lumberyard should be helpful in finding regional suppliers of these synthetics as well.
Carefree Decking (recycled high-density polyethylene)
Earth Care Products, 765 Skippack Pike, Suite 200, Blue Bell, PA 19422
(888) 853-2784
ChoiceDek (high-density polyethylene and cedar composite)
Advanced Environmental Recycling Technologies Inc., Farm Road 2169, HC10, P. O. Box 116, Junction, TX 76849
(800) 951-5117
www.choicedek.com
Dream Deck (polyvinyl chloride)
Thermal Industries, 301 Brushton Ave., Pittsburgh, PA 15221-2168
(800) 245-1540
Perma-Poly (recycled high-density polyethylene)
Renew Plastics (division of N.E.W. Plastics Corp.), 112 4th St., Luxemburg, WI 54217-0480
(800) 666-5207
www.renewplastics.com
Phoenix Plastic Lumber (recycled high-density polyethylene)
Outwater Plastic Industries Inc., 4 Passaic St., Woodridge, NJ 07075
(800) 888-0880
TimberTech (wood/plastic resin composite)
Timber Tech Ltd., 894 Prairie Avenue, Wilmington, OH 45177
(800) 307-7780
www.timbertech.com
Trex (recycled wood and polyethylene composite)
Trex Co. LLC, 20 S. Cameron St., Winchester, VA 22601
(800) 289-8739
www.trex.com
Photos: Scott Phillips
Batch trucks make pouring concrete an efficient process — After digging the post holes and a circular footing for the barbecue, we called for concrete. Normally, we mix small batches of concrete for footings from 80-lb. bags. When we need more than a few post holes but less than a foundation, we make a call to the local ready-mix company for a concrete batch truck. Batch trucks are smaller than big mixers and mix concrete on the spot in the strength that we need. We pay for what we use. The normal batch truck can deliver up to 5 yd. It’s also quite a bit faster than mixing the stuff by hand.
An underground fixture becomes the barbecue base in the center of the deck —Before the framing began, we needed to finalize the fireplace/barbecue design. The owners weren’t interested in a fancy gas-fired contraption; they just wanted a place where they could build a real fire for sing-alongs, s’mores or serious cooking. During the design, we planned for a shallow brick pit built on some sort of concrete-base platform. We found the base after some research and a few phone calls: a wire-mesh reinforced concrete tower normally used to house utilities underground. This concrete tube had a 42-in. dia. We brought in a 40-in. tall section of the utility tower and set it in place, centered on a circular footing 5 ft. in dia. Next, we filled the tower with rubble and concrete; after the deck was finished, a mason laid the firebrick inside the barbecue.
Once the concrete had cured, we began setting the support posts and beams. Pressure-treated 4×4 posts would support doubled pressure-treated 2×8 beams that would run under and perpendicular to the joists. We used galvanized connectors to secure the posts and beams, and after bolting the ledger boards to the house, we bent and attached aluminum flashing over the ledger. We then nailed on the joist hangers, cut the pressure-treated 2×8 joists and began framing. Because Trex has no structural properties, its manufacturer recommends no greater span than 16 in. o. c. for 5/4×6 bullnose decking in residential applications. We let the joists run long past the support beams and perimeter outline (photo, below) to prepare for the next step of laying out the circles.
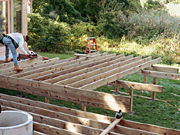 Rather than cut joists to length as they were installed, the author found that it was easier to let them extend beyond the proposed outline, draw the circumference with a trammel and cut them all at once.
It’s easier to frame curves if you start by framing a square — With the joists installed and run long, we tacked a piece of 3/4-in. plywood roughly in the center of the joists on the upper deck and located the exact center of our first circle on the plywood. We then drove a nail through one end of a 1×3 into the plywood at the centerpoint, and we cut the 1×3 to the circle’s radius after subtracting 1-1/2 in. for the skirtboard, 3/8 in. for the lattice and 1-1/2 in. for the plywood band joist.
We swung the homemade trammel over the tops of the joists and marked the curve with a fine-point felt-tip pen. We drew plumb lines with a framing square and cut the joists 2 in. to 3 in. beyond the line with a chainsaw.
To make the curved blocking that would support the plywood band joist, we used the offcuts and cut them to fit between the joists, flush to the top. After nailing the blocking, we redrew the arc and cut to the line with a circular saw (photo below left). (After trying to cut straight for years, I found that it was surprisingly easy to cut a curve; it was also much faster than cutting with a jigsaw.) The bottom blocking was traced from the top, cut and nailed into place at the bottom of the joists (photo below right). The joist ends were then trimmed flush with a reciprocating saw.
 After drawing the curves with a 1×3 trammel tacked to the centerpoint and nailing off the blocking, the author cut the outline, setting the blade depth to 1-5/8 in. to reduce the chance of binding the blade.
 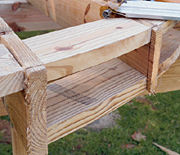 To provide easier nailing and to reduce splitting, the joist ends were cut off with a reciprocating saw after the blocking was installed. Note the vertical lines plumbed down from the saw kerfs on the tops of the joists.
To make the band joist, we ripped 1/2-in. pressure-treated CDX plywood into 7-1/2-in. wide strips and laminated three layers together across the joist ends. We clamped one end to the starting point and slowly began to glue, clamp and nail, using construction adhesive and 8d galvanized box nails (photo below left). We let the ends fall without regard to the joist ends and were generous with the glue; we also were careful to stagger the joints on each layer. After completing the lamination, we used the chainsaw and cut the support beams flush with the plywood. We shared a congratulatory coffee break and set off to tackle the larger lower section.
The lower-deck framing was identical to its upper neighbor with one exception: The curving band joist would run parallel to the framing along one side of the deck and would not be supported by the joists. Rather than fill in the void with short blocks, we nailed a length of pressure-treated 2×8 horizontally to the top of the last joist . After scribing and cutting the arc, we traced the arc onto a second piece of pressure-treated 2×8 that would serve as bottom blocking. The plywood band joist secured the blocking, and vice versa.
 The author met the challenge of a tightly curved rim joist by laminating three layers of 1/2-in. pressure-treated plywood onto the joist ends with plenty of construction adhesive, clamps and careful nailing.
 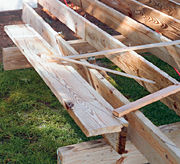 For the structural blocking where the deck’s curve ran parallel to the joists, a 2×8 was nailed to the edge of the last joist, and a 1×3 trammel was used to trace the curve onto the 2×8. After the board was cut, another just like it was nailed to the bottom of the joist, and the two were tied together with a laminated band joist.
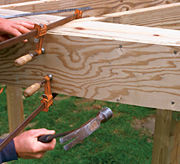
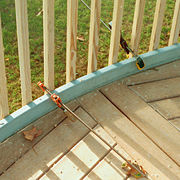
The beauty of composites is revealed in the bending– After stapling plastic lattice around the perimeter, we began bending and attaching the 2×10 Trex skirtboard. We used scrap 5/4 decking to establish the height of the skirtboard above the rim; when screwed onto the band joist, the skirt would cover the butt ends of the decking. We’ve found through experience that scribe-fitting the decking into the rim yields a more precise joint than installing the decking first. Prebending the 2×10 was a cinch, and in quick succession we attached the skirts with 3-1/2-in. galvanized decking screws into the joists. We glued the joints with PVC cement and filled gaps with a mixture of PVC cement and Trex sawdust.
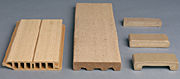
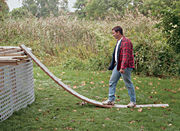 Prebending synthetic decking can be as easy as walking. Because Trex is made from a composite of recycled high-density polyethylene and wood chips, it has little lateral stiffness and can be bent easily. Once bent, the material keeps its shape for some time without reinforcement.
  The skirtboard is screwed to the rim before the decking is laid down. The author scribe-fit the decking to the skirtboard, which helped to maintain precise joints between the butt ends of the decking and the skirt. Scrap decking helped to align the skirt as it was clamped and screwed into place.
 The deck design included a segmented section that radiated out from the hub of the barbecue. Because the decking material has poor lateral strength, it must be supported at least every 16 in.
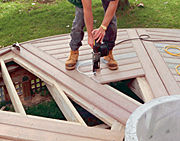
Take extra care to keep the decking straight and well supported — It was time to lay the decking down. Because the boards are so flexible, we had to watch closely that the courses didn’t wander too much. We snapped a series of chalklines, each representing a double-board width, and screwed a decking board with 2-1/2-in. galvanized decking screws to each chalkline, leaving a board-width space between. We then dropped in another board and centered it by eye, using a scraper or flat bar as needed to match the gaps on both sides.
On the upper level, the decking ran straight out across the joists, parallel to the house. We scribed and cut the decking to length with a jigsaw, trimming the butt ends with a block plane as needed. The bottom level wasn’t so easy. To bring a visual focus to the barbecue, the final design called for the decking to radiate out from the barbecue like spokes in a wheel. This required a significant amount of additional blocking to support the diagonal runs of decking.
Bent railings add a unique design element and are as solid as a rock — With the decking complete, we began the railing construction. We predrilled each baluster top and bottom, set the heights, plumbed them up and screwed the lower ends into the skirtboard.
We prebent the vertical face of the railings by clamping a Trex 2×4 to the inside perimeter of the balusters. After bending, Trex will hold its basic shape for quite a while. We then brought the 2×4 to the top of the balusters, clamped it in place and screwed it. We tried several different joints to connect the 2x4s, but because of the curved railing, we could not get the joint tight to my complete satisfaction. For future decks, I will special-order longer pieces (Trex can be extruded up to 40 ft. long) and won’t have to deal with seams.
 After spacing and securing the lower ends of the balusters, the author used bar clamps to pre-bend the curve of the 2×4 vertical railing face.
 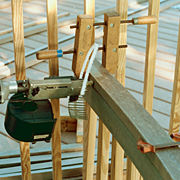 The author laminated the top part of the T-shaped railing by ripping the Trex into thin strips and reassembling them with PVC cement and screws.
The top of the railing was a new challenge. We tried bending a Trex 2×6 on edge but could not get the radius required, so we ripped Trex 2x6s into 1-3/8-in. strips. Using PVC cement, we glued and screwed the first strip to the top of the vertical 2×4; this served as our form. We then glued, clamped and screwed the remaining pieces into place, staggering the seams as we went. Any irregularities were removed with a belt sander.
fter completing our work on the railing, we began to build the bench for the lower level. We constructed right-angle pressure-treated 2×4 supports and secured one to every fourth baluster and to the deck, providing a finished seat height of 19 in. from the deck. After tying the supports together with a vertical Trex 2×4 as a facing, we ripped, bent, glued and then screwed 5/4×6 Trex for the bench seat as we had for the railing.
New materials and designs require time — When I work, I strive to learn new ideas and techniques. Unfortunately, learning new techniques can be time-consuming and expensive. After this experience, I’m ready to take on the next challenge. Bent glass rails, anyone?
Ted Putnam is the owner of Putnam Custom Carpentry/Deck Creations in Chester, Connecticut.
Photos, except where noted: Ted Putnam
Fine Homebuilding Recommended Products
Fine Homebuilding receives a commission for items purchased through links on this site, including Amazon Associates and other affiliate advertising programs.
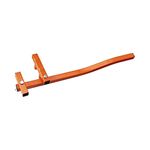
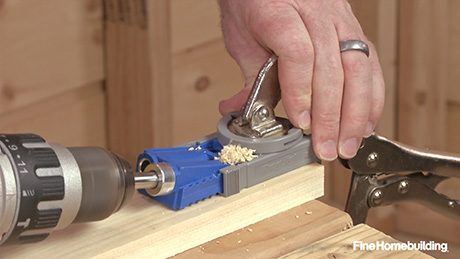
Cepco BoWrench Decking Tool

4-Gallon Piston Backpack Sprayer

MicroFoam Nitrile Coated Work Gloves