Getting More out of Your Rafter Square
If you understand the twelfth scale, your square becomes a durable calculator that never needs batteries.
Synopsis: A short but highly informative article about using the twelfth scale stamped on rafter squares. If you’ve ever been baffled by these numbers, here’s a chance to learn how to use them.
Several months ago, a coworker of mine went into a tool-buying frenzy. One of the tools he bought was a rafter square. After inspecting his new square, he became upset that not all the scales were in 1/16-in. or 1/8-in. increments. He insisted that the tenth and twelfth scales on the back of his square were useless and that he would always have to fumble for the front of the square to use it.
My disgruntled friend’s assumptions were not completely correct. The twelfth scales, located on the back of most rafter squares, have many uses on framing jobs. These scales are especially handy for solving basic right-triangle problems and theoretical roof calculations, as well as for performing simple division and multiplication.
A rafter square has two different sides
A rafter square is composed of two arms of different lengths that meet at a right angle. The smaller arm, the tongue, measures 1½in. wide by 16 in. long. The larger arm, the blade, is 2 in. wide by 24 in. long. (Notice that all these dimensions are convenient sizes of layout work.) The two arms meet at a 90° angle and form the heel of the square. The front side of the square is stamped with the rafter table and octagon table; the lumber table and brace table are located on the back. The tenth and twelfth scales are on the back as well. (It is important to note that not all rafter squares have the tenth and twelfth scales.)
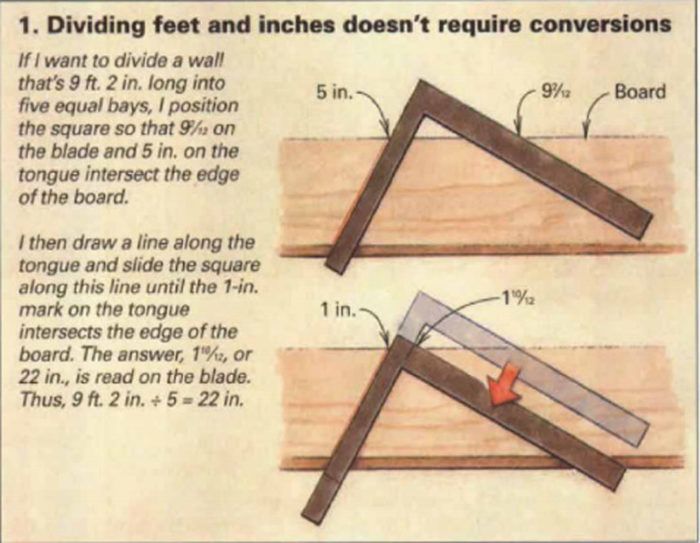
The twelfth scales, stamped on squares since the late 1800s, were intended as a means to calculate carpentry equations in feet and inches, thereby skipping the conversion of fractions to linear units. Because each inch is divided into 12 parts, it is possible to reduce layout work to of its original scale and still maintain the original proportions. With these scales, an inch mark can represent 12 ft., 1 ft. or 1 in.
The key to accurate calculations is a sharp, straight line
To perform calculations with a rafter square, you’ll need a square, a sharp pencil and a straight piece of 1x or 2x stock with crisp, sharp edges, the wider the better. A flat piece of plywood will also work; just snap a chalkline down its center and use the line as you would the edge of a board.
For more photos and information on how to get more out of a rafter square, click the View PDF button below.
Fine Homebuilding Recommended Products
Fine Homebuilding receives a commission for items purchased through links on this site, including Amazon Associates and other affiliate advertising programs.
Metabo HPT Impact Driver (WH18DBDL2)
Heat-Shrink Tubing

Magoog Tall Stair Gauges
