
10 Rules for Finish Carpentry
A veteran builder and teacher shares tips that make it easier to do a great job installing beautiful trim.
My first construction job was as a trim carpenter’s helper during school summer vacation. My boss had always worked solo, but as he got on in years (I’m older now than he was then), he wanted help moving his tools and materials. All I did that first summer was fetch and carry; I wasn’t allowed to measure, cut or nail. I was told to observe. In doing so, I learned that finish carpentry is essentially a visual exercise.
What is Finish Carpentry?
Before I launch into my advice, I want to clarify any misconceptions about what finish carpentry is. Although it evokes the idea of “finishing touches,” finish carpentry is a lot more than interior trim. It includes all the work done on a home after building, insulation, wiring, and plumbing are complete. That includes interior and exterior doors, stairs, window casings, wainscoting, ceiling coffers, joinery, cabinetry, furniture, and, of course, baseboards. Unlike rough carpenters (or “form carpenters”) who work on the early stages of construction, finish carpenters are generally considered artisans. They may work directly inside the home as well as in a workshop, since some finish carpentry requires stationary tools. Rough carpenters evolve into finish carpenters by learning how to measure, mark and cut more accurately. With practice, splitting the pencil line with a sawcut and working to closer tolerances become second nature.
Finish carpentry makes the eye work hard and skip over imperfections. At this point, the framing carpenter has made the house plumb, level and square. Or not. A good framer can ease the finish carpenter’s job by providing plumb walls and plenty of blocking for nailers for attaching trim. Or not. But even if the framer couldn’t read a level and and even if he added no more blocking than was absolutely necessary, the finish carpenter’s job is to make the doors, windows and cabinets work, and to make the house look good.
Perfect miters are only part of finish carpentry. Finish carpenters must develop an eye for proportion and detail. They must learn to visualize the steps that lead to the finished product. I teach these skills to novice carpenters at the Heartwood School in Massachusetts. To make learning them easier, I’ve organized the following ten rules of thumb.
1. Avoid using numbers
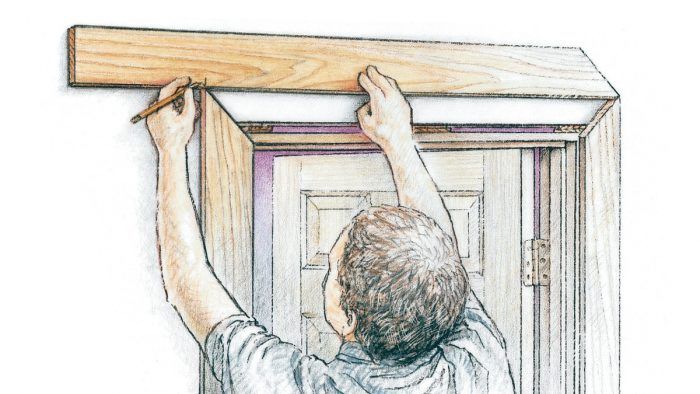
Don’t measure: It is more accurate to mark trim in place than to measure and then transfer numbers. It’s easy to misread a ruler or to confuse numbers while walking to the saw.
It is usually more accurate to hold a board in place to mark its length rather than to use a tape and involve numbers. Sometimes, using a ruler or tape is unavoidable. I’ll use a tape measure on a long piece that’s too difficult to mark in place, but generally I don’t like tapes. A tape can flex and change shape, and the movable end hook bends easily, affecting accuracy.
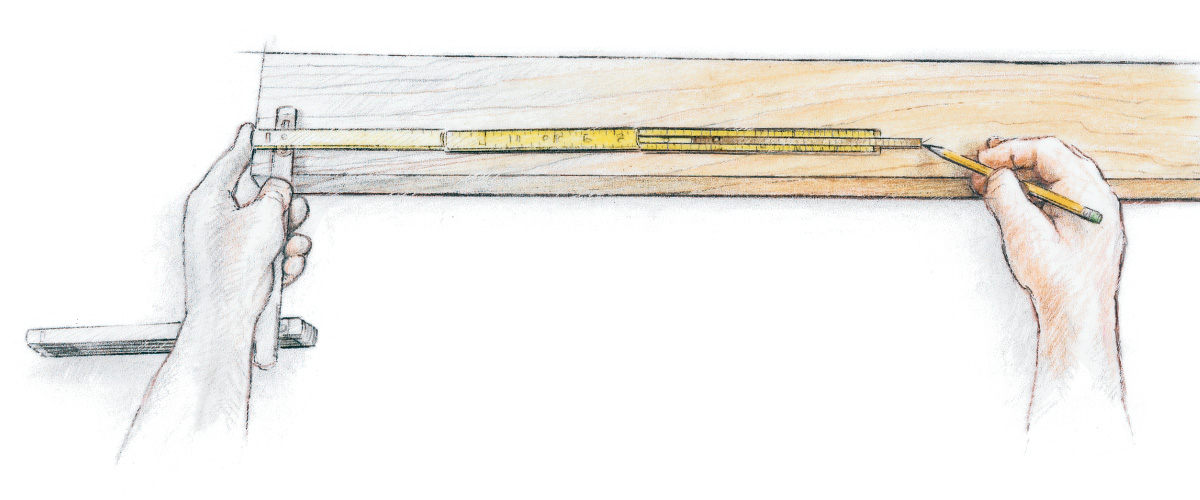
A rigid rule is better than a tape for measuring lengths under 6 ft.; hence, the 6-ft. folding wooden rule takes over during trim and cabinet work. The best folding rules come with a sliding brass extension that makes taking inside measurements easy. Open the rule to the greatest length that fits between the points to be measured, and slide out the brass extension the rest of the distance. Hold it at that length, and carry it to the board to be cut. No need for numbers. Just mark the board from the extended ruler.
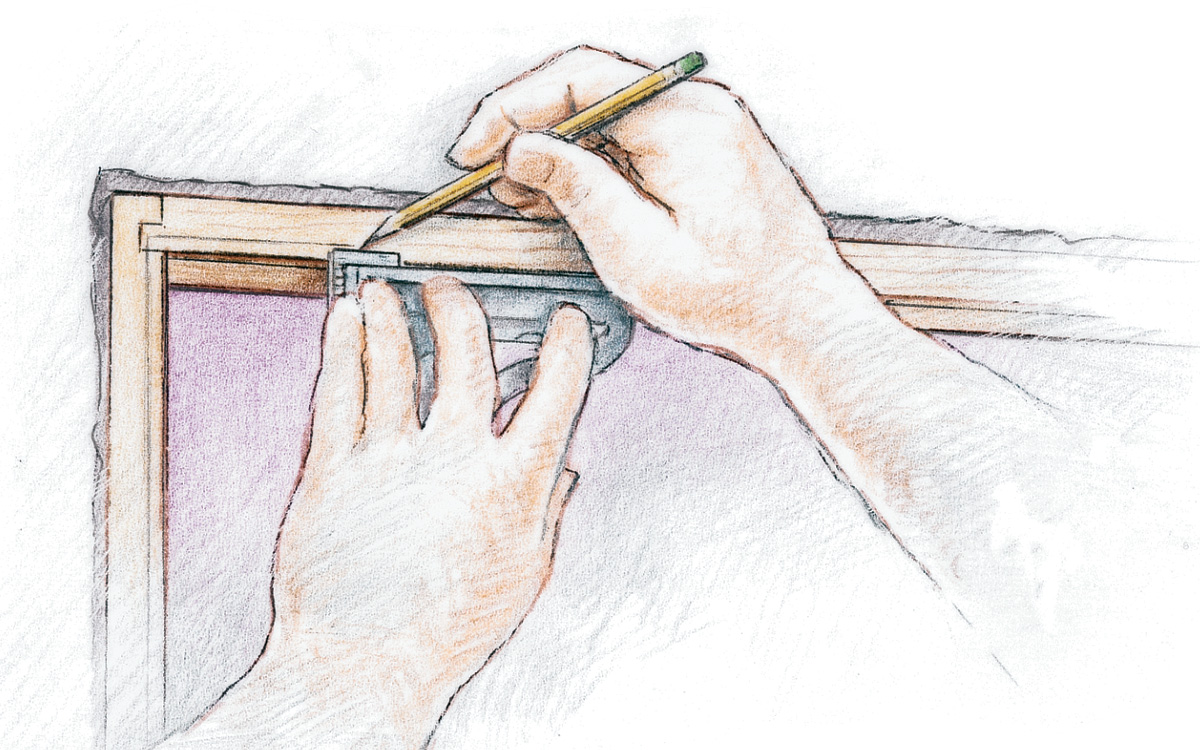
A combination square or a wood block of known dimension is the best way to lay out the small measurements needed for reveals and other spacings. Learn what dimensions are built in to the tools you use. A carpenter’s pencil is 1/4 in. thick; you can use it as a spacer for decking. The pencil lead is 1/16 in. from the edge of the pencil, so it can scribe 1/16-in. increments. The body of a folding rule is 5/8 in. wide. The blade of the standard combination square is 1 in. wide, and its body is 3/4 in. thick.
A door or window should be cased without the use of a tape. Lightly mark the reveal on the jamb with a pencil. Square-cut the bottoms of the casing legs, hold them up to the jamb, and mark the top cuts from the reveal lines. Cut the legs and tack them in place. Miter one end of the head, and holding it upside down over its final position, mark the other end to length.
2. Use reveals, and avoid flush edges
Wood moves — as it dries out, as the house settles, as you cut it and as you’re nailing it up. It’s almost impossible to get flush edges to stay that way. That’s why, for example, carpenters usually step casing back from the edge of door and window jambs. Stepping trim back to form reveals causes shadowlines and creates different planes that make it harder for the eye to pick up discrepancies. If a casing is installed flush to the inside of a jamb, it may not stay that way. The eye will easily pick up even a 1/16-in. variation from top to bottom. If the casing is stepped back 1/4 in. or 3/8 in., this variation will not be nearly as evident and will be hidden in shadow much of the time. Separate discrepancies, and they become less evident.
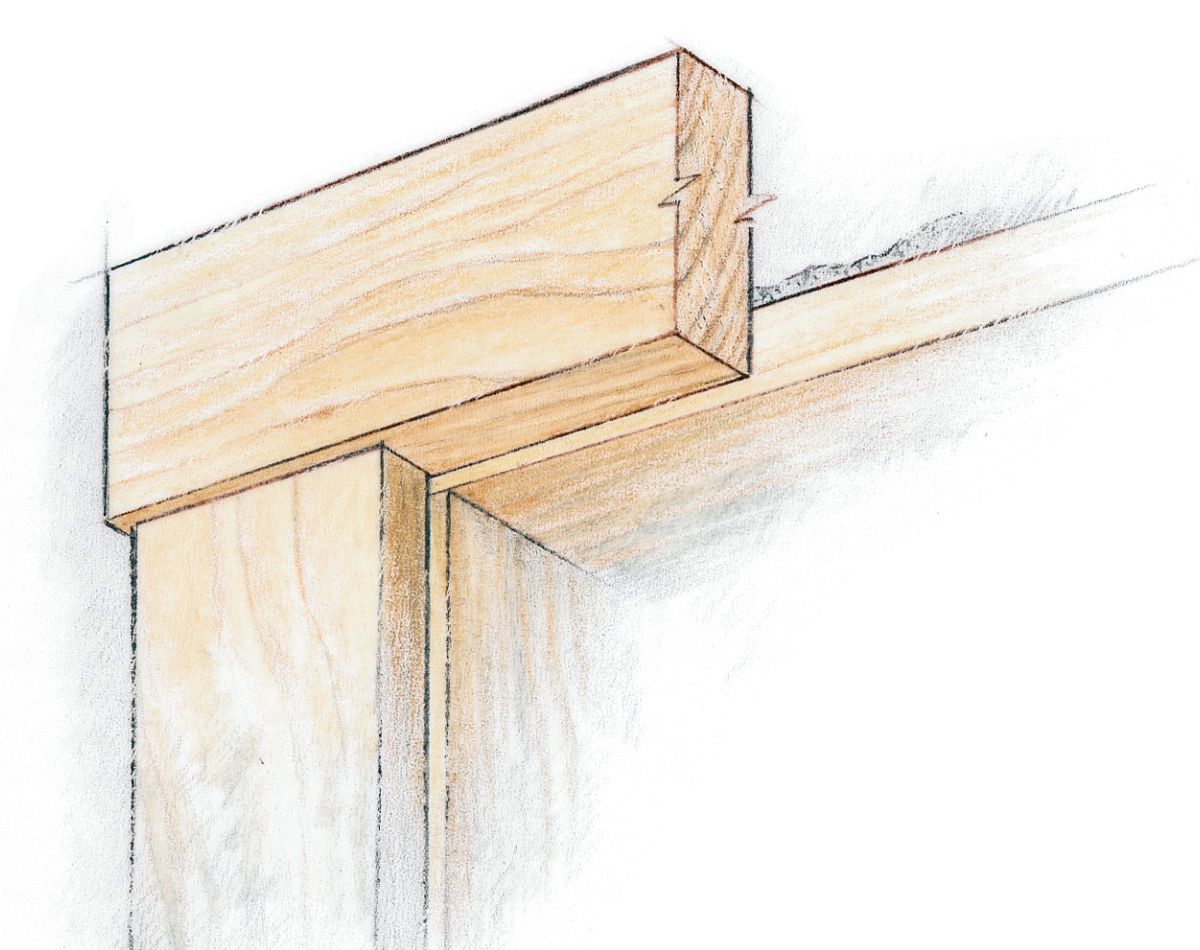
In years past carpenters by necessity used trim materials of different thicknesses; planers were not in widespread use. You rarely see mitered casings in older houses because differences in material thickness are obvious in a mitered joint. Instead, the casing legs butt to the head, which runs over and past the legs by 3/8 in. or so. This way, the carpenter didn’t worry about the length of the head casing being exact or the side casings noticeably changing width with changes in humidity. The head casing is usually the thicker piece so that the shadow it casts makes it appear to be a cap. Carpenters in the past often placed rosettes at the upper corners and plinth blocks at the bottoms of door jambs. The casings and baseboards butted to them. The variations in thickness of these boards were lost in the overwhelming presence of the thicker plinths and rosettes.
3. Split the difference
If you’re running courses of material between two diverging surfaces, it’s obvious that if you start out working parallel to one, you won’t be parallel to the other. In the case of decking, roofing or siding, you can slightly adjust the gap or coverage at each course so that the courses are parallel to the other surface when they reach it.
This adjustment is easily figured. Say that you’re shingling an old house, and the roof measures 135 in. from ridge to eave on one end and 138 in. on the other. Divide one of these figures by the ideal exposure per course, 5 in. for normal three-tab shingles. Thus, 135 in. divided by 5 equals 27; this is the number of courses at 5 in. per course. At the other end of the building, 138 in. divided by 27 yields 5 1/8 in. Lay out each side of the roof using the two different increments, and snap chalklines between them. With these adjustments, the chalklines start out parallel to the eaves and end up parallel to the ridge.
It’s difficult for the eye to pick up even a 1/4-in. change in exposure from one course to another, especially high up on a house. By accounting for discrepancies early and gradually, your adjustment should rarely have to be greater than that.
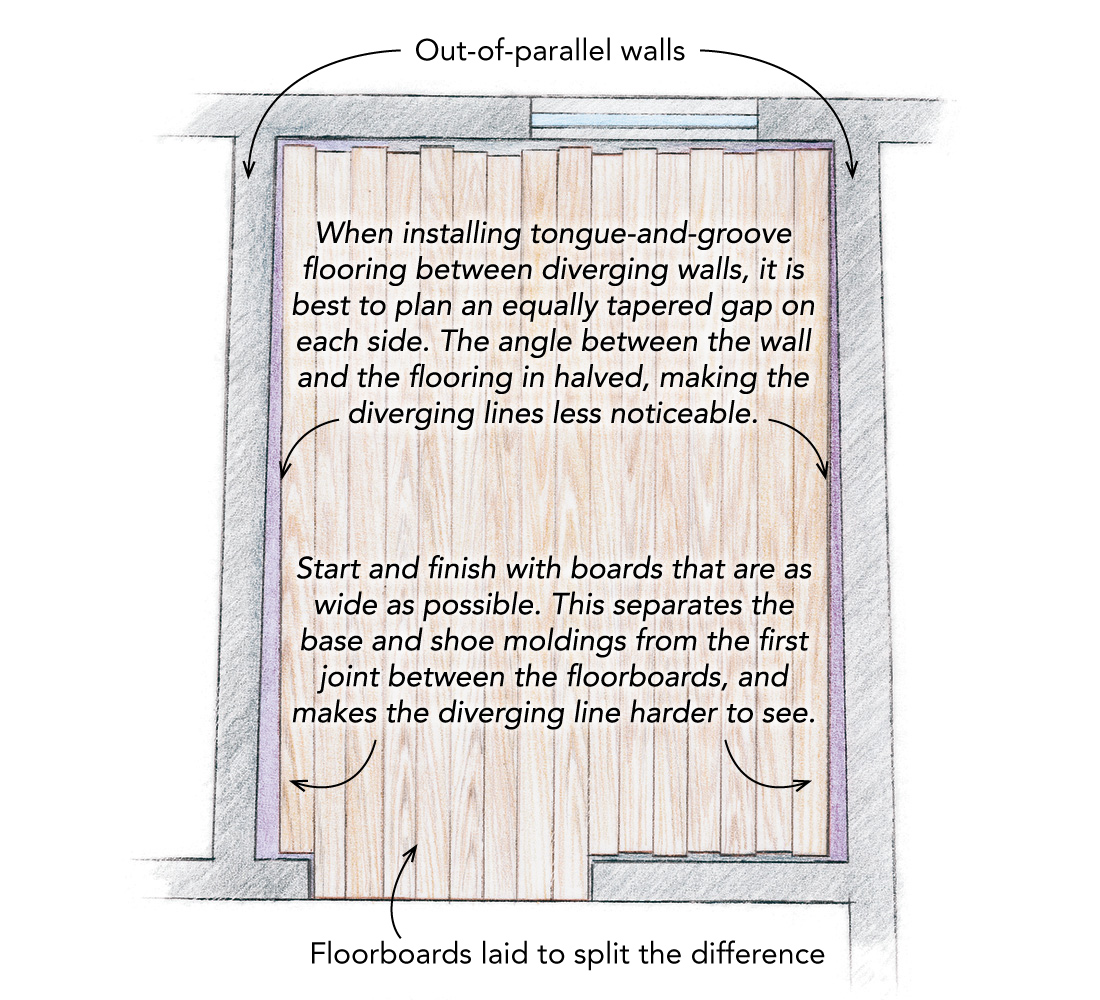
In cases where the gap or coverage is not adjustable, as in tongue-and-groove flooring, you have to make up part of the discrepancy at the start and the rest at the end. Say you’re installing flooring between two walls that are 1 in. out of parallel, and you’re leaving a minimum expansion gap of 1/2 in. between the flooring and the wall. Make the expansion gap 1 in. at each side of the wide end of the room and 1/2 in. at each side of the narrow end. Shoe molding and baseboards cover the gap. If you’re using a one-piece thin baseboard, you’ll have to rip tapered floorboards at the start and finish to keep the expansion gap narrow and parallel to the wall.
Moldings hide the gap: Floorboards don’t have to be a uniform distance from the wall. As long as the base/shoe molding covers it, the gap can vary.
In any case, you’ll want to use boards as wide as possible as your starting and ending courses. Measure the room width at both the wide and narrow ends, and subtract the expansion gaps. Divide these measurements by the floorboard width. Multiply the remainders by half the board width. These will be the widths of the starting and ending strips at the wide and narrow ends of the room. If these strips are narrow, try adding half a board width. As long as these sums are less than full board widths, use them for the starting and ending strips. This keeps the converging lines of the baseboards and the first and last seams as far apart as possible.
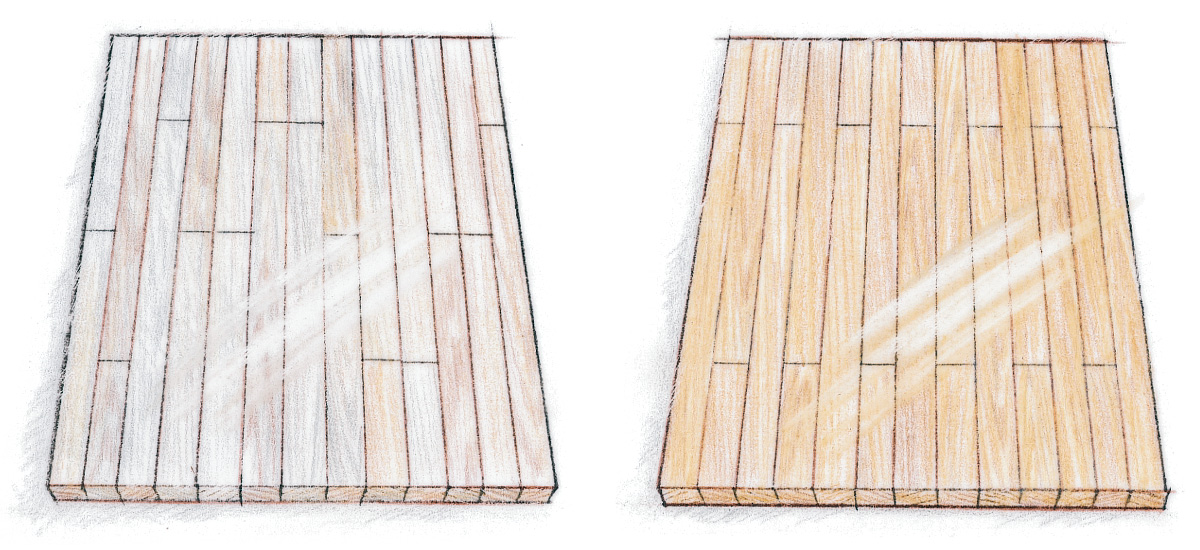
4. Avoid exposing end grain

Don’t show end grain. It absorbs paint and especially stains differently than flat grain. If a piece of molding must end abruptly, cut a return for it.
End grain will always absorb stain and paint differently than face or side grain; even if left natural, end grain reflects light differently. Unless you want to emphasize this difference, as with through tenons in furniture, it’s best to plan your installation to hide end grain or cut mitered returns to cover it up.
A return is a small piece of trim, often triangular in section, that ends a run of molding. Returns are used in traditional finish work on stair treads, window stools and aprons, butted head casings–anywhere a piece of molding doesn’t end in a corner.
Small returns are difficult to cut on a power miter saw. The blade often throws the return to some dimly lit, inaccessible corner of the room. I cut them with a small miter box and a backsaw.
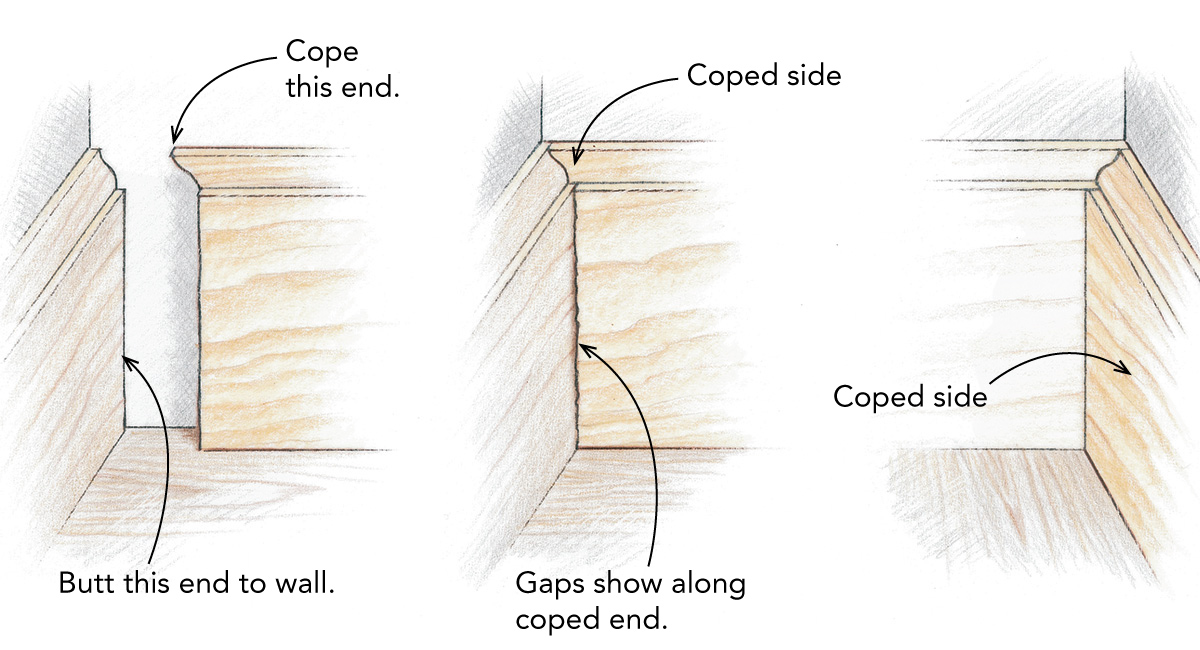
5. Fit the joint before cutting to length
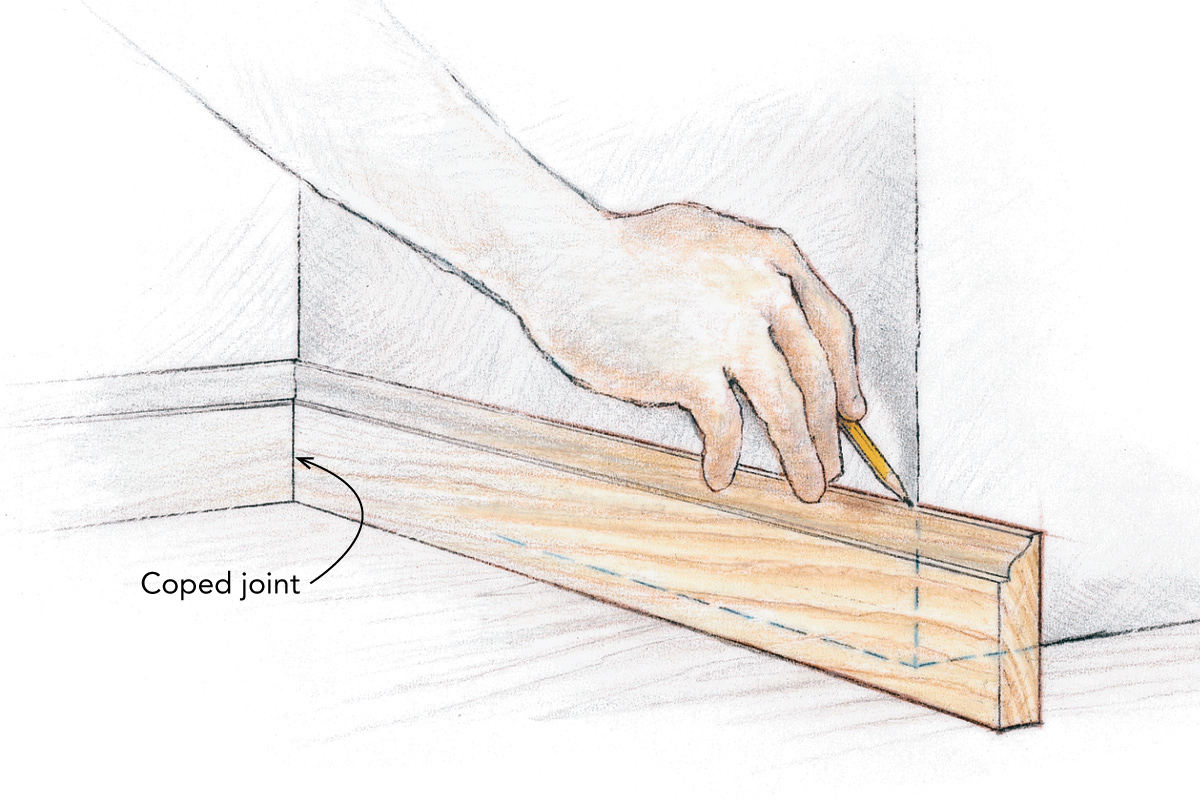
Fit the more difficult end before cutting to length. In this case, the left side is coped and the fit is checked before the miter is marked.
If you’re coping or mitering a joint on a piece of base, chair rail or crown, make sure that joint fits well before you cut the other end to length. You may need the extra length if you make a mistake and have to recut the cope or miter. If you had cut the piece to length before miscutting the cope or miter, you’d be grumbling on your way back to the lumberyard instead of calmly recutting the piece.
6. Don’t be fussy where you don’t have to be
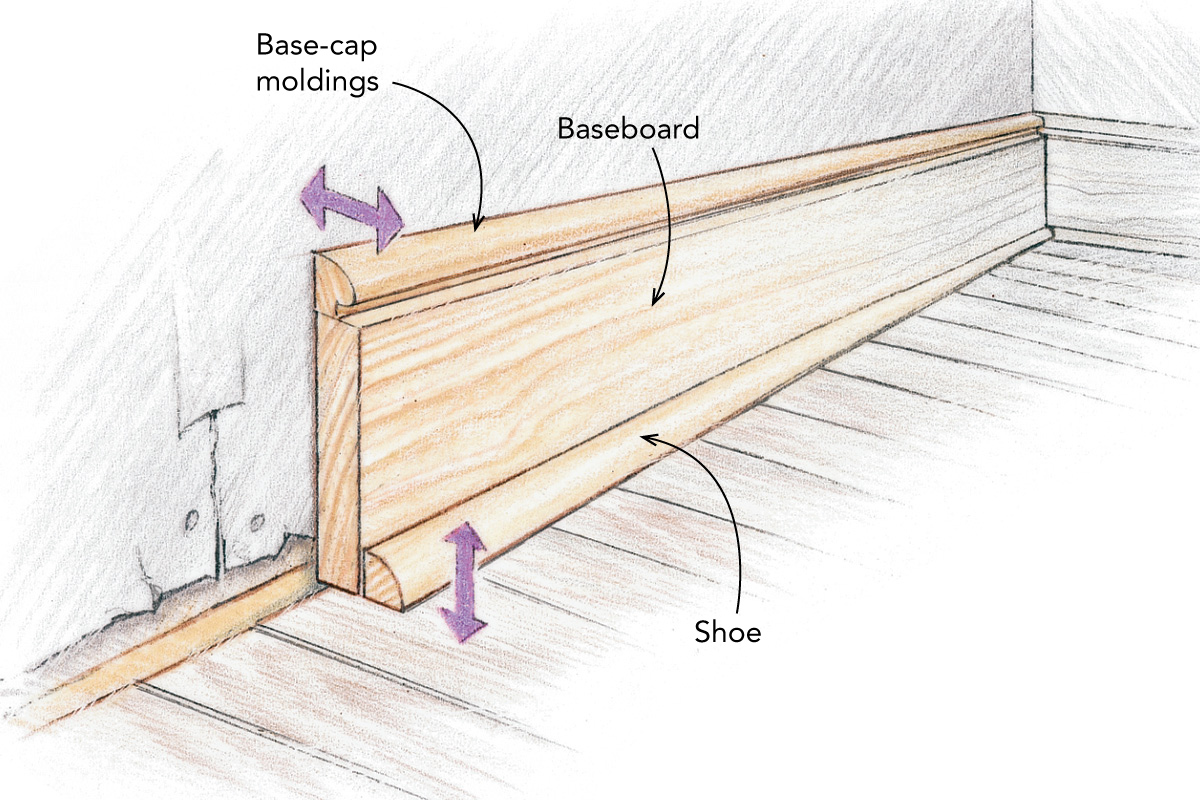
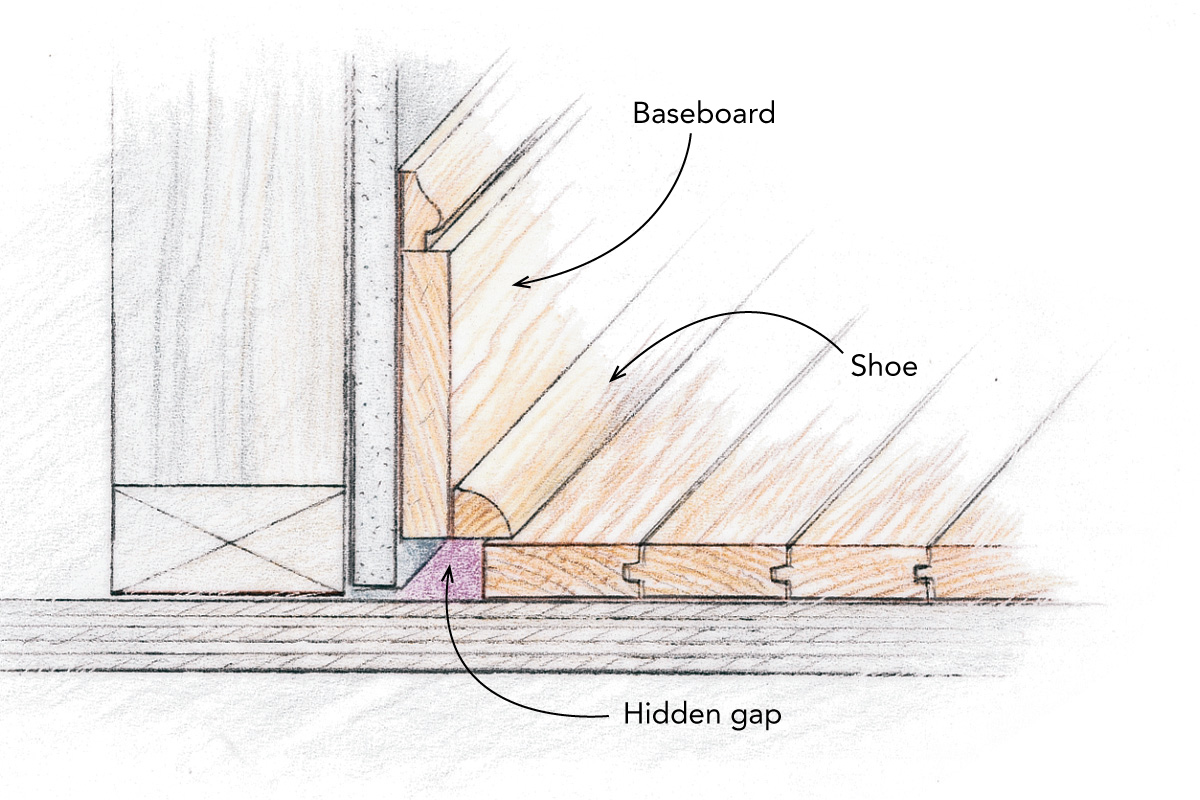
Some joints don’t need to be perfect. Base will hide the ugliness where the drywall meets the floor. The baseboard spans hollows in the wall and floor. The cap and shoe are flexible and conform to ins and outs, hiding them.
Learn to think ahead to see if what you’re working on will later be covered, which is often the function of moldings. At the intersection of wall and floor, for example, the drywall doesn’t have to come all the way down to the floor, nor does the flooring need to meet the wall perfectly, because the baseboard will cover the gap. If the floor or wall undulates, you might be tempted to scribe or fill behind the baseboard to follow the contours. In older houses, however, where walls and floors always undulated, you often see three-piece baseboards, with the thin base-cap molding attached to the wall and following its contour while the shoe does the same on the floor. The thicker baseboard installs quickly and easily because it doesn’t have to conform; that’s what the shoe and cap do.
7. Plan your sequence to avoid perfect cuts at both ends
There is usually a sequence of installing trim that requires the fewest perfect cuts. For example, with my method of casing doors and windows, only the last cut on the head need be perfect. Cut this end slightly long, and shave it with the chopsaw until it fits just right. One neat trick here: Push the casing up to the lowered, idle chopsaw blade. Raise the blade without moving the casing, and then make the cut. The teeth are set slightly wider than the body of the blade, so the cut will take off 1/32 in. If you had installed the head first, you then would have had to make an exact miter cut on each casing leg to make the joint turn out right.
As with trimming doors and windows, sequence of installation is also important when running trim around a room, whether it’s baseboard, chair rail or crown molding. For instance, I’m right-handed and can generally do a faster, neater job of coping the right end of a board than the left end (coping is an alternative to mitering joints at inside corners). Consequently, I often prefer to work from right to left around a room.
If a coped joint opens up, the crack will be obvious when viewed parallel to the uncoped piece and nearly invisible viewed parallel to the coped piece.
As I work my way around a room, especially when running crown molding, I’ll often end up with a piece that needs to be coped on both ends, a challenge for even the best carpenters. I try to plan my installation so that this last piece of trim is in the least conspicuous place. If a coped joint isn’t perfect, or if it opens up over time, the crack is most visible when viewed at right angles to the coped piece. Wherever possible, I orient the coped pieces so that people entering or using the room won’t have right-angle views of them.
8. Parallel is more important than level or square
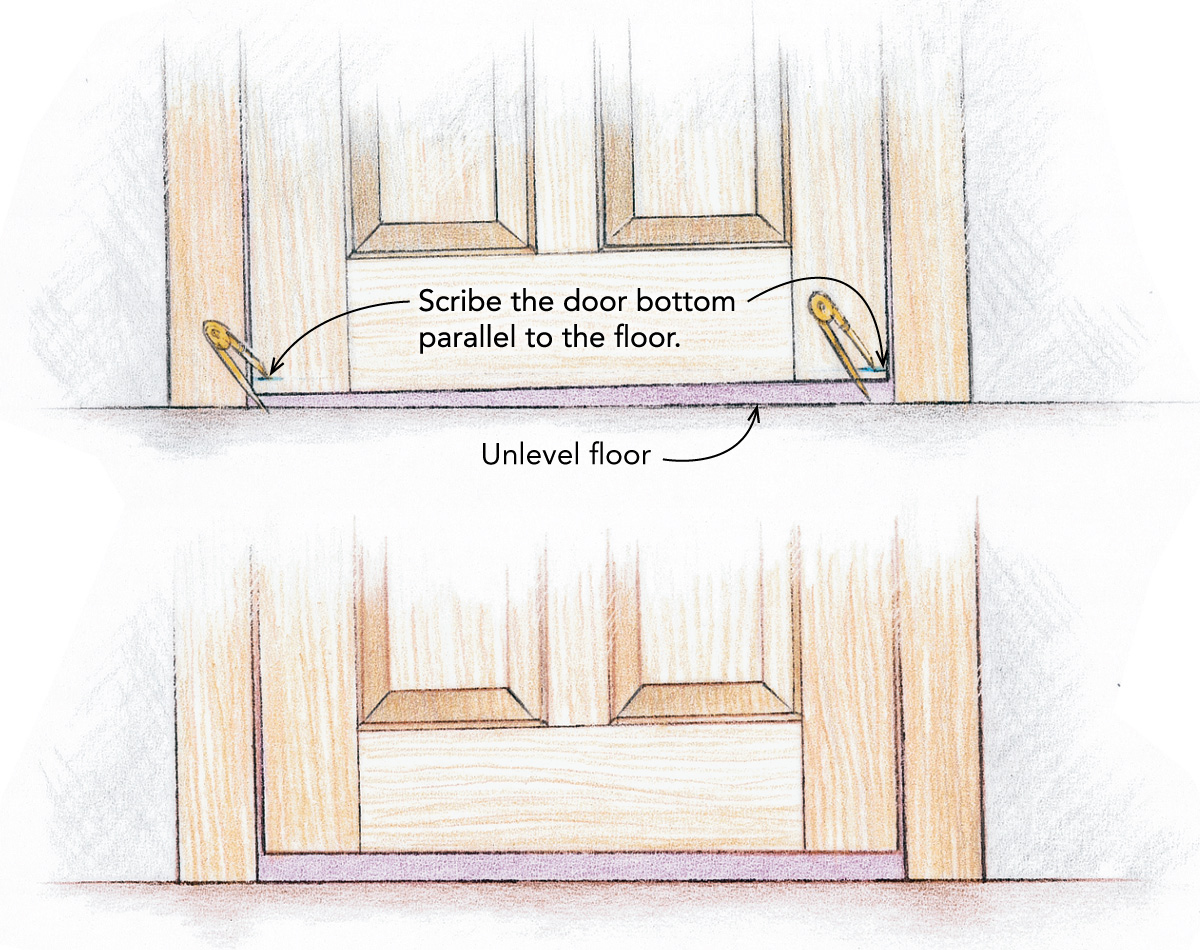
Some rules of carpentry change from framing to finish work. Instead of keeping track of plumb, level and square, you now must keep finish materials parallel to the walls and floors. The eye sees diverging lines more readily than it sees plumb and level.
The only exceptions are cabinets and doors, which must hang plumb to work properly. If the floor isn’t level, trim the door bottoms parallel to the floor rather than leave them level with a tapered gap.
If a deck is out of square, run the decking parallel to the house wall rather than squaring it up to the deck framing. If for some reason two lines must diverge, separate them as widely as possible so that the difference is harder to see.
9. Nothing is random
Whenever I find myself saying, “It doesn’t matter,” the red flag goes up. Which end of the board you cut first, which face is out, where you put the nails–all this matters, and the care you put into the details shows up as craftsmanship in the entire job. “God lives in the details,” said Mies van der Rohe, and this is especially true in finish carpentry. Occasionally, it won’t matter, but you should first consider whether it does. Taking this to the extreme may result in a phenomenon I call “analysis paralysis.” As your experience increases and your eye becomes more efficient, it will become second nature to line up your nails in an attractive pattern and to look critically at each board as you carry it to the saw.
10. Finish the job

A contractor usually has to complete a punch list before final payment is issued, but sometimes getting all the details wrapped up is like pulling teeth. The clean-slate attraction of starting a new job can overpower the drudgery of completing the old. This temptation can backfire, souring good clients and losing referrals.
Owner-builders doing their own work are often tempted to move in to their house before the finish work is done, thinking it will be easier to do when it’s close at hand. After a while, they don’t notice the lack of trim, especially if there’s furniture in the way, and it becomes harder and messier to set up the tools and work around the obstacles. It can be a strain on a marriage if the bathroom doors aren’t hung after a few years of residence. I advise owner-builders to get everything done before they move in, and contractors to finish all work before they move on. They’ll be glad they did.
Will Beemer is director of the Heartwood School in Washington, Massachusetts, and a director of the Timber Framers’ Guild of North America.
Drawings: Dan Thornton
From Fine Homebuilding #113

View Comments
As a Trim Carpenter of 20 yrs, I really loved this article when I read it. Preparation and Over Attention to Detail has always scored my Business all A's!
Thanks Will...
Very helpful article. I am new to DIY and starting my first remodel. You answered a lot of questions for me. Thanks!
That's a thick pencil!
Great article. I'm tempted to send it to the contractor my current client hired! She doesn't see the poor workmanship, and if I show her any poor details, her response has been, to pick my battles! I wish I would have seen this article 2 weeks ago, when I saw the end grain exposed at every window sill/apron. I knew it was wrong, but thought, it will be fine after painting. The first window he trimmed, he even aligned the apron sides with the ends of sill, instead of the legs of the casing! Attached photo shows just one of the poor details...so disappointing.
After working for a very detail oriented, design-build firm, with the best trim carpenters, who were truly craftsmen, I'm shocked at the lack of attention to detail I'm faced with so often on my projects.
BTW, I'd love to have seen a section on 'Scribing' in this article. I provide cabinetry for most of the kitchens I design, and insist on extended stiles to be scribed to the walls, without a molding/trim to cover the joint, and tell them there will be no base shoe inside the toekicks! You'd be surprised at how many carpenters push back on this, and/or don't even know what a scribe is!
My last name is obvious Dutch. In high school, I worked for an excellent finish carpenter with an advanced degree in philosophy and a great sense of humor. He taught me much about finish carpentry so well set forth in this article, and over the years I’ve become a good finish carpenter in my own right. He also gave me this little joke. He said that whenever I’m asked if I’m a finish carpenter, I should always say, “No, I’m Dutch.” He’s gone, but I remember and appreciate him by doing as he said.