FHB Logo Facebook LinkedIn Email Pinterest Twitter X Instagram Tiktok YouTube Plus Icon Close Icon Navigation Search Icon Navigation Search Icon Arrow Down Icon Video Guide Icon Article Guide Icon Modal Close Icon Guide Search Icon Skip to content
Subscribe
Log In
  • How-To
  • Design
  • Tools & Materials
  • Restoration
  • Videos
  • Blogs
  • Forum
  • Magazine
  • Members
  • FHB House
  • Podcast
Log In
How-To

Cutting angled stair stringers

By Mike Guertin Issue 113
  • X
  • facebook
  • linkedin
  • pinterest
  • email
  • add to favorites Log in or Sign up to save your favorite articles

Q:

I plan to build a small staircase connecting a deck to the ground. I want the stairs to flare out so that the top of the proposed stairs will be 4 ft. wide and the bottom will be around 8 ft. wide. The overall rise of the stairs will be just over 4 ft. I can figure the rise and run for the standard stringers, but I’m struggling with the layout of the angled stringers. Can you help?

Roger Knudsen, Weston, CT

A:

Contributing editor Mike Guertin replies: I’ve never built stairs like the ones you describe, but here’s how I’d approach the task. I’d begin with a quick scale drawing with the known measurements of 4 ft. at top, 8 ft. at bottom. For ease of figuring, I picked a 49-in. overall rise (so that the 7-11 rule would work conveniently), which gives us seven risers and six treads with an overall run of 66 in. The side-view drawing indicates that you need common stringers roughly 6-1/2 ft. long. And by guessing, I figure the outer angled stringers should be just over 7 ft. long. The tread materials are easy to scale off the plan view.

With all the stock on site, I’d build the three common stringers and tack them in place temporarily about 2 in. shy on each side of the 4-ft. overall width. (The 2-in. space allows enough room for the angled stringer.)

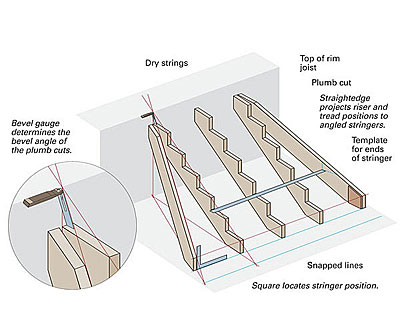
Now the alchemy begins. I’d first run a dry string from the top of the rim joist (don’t go to the top of the decking, or your line will be too high) down along the tips of the sawteeth on the two outermost regular stringers (see drawing below). A straightedge running down the stringer teeth will also work. Mark the point where the dry strings hit the landing pad, and snap a line running through and extending a few feet beyond those points.

Snap another line along the bottom front edge of your regular stringers, and measure over 2 in. shy of the 8-ft. mark. Hold a square on that mark, and run another dry string from the 4-ft.-minus-2-in. mark on the top edge of the rim joist to the outermost snapped line, just touching the edge of the square. This line should represent the top inside edge of your angled stringer. With this string in place, measure the length between the top and bottom points to determine the overall length of the stringer.

Next, establish the bevel angle for the top and bottom plumb cuts of the angled stringer with a sliding bevel gauge. The bevel gauge can also be used to get the angles for the ends of the stringer. But I find it quicker and more accurate to make a cardboard template for the end cuts.

Note that the string represents the inner edge of the proposed stringer, so the top bevel cut is measured to the long point. Now you can make the top and bottom cuts of the angled stringers and set them temporarily in place.

The next step is determining the tread and riser locations for the cleats if you go with closed stringers or for the sawcuts if you go with open stringers. Lay a straightedge across each tread cut of the three regular stringers, and extend it over to the angled stringers. Draw lines on both angled stringers for each tread. Continue the same process to mark the riser lines. Before removing the angled stringer for further fabrication, draw a pencil line on the landing pad around the bottoms of the stringers to ensure proper placement.

You’re on the home stretch. Now just screw on the tread cleats, or make the tread and riser cuts on the stringer. If you opt for open stringers, remember to bevel the riser cuts. Chances are you will still have enough meat left on the angled-stringer stock if you do choose to cut out for the treads and risers. If you’re concerned about their strength, you can glue and screw a 2x on the inside of the stringer just beneath the tread/riser cut points.

If on a similar set of stairs the angled stringer were more than 3 ft. away from the adjacent regular stringer, then jack stringers would be in order. Just use the lower end of one of the regular stringers as a pattern, and make a beveled plumb top cut at the appropriate point where the jack stringer meets the angled stringer. A straightedge will help to fine-tune the attachment location of the jack stringer before you nail it.

Fine Homebuilding Recommended Products

Fine Homebuilding receives a commission for items purchased through links on this site, including Amazon Associates and other affiliate advertising programs.

Standard Marking Chalk

We like white chalk because it’s non-permanent and wears off easily — this is especially helpful when marks are exposed and need to disappear.
Buy at Amazon

Metal Connector Nailer

This time-saving tool is the fastest way to install hardware. The tip is designed to locate the hole in the hardware, then all you have to do is pull the trigger.
Buy at Amazon

FastenMaster Screw Bolt Fastening System

These solid, time-saving bolts don't require pre-drilling and come in very handy when it comes to guard rail posts.
Buy at Amazon

Sign up for eletters today and get the latest how-to from Fine Homebuilding, plus special offers.

Signing you up...

This site is protected by reCAPTCHA and the Google Privacy Policy and Terms of Service apply.
See all newsletters
See all newsletters
×

Get home building tips, offers, and expert advice in your inbox

Signing you up...

This site is protected by reCAPTCHA and the Google Privacy Policy and Terms of Service apply.
See all newsletters
See all newsletters

New Feature

Fine Homebuilding Forums

Ask questions, offer advice, and share your work

  • X
  • facebook
  • linkedin
  • pinterest
  • email
  • add to favorites Log in or Sign up to save your favorite articles

Log in or create an account to post a comment.

Sign up Log in

Become a member and get full access to FineHomebuilding.com

Up Next

Video Shorts

Featured Story

FHB Summit 2025 — Design, Build, Business

Join some of the most experienced and recognized building professionals for two days of presentations, panel discussions, networking, and more.

Featured Video

Micro-Adjust Deck-Baluster Spacing for an Eye-Deceiving Layout

No math, no measuring—just a simple jig made from an elastic band is all you need to lay out a good-looking deck railing.

Related Stories

  • Preservation and Renewal for a Classic
  • A Postwar Comeback
  • With Swedish Arts & Crafts Precedent
  • Natural Simplicity

Discussion Forum

Recent Posts and Replies

  • |
  • |
  • |
  • |
  • |
  • |
View More Create Post

Highlights

Fine Homebuilding All Access
Fine Homebuilding Podcast
Tool Tech
Plus, get an extra 20% off with code GIFT20

Video

View All Videos
  • Insulation for Homes in the Wildland Urban Interface
  • FHB Podcast Segment: A Homemade Radiant Heat Floor Assembly
  • FHB Podcast Segment: Can a Pretty Good House Have a Fireplace?
  • Building a Detached Shop with Full Utilities and HVAC
View All

Stairs

View All Stairs Articles
  • Step Up Your Stair-Gauge Game
  • Original Woodwork in Old Houses
  • Functional Floating Home
View All Stairs Articles

Fine Homebuilding Magazine

  • Issue 332 - July 2025
    • Custom Built-ins With Job-Site Tools
    • Fight House Fires Through Design
    • Making the Move to Multifamily
  • Issue 331 - June 2025
    • A More Resilient Roof
    • Tool Test: You Need a Drywall Sander
    • Ducted vs. Ductless Heat Pumps
  • Issue 330 - April/May 2025
    • Deck Details for Durability
    • FAQs on HPWHs
    • 10 Tips for a Long-Lasting Paint Job
  • Issue 329 - Feb/Mar 2025
    • Smart Foundation for a Small Addition
    • A Kominka Comes West
    • Making Small Kitchens Work
  • Issue 328 - Dec/Jan 2025
    • How a Pro Replaces Columns
    • Passive House 3.0
    • Tool Test: Compact Line Lasers

Fine Home Building

Newsletter Sign-up

  • Fine Homebuilding

    Home building tips, offers, and expert advice in your inbox.

  • Green Building Advisor

    Building science and energy efficiency advice, plus special offers, in your inbox.

  • Old House Journal

    Repair, renovation, and restoration tips, plus special offers, in your inbox.

Signing you up...

This site is protected by reCAPTCHA and the Google Privacy Policy and Terms of Service apply.
See all newsletters

Follow

  • Fine Homebuilding

    Dig into cutting-edge approaches and decades of proven solutions with total access to our experts and tradespeople.

    Start Free Trial Now
    • Facebook
    • Instagram
    • X
    • LinkedIn
  • GBA Prime

    Get instant access to the latest developments in green building, research, and reports from the field.

    Start Free Trial Now
    • Facebook
    • YouTube
  • Old House Journal

    Learn how to restore, repair, update, and decorate your home.

    Subscribe Now
    • Facebook
    • Instagram
    • X

Membership & Magazine

  • Online Archive
  • Start Free Trial
  • Magazine Subscription
  • Magazine Renewal
  • Gift a Subscription
  • Customer Support
  • Privacy Preferences
  • About
  • Contact
  • Advertise
  • Careers
  • Terms of Use
  • Site Map
  • Do not sell or share my information
  • Privacy Policy
  • Accessibility
  • California Privacy Rights

© 2025 Active Interest Media. All rights reserved.

Fine Homebuilding receives a commission for items purchased through links on this site, including Amazon Associates and other affiliate advertising programs.

  • Home Group
  • Antique Trader
  • Arts & Crafts Homes
  • Bank Note Reporter
  • Cabin Life
  • Cuisine at Home
  • Fine Gardening
  • Fine Woodworking
  • Green Building Advisor
  • Garden Gate
  • Horticulture
  • Keep Craft Alive
  • Log Home Living
  • Military Trader/Vehicles
  • Numismatic News
  • Numismaster
  • Old Cars Weekly
  • Old House Journal
  • Period Homes
  • Popular Woodworking
  • Script
  • ShopNotes
  • Sports Collectors Digest
  • Threads
  • Timber Home Living
  • Traditional Building
  • Woodsmith
  • World Coin News
  • Writer's Digest
Active Interest Media logo
X
X
This is a dialog window which overlays the main content of the page. The modal window is a 'site map' of the most critical areas of the site. Pressing the Escape (ESC) button will close the modal and bring you back to where you were on the page.

Main Menu

  • How-To
  • Design
  • Tools & Materials
  • Video
  • Blogs
  • Forum
  • Project Guides
  • Reader Projects
  • Magazine
  • Members
  • FHB House

Podcasts

  • FHB Podcast
  • ProTalk

Webinars

  • Upcoming and On-Demand

Podcasts

  • FHB Podcast
  • ProTalk

Webinars

  • Upcoming and On-Demand

Popular Topics

  • Kitchens
  • Business
  • Bedrooms
  • Roofs
  • Architecture and Design
  • Green Building
  • Decks
  • Framing
  • Safety
  • Remodeling
  • Bathrooms
  • Windows
  • Tilework
  • Ceilings
  • HVAC

Magazine

  • Current Issue
  • Past Issues
  • Magazine Index
  • Subscribe
  • Online Archive
  • Author Guidelines

All Access

  • Member Home
  • Start Free Trial
  • Gift Membership

Online Learning

  • Courses
  • Project Guides
  • Reader Projects
  • Podcast

More

  • FHB Ambassadors
  • FHB House
  • Customer Support

Account

  • Log In
  • Join

Newsletter

Get home building tips, offers, and expert advice in your inbox

Signing you up...

This site is protected by reCAPTCHA and the Google Privacy Policy and Terms of Service apply.
See all newsletters
See all newsletters

Follow

  • X
  • YouTube
  • instagram
  • facebook
  • pinterest
  • Tiktok

Join All Access

Become a member and get instant access to thousands of videos, how-tos, tool reviews, and design features.

Start Your Free Trial

Subscribe

FHB Magazine

Start your subscription today and save up to 70%

Subscribe

We hope you’ve enjoyed your free articles. To keep reading, become a member today.

Get complete site access to expert advice, how-to videos, Code Check, and more, plus the print magazine.

Start your FREE trial

Already a member? Log in

Privacy Policy Update

We use cookies, pixels, script and other tracking technologies to analyze and improve our service, to improve and personalize content, and for advertising to you. We also share information about your use of our site with third-party social media, advertising and analytics partners. You can view our Privacy Policy here and our Terms of Use here.

Cookies

Analytics

These cookies help us track site metrics to improve our sites and provide a better user experience.

Advertising/Social Media

These cookies are used to serve advertisements aligned with your interests.

Essential

These cookies are required to provide basic functions like page navigation and access to secure areas of the website.

Delete My Data

Delete all cookies and associated data