Tiling With Limestone
An earthy alternative to the cold, austere look of marble, limestone is easy to work with and maintain.
Synopsis: This article offers a good description of working with limestone, an attractive alternative to marble and ceramic tile for bathroom showers and walls. Limestone can be worked almost as if it were wood. Sidebars explain how to make a waterproof niche in the shower wall, and the basics of adding a tile mural to the bathroom wall.
My wife, Lane, and I own a tile store on Cape Cod, so I’ve gotten used to seeing tile of many different colors, shapes and materials all in the same room. But I’ve never met a homeowner who wanted to turn a bathroom into a tile showroom. I did come close recently when I tiled a bathroom that combined striking black marble, gray granite, tumbled marble and a large, colorful hand-painted ceramic mural. The unifying element that made this unlikely combination successful was limestone tile.
Sort the tiles before you mix the mortar
As an experienced tile installer, I had the dream job of integrating all these different types of tile with limestone in a single room. Limestone, which can be fairly soft and porous, is usually a breeze to work and has subtle, earthy tones that form a perfect complement to almost any type or color of material.
Because the color of limestone can vary from tile to tile and from box to box, I begin by opening boxes and checking the tiles for differences in shade or slight veining that might make one tile stand out from the rest. The differences are usually subtle, but a misplaced tile in a different shade can stick out.
As I went through the boxes of limestone tiles for this bathroom, I culled some tiles that had slightly different shades or that had chipped corners. I also came across some tiles with nice crystalline veins that I set aside to give large open areas such as the floor or the shower walls a monolithic look. Out of the 550 sq. ft. of limestone tile that I installed in this bathroom, only about 20 or 30 tiles were irregular in color or badly chipped. These tiles were set aside for cuts, and tiles with off colors were relegated to an inconspicuous closet floor.
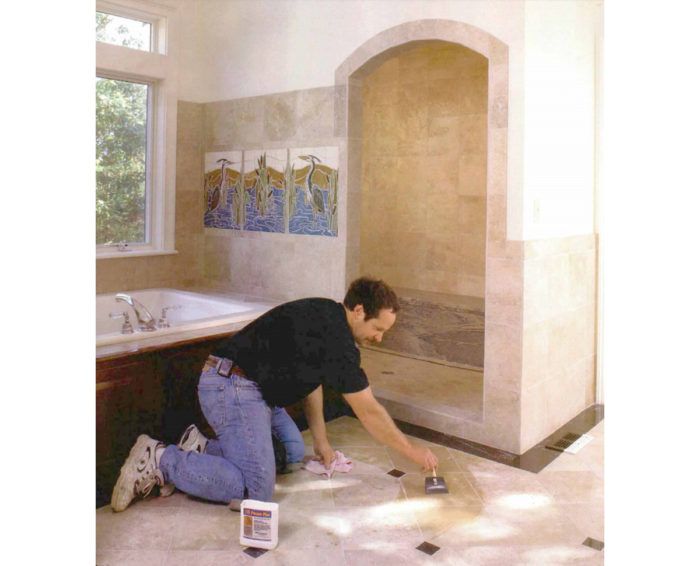
To add interest to the layout, we decided to run the tiles diagonally on the horizontal areas (tub deck and main floor). The diagonal pattern contrasted the square layout of the wainscoting and the shower walls. For the floor, I figured that a 6-in. border (in black marble) would allow me to use more full tiles and fewer small pieces in the field.
To enhance the diagonal layout, I positioned 3-in. black-marble inserts at the intersection of every fourth tile. A pattern of inserts done this way is called a clipped-corner pattern because the comers of the intersecting tiles are cut off to accommodate the insert. I centered the floor pattern in the area that would be seen first, in front of the raised-panel tub-enclosure face.
Another layout concern was the long exposed wall that holds the main door to the bathroom. To catch another full diagonal tile, I increased the border along that wall to about 6 1/2 in. My objective was to give the appearance that the room was built to the size and dimension of the limestone tile.
The layout of the walls was relatively simple. Because the floor tiles ran diagonally, the walls and floor did not have to line up. I made it a point to avoid small cuts whenever possible and to put the fuller-cut tiles in obvious places such as inside corners. The mural was centered on the wall above the tub to give the feeling of looking out a big limestone and ceramic window at Cape Cod’s scenic landscape.
For more photos and details, click the View PDF button below:
Fine Homebuilding Recommended Products
Fine Homebuilding receives a commission for items purchased through links on this site, including Amazon Associates and other affiliate advertising programs.

Plate Level

Smart String Line

Anchor Bolt Marker


