Installing Handrails Made From Stock Parts
A full-scale drawing and some shop-built jigs can ease the assembly of expensive stair parts.
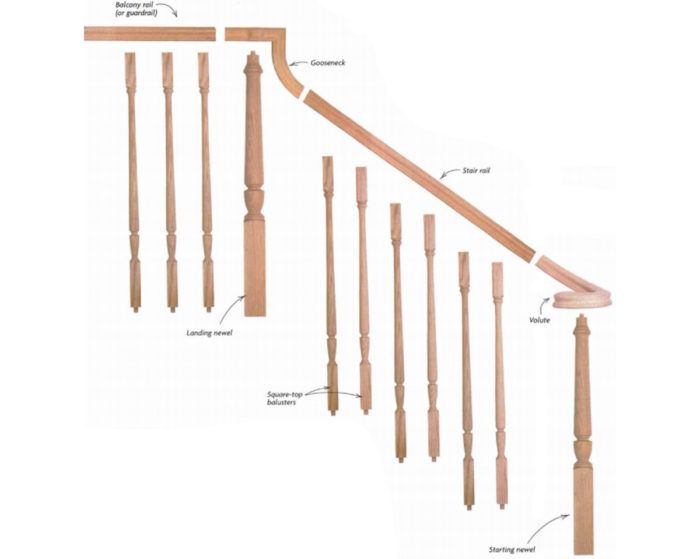
Synopsis: An experienced stairbuilder walks through the process of cutting, fitting, and installing rail parts. A few simple shop jigs help.
Of all the parts that make up a home’s interior, the most visually dramatic is often the staircase. In particular, a stair’s handrail is a combination of precise joinery and crisply milled components that looks as delicate as it is strong. It should come as no surprise, then, that building a handrail can be a complicated job, even for an experienced carpenter.
After installing hundreds of handrails, I’ve come up with a pretty simple system to handle everything from manufactured stock parts to custom stair railings. On a recent remodel, I installed new turned newel posts, handrails, and balusters on a staircase that would be carpeted later. These few examples won’t be the final word on how to install handrails, but they should get novices off to a solid start and perhaps offer more experienced carpenters a new trick or two.
A full-size drawing is the first step to easier railing installation
Nearly all the instructions I’ve seen describe fitting a handrail by first laying it on the stairs instead of setting it on the previously installed newel posts. The installer attempts to clamp fittings in place or uses charts and formulas to determine the height of newels; easings (such as volutes and goosenecks) are trimmed with the aid of a pitch block.
Instead, I find that making full-scale drawings is the easiest and fastest way to lay out handrails. It’s much easier working through difficult problems on paper than making mistakes with expensive stock. I use 60-in.-wide brown wrapping paper from Papermart for these drawings.
After taking the necessary measurements at the job site, I draw the top, the bottom, and an intermediate step in elevation view to locate top and bottom newels. Obviously, there are usually more steps than that in a single run, but I can figure the pitch angle of the stair and handrail by drawing a line touching the three tread nosings. Next I draw the handrail at its correct angle and height determined by code, in my case between 34 in. and 38 in. above the nose of the tread. If there is a guardrail, I draw it at least 36 in. above the floor. I draw certain areas, such as the starting step, in plan view as well as elevation to locate the volute position.
In a few minutes, I’m able to make a list of parts that I need and do nearly all the planning for the whole job. When I get to the site, I unroll the drawing and refer to it for layout work. It’s also a great device for discussing designs with the clients.
At this stage, I make sure that the staircase will pass muster with the building inspector. For instance, the building code in California specifies a maximum opening of 4 in. between balusters, so I may need to draw three balusters per tread instead of the more common two per tread I might have planned.
For more photos, drawings, and details, click the View PDF button below:


