Q:
Fine Homebuilding has featured many houses over the years with decorative patterns woven into the shingle courses. One such example with a diamond pattern appears in issue #105 on p. 99. I can’t quite figure out how these patterns are done. Can you help?
Nick Bye, Port McNeill, None
A:
Former associate editor Roe A. Osborn replies: The first time I attempted a diamond pattern in sidewall shingles, I spent the better part of a morning scratching my head, mumbling to myself and tearing out shingles. I finally went to the senior member of the crew, threw up my hands and said, “I need to do a weave.”
He looked at my bald head, which had gotten redder as my frustration rose, and he said with a grin, “Either that or a toupee.”
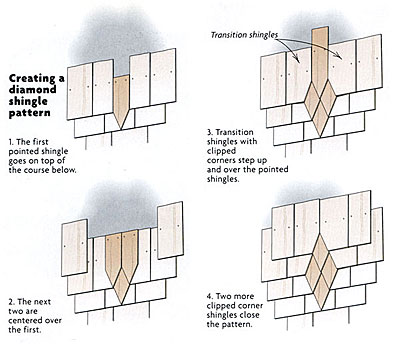
Here’s what he showed me. To copy the four-diamond pattern shown on the house in the article, start by ripping four shingles to the width of one of the diamonds, in this case 4 in. Next, saw points on the 4-in. shingles that are as long as a shingle course, in this case 5 in. I like to use a table saw with a miter fence to cut the points.
Pick the starter-course height for your pattern, complete that course of shingles in the normal fashion, and nail the first pointed 4-in. shingle on top of that course. The point should be lined up with the bottom edge of the completed course and centered left to right wherever you want the pattern. The pointed shingle should be nailed fairly high so that the nails don’t show. Now, apply the next full course of shingles extending from both sides of the pointed shingle.
The second step is installing the next two pointed shingles with the joint between them on the centerline of the first pointed shingle. Bring the next course of shingles to within a large shingle’s width of the pattern and measure over to the edge of the pattern. Using the remaining pointed shingle as a pattern, cut half a point off one corner, and rip the shingle to proper width.
After cutting both sides of the pattern, make another matched pair the same way for the next course, and set that pair aside.
Now comes the transition course (the sleight-of-hand stage) where the pattern begins to close back up to the top point. Install the pieces you just cut, letting them overlap on top of the side-by-side pointed shingles. If cut properly, there should be a 4-in. gap between the bookends where the last pointed shingle is to be installed.
Now the second pair of cut shingles that you set aside earlier are installed, completing the pattern. This same principle can be applied for any decorative pattern. The key is that as the pattern expands, the decorative courses go over the courses below, and as the pattern starts to close up, the shingles have to overlap at the transition course. By the way, if you’re going to leave the shingles natural, try using a different species of wood to make the pattern stand out.
Fine Homebuilding Recommended Products
Fine Homebuilding receives a commission for items purchased through links on this site, including Amazon Associates and other affiliate advertising programs.

Plate Level

Smart String Line
Original Speed Square


