Building a Bow Window From Scratch
Lay out the curved plates with a trammel, then use them as a bending form for laminated trim.
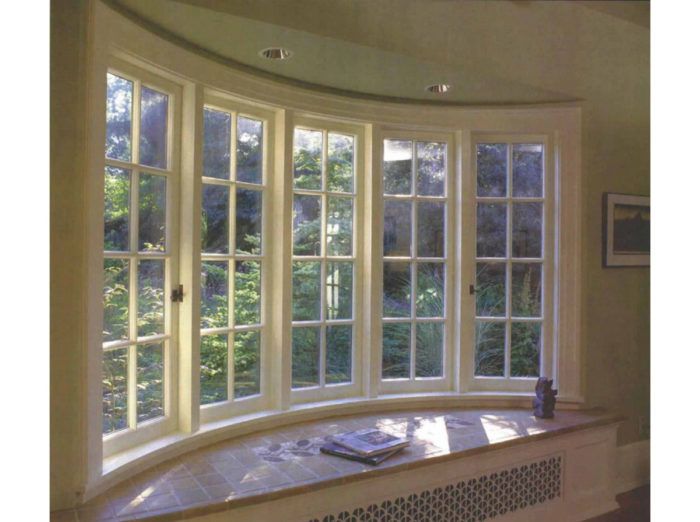
Synopsis: The author devises a method for making a curved, five-sash bow window that is installed in a 1915 Bungalow-style cottage. After laying out the pattern on the shop floor with a makeshift compass, the author cut bottom plates with a bandsaw and brick-laid the header to fit the curve. The roof is a conical section that doubles as a mold to bend the laminated fascia and trim pieces.
It would have been a whole lot easier had Lee and John Neff just bought a stock bow window. Easier, maybe, but even the best ready-made window probably would have been a little off in one way or another. Working from an early photograph of their 1915 bungalow-style house in Seattle, the Neffs and architect Ray Studebaker had already restored many details obliterated in a 1950s remodel. So getting a window built to match made perfect sense, even if it was a little more trouble.
The Neffs wanted a prominent window that would frame views of Lee’s gardens and include a shelf inside for plants. Ray had already made changes in the room where the new window would go, including the addition of a pair of French doors and a trellised portico just outside. Window trim would have to be compatible. Contractor Tom Clark and I provided some design and construction ideas. Before long, the window evolved from a floor-to-ceiling unit to one with a seat-height ledge inside decked with handmade tiles. It would have to fit in a rough opening 6 ft. 10 in. high by 8 ft. 9 in. wide.
Windows these days typically arrive as prehung units that include sashes, jambs, and exterior trim. But I enjoy making divided-lite window sashes, so I built the five double-glazed sashes for this project myself. Some manufacturers, however, are willing to sell double-glazed sashes. Both Kolbe & Kolbe Millwork Company and Marvin, for example, will sell just sashes through a local dealer. You also could contact a local millwork shop that makes sashes.
Making a curved frame is first
I broke the job into its three major parts: the window frame, the section of curved wall surrounding it, and the roof. I made the components in my shop and then trucked them across town to the Neffs’ house. I started by making a full-scale plan drawing of the job on 1/4-in. plywood tacked to the shop floor. Having this drawing always on hand (well, at least underfoot) was a big help.
Drawing layout lines for the curved pieces required a long trammel. I made one from a length of scrap plywood, drilling a pivot hole in one end and a series of holes in the other end to mark the radii for different components. The lines intersected a layout of the rough opening so that I clearly understood how the window would be installed.
For more photos and details, click the View PDF button below:
Fine Homebuilding Recommended Products
Fine Homebuilding receives a commission for items purchased through links on this site, including Amazon Associates and other affiliate advertising programs.
Flashing Boot Repair
Roof Jacks
Ladder Stand Off


